This is the eighth (and final!) post in a series this week on different fitting adjustments you can use for the Clover sewalong, or for nearly any other pair of pants you make. This tutorial is for those who have large legs, or thin legs.
Fitting notes:
- After you’ve made your muslin, please refer to the pants fitting cheatsheet to help you decide which adjustments to try.
- Use your muslin to determine how much to adjust the pattern. For example, if you can see that you need an extra inch of width in a certain area, you’ll need to add an inch of width when adjusting your pattern.
- Refer to this post on making muslins for further help with this.
- Be sure to make a second muslin (and perhaps more) after you’ve adjusted your pattern.
How to use the fitting diagrams:
- You will want to trace a copy of your pattern. Not a big deal, since this pattern has only a few pieces, and it will save you from ruining your pattern.
- Mark your seamlines on the pattern (5/8″ from the edge). You don’t need to mark it over the whole pattern, but at least mark the seam at the points where the slash lines are. On the diagrams, the seamlines are marked with dashed lines.
- The diagrams show where to cut, spread, and overlap your pattern.
- You’ll notice little circles in some spots, where the slash lines intersect the seam line. This is called a “pivot point.” Don’t slash the pattern all the way to the edge, but instead slash just to where this circle is. Then carefully snip into the seam allowance, forming a little hinge where the circle is. When you adjust your pattern, you’ll be pivoting at this point rather than from the very edge.
- Once you have your pieces adjusted, tape them into place. You can then retrace the pattern piece if you like.
Further help:
I’d love to help you as much as possible, but please realize there are a lot of you and only one of me. Please be sure to help each other out in the Flickr group as much as you can, and check out the fitting section of our Amazon store for further research.
Adjusting for large legs

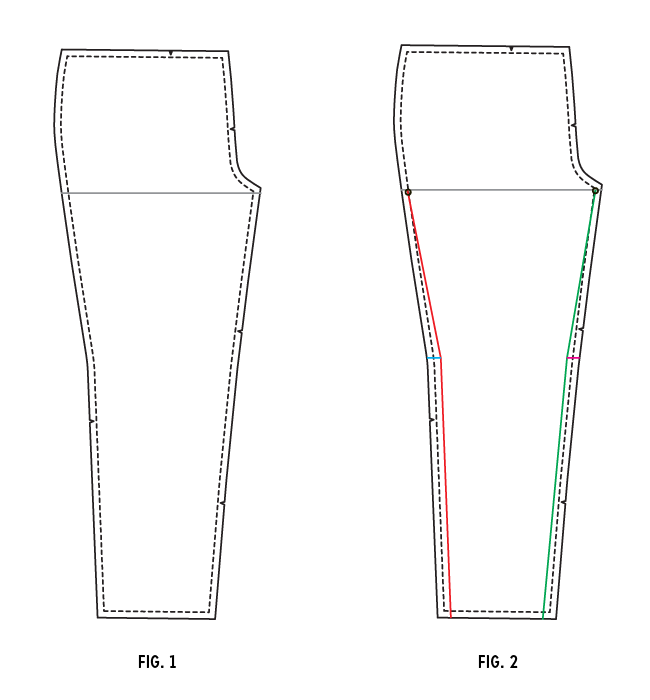
1. Draw in the crotch line on both the front and back, as shown in fig. 1. For this adjustment, you’ll only be working with both the front and back pieces. We will just show the front.
2. Draw slash lines, as shown in fig. 2. Notice the smaller slash lines, in blue and pink near the knee.
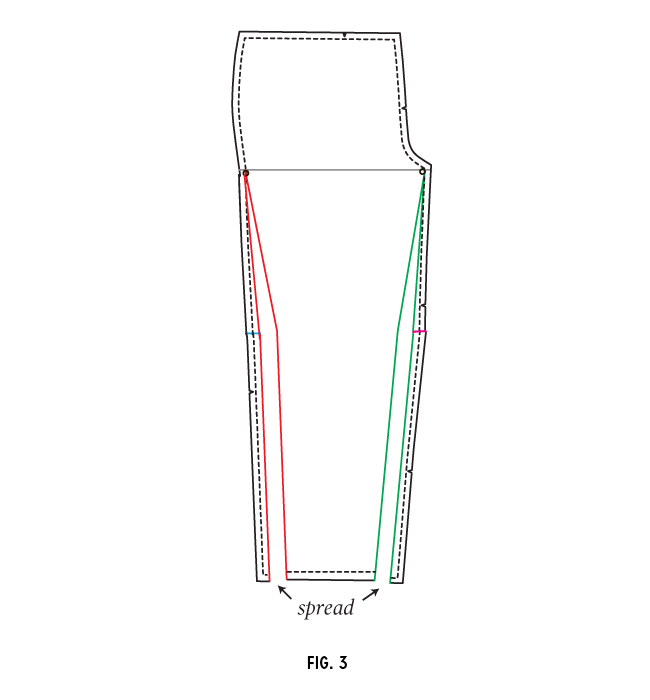
3. Cut the pattern along these lines. Note the circles, which indicate where you will pivot the pattern. Cut a hinge here in the seam allowance rather than cutting all the way through to the edge (see notes above).

4. Spread the pattern along the red and green lines, as shown in fig. 3. Overlap the bottom pieces as necessary. You want to keep those two pieces at the bottom sides at the same angle they were before spreading. In other words, the red lines and green lines should stay parallel towards the bottom of the pant.
5. Tape in place and retrace the pattern piece, smoothing out any lines that need it.
Adjusting for thin legs

1. Draw in the crotch line on both the front and back, as shown in fig. 1. For this adjustment, you’ll only be working with both the front and back pieces. We will just show the front.
2. Draw slash lines, as shown in fig. 2. Notice the smaller slash lines, in blue and pink near the knee.
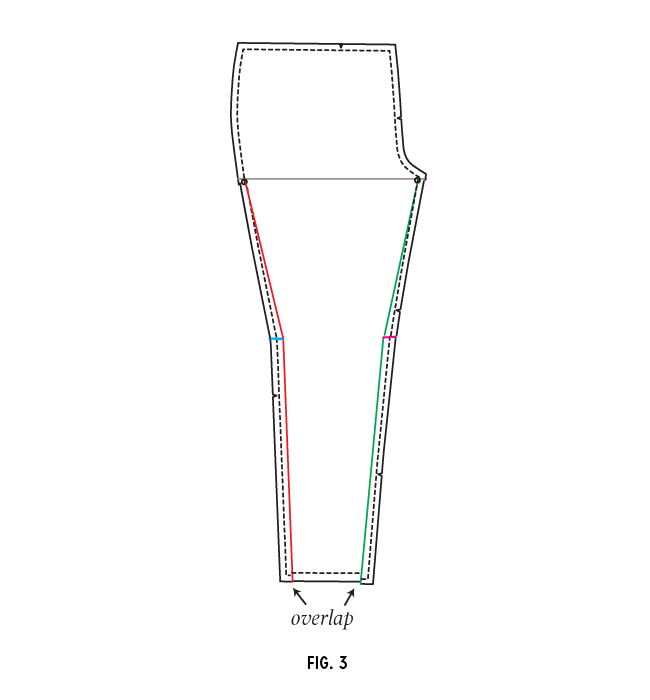
3. Cut the pattern along these lines. Note the circles, which indicate where you will pivot the pattern. Cut a hinge here in the seam allowance rather than cutting all the way through to the edge (see notes above).

4. Overlap the pattern along the red and green lines, as shown in fig. 3. Spread the bottom pieces as necessary. You want to keep those two pieces at the bottom sides at the same angle they were before spreading. In other words, the red lines and green lines should stay parallel towards the bottom of the pant.
5. Tape in place and retrace the pattern piece, smoothing out any lines that need it.


Comments
Sarai
I just wanted to say thank you for what has been a series of epic and incredibly useful posts. I have yet to even start my muslin but the resource you have supplied here is incredible – and brilliantly written and illustrated. So, thank you!
I second that! These posts have been mind-blowing– thanks for all the effort you’ve put into this sewalong! I’m so excited for my finished Clovers!
I third this! LOL thank you so much for all the work you and Caitlin put into this. I love your blog, so much great information!!!
Thank you guys so much. :)
This may be a really stupid question – I’m a beginner fitter at best. But for the large leg adjustment and the large calf adjustment -what’s the ultimate difference between slashing and spreading versus just adding the extra outside of the seam line? What changes if you do that? When I slash and spread I always end up with wrinkles and tears. Maybe I’m just doing it wrong, but I’ve always wondered about this.
The effect is exactly the same. Slashing and spreading ensures that you keep the curve of the leg the same, but if you were to just add the width evenly, you’d get the same thing in the end.
Thanks so much for the response. BTW, I cannot wait for your book to come out!
I’ve been following the Clover adjustment tutorials; great information! However, I’m a little confused. In this tutorial, the “hip line” passes through the crotch point; it’s much lower than in the previous tutorials. Is this really the hip line, in which case the diagram is probably not quite right? Or is it something else and the text doesn’t match the diagram? Or none of the above?
You’re right! I meant to write “crotch line” not “hip.” I’ve fixed it. :)
You guys are just pure awesome. All my pant fitting woes have been answered this past week. I’m so amazed. Thank you so much for making gorgeous patterns and for helping me sew them!
So, my question is this: If I need to do several adjustments, how do I decide what order to do them in?
I hope this question gets to you.
The trousers fit fine at the bottom of the leg, but are very loose at the top of the leg, especially at the back below her bottom. How would I adjust for this?
Machine that is new to me! Working with stretch fabric. Pants legs puckering and drawing up with stretch and serge stitch, also zigzag stitch, after having basted the pieces by hand. I have flat gluteus, some protrusion in stomach, slender long legs, tall, size 14.
What kind of stitch or technique can I use to get the leg stitching to be smooth and professional looking? What am I doing that is causing this?? Have been sewing for years, but not much with stretch fabric. Length of leg material cut lengthwise and in line with bias. Thanks.
This adjustment is brilliant – thank you!