This is the third in a series of posts I have planned for this week all on different fitting adjustments you can use for the Clover sewalong, or for nearly any other pair of pants you make. This tutorial covers one of the most common adjustments, lengthening or shortening the lower torso area. This is a great (and easy) technique that can help eliminate drooping or binding around the crotch area.
Fitting notes:
- After you’ve made your muslin, please refer to the pants fitting cheatsheet to help you decide which adjustments to try.
- Use your muslin to determine how much to adjust the pattern. For example, if you can see that you need an extra inch of width in a certain area, you’ll need to add an inch of width when adjusting your pattern.
- Refer to this post on making muslins for further help with this.
- Be sure to make a second muslin (and perhaps more) after you’ve adjusted your pattern.
How to use the fitting diagrams:
- You will want to trace a copy of your pattern. Not a big deal, since this pattern has only a few pieces, and it will save you from ruining your pattern.
- Mark your seamlines on the pattern (5/8″ from the edge). You don’t need to mark it over the whole pattern, but at least mark the seam at the points where the slash lines are. On the diagrams, the seamlines are marked with dashed lines.
- The diagrams show where to cut, spread, and overlap your pattern.
- You’ll notice little circles in some spots, where the slash lines intersect the seam line. This is called a “pivot point.” Don’t slash the pattern all the way to the edge, but instead slash just to where this circle is. Then carefully snip into the seam allowance, forming a little hinge where the circle is. When you adjust your pattern, you’ll be pivoting at this point rather than from the very edge.
- Once you have your pieces adjusted, tape them into place. You can then retrace the pattern piece if you like.
Further help:
I’d love to help you as much as possible, but please realize there are a lot of you and only one of me. Please be sure to help each other out in the Flickr group as much as you can, and check out the fitting section of our Amazon store for further research.
Adjusting for a longer torso

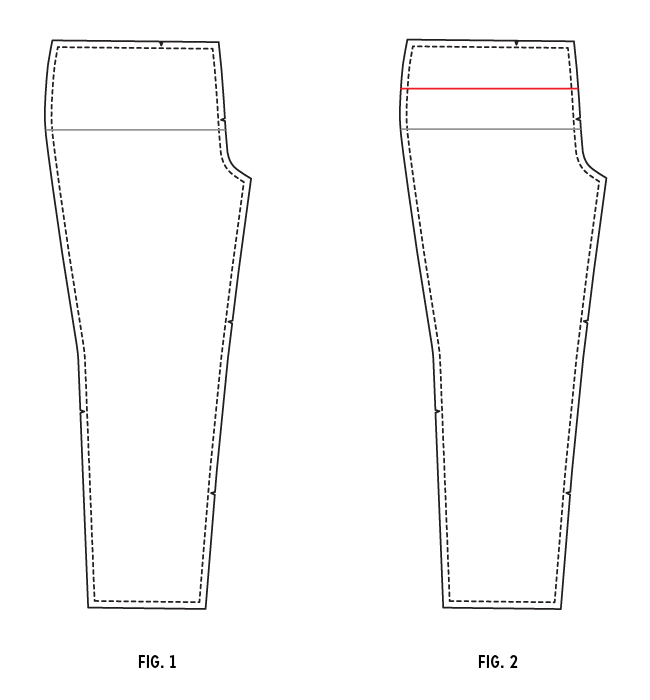
1. Draw in the hip line on your pattern front and pattern back (the grey line in fig. 1). For this adjustment, you’ll be working with both the front and back, but we’re only showing the front.
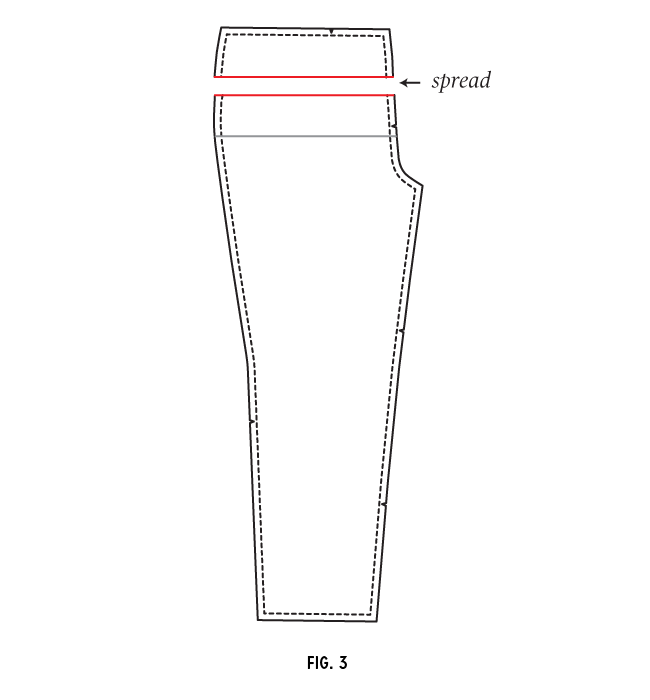
2. Draw a slash line, as shown in fig. 2.
3. Cut the pattern along this line.

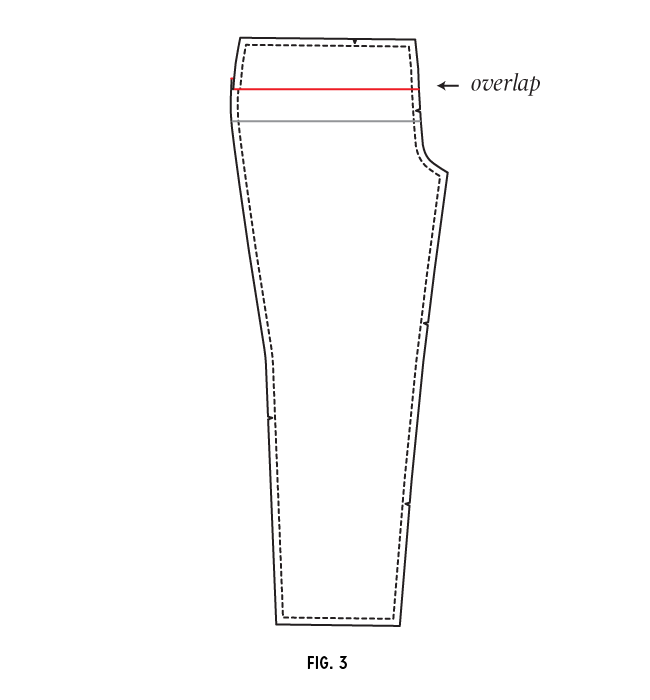
4. Spread the pattern as shown in fig. 3. Be sure to do this on both the back and front of the pattern.
5. Tape in place and retrace, smoothing out the lines.
Adjusting for a shorter torso

1. Draw in the hip line on your pattern front and pattern back (the grey line in fig. 1). For this adjustment, you’ll be working with both the front and back, but we’re only showing the front.
2. Draw a slash line, as shown in fig. 2.
3. Cut the pattern along this line.

4. Overlap the pattern as shown in fig. 3. Be sure to do this on both the back and front of the pattern.
5. Tape in place and retrace, smoothing out the lines.


Comments
Hi Sarai,
Thankyou so much for these posts! With regard to these adjustments, should the pants sit on the natural waistline, or just below? My muslin pair sit below, so I have been wondering whether to add to the crotch length or the torso length to fix fit issues. Thankyou for your help! Rachel
They should sit just below the natural waist.
Sarai, this sewalong has been amazing! I’m having such a great time following along. I have a question regarding the torso adjustment: Would this alteration be similar to modifying the crotch depth?
Thanks.
Hi Sarai – in relation to Cynthia’s question, is the torso adjustment you’ve outlined similar to lengthening/shortening the crotch length? I’ve lengthened my pattern pieces using the Threads magazine method of lengthening the crotch – involve slashing 3″ down from the waist and spreading from there. It doesn’t slash all the way through as you do in the torso adjustments, it gets you to essentially create a triangle cut-out.
Thanks again, this sew-a-long is just fantastic!
I have just shortened my pants in the crotch area by using Helen Armstrongs method of slashing 1 inch down from the crotch point to midway accross thigh (in line with first dart) and then slashing up to waist. You then move this piece up however much you need to shorten it by and blend new lines. It worked really well.
I did a muslin, but didn’t pay enough attention to the finer points in the hip area (I was obsessed with my sway back + large waist adjustment). I ended up not doing the sway back adjustment because the back fit perfectly and I was weary about adding any more width to the front (should’ve been a clue!).
Now I’ve got a nearly complete Clover with excess fabric in the front, so I think that’s pointing me to both a narrow hip adjustment (excess fabric at side seams, which I can fix) and a short torso (pooling fabric in front by the crotch). Here’s my conundrum: The back fits perfectly, so on my next iteration, how do I decrease the front torso length while maintaining the back? And any suggestions on making it work with a nearly complete Clover? (<—- Totally my fault, but I'd love any suggestions! :)
Thanks for all these diagrams, so helpful! Hopefully I'll get it right on the next one.
I needed to add three inches to the torso- do I make the pockets and zipper three inches longer too?
Thanks :)
I’m not a professional but no, I wouldn’t make the zipper 3 inches longer at all… maybe only 1 inch, maximum. The pockets would be optional but again you don’t need to add a full three inches… only half of that because you need to remember that adding 3 inches to the crotch length is over its entirity (approx 1.5″ at the front and 1.5″ at the back). I’m in the process of adding crotch length to Thurlow pants and then once I’ve mastered that pattern I’ll be having a go at the Clover pants. Can’t wait until I’ve mastered it. I’m close at this stage and really happy! :)
Thanks Carola, I really appreciate your help!
Actually, I added 3 inches all round! front and back.. so 6 inches total! I am actually making the pants for my hubby, who has a big tummy and hips and thighs, and has had a terrible time finding anything that didn’t pull so much thru the rise. No wonder with the needed depth! His shape is much more like a typical large female shape, than a man’s, so the pattern is actually working good for him.
perfecto
I just finished reading the instructions on how to adjust the Colette pants pattern for various problem areas. However, I did not see any advise on how to solve the problem of “smile” lines (the extra fabric below the stomach). This has always been my problem when making and failing to make a good looking pair of pants. Any advise would be appreciated. Also, how do I locate the pants pattern cheat sheet ?
Hello! My Junipers turned out so well that I used by burgeoning confidence to attempt some Thread Theory Jedediah pants for my husband. The rise on the first muslin is a bit too short so I am wanting to use this method to lengthen, but the pants have slash pockets and I am wondering if lengthening just below the waist (per the above photo) the diagonal line where the pocket attaches gets proportionately longer, too. Will I then have to also lengthen the pocket facing or will it magically work out? And if I do have to lengthen the pocket facing, will I end up with a freakishly large pocket opening?