Thanks for reading Colette Sewalongs!  This site is no longer being updated so head over to Seamwork to get all the latest patterns, tutorials, video classes, and more.

Selene Sewalong May – June, 2016

sewalong-hero-small

Welcome to the Selene sewalong! Over the next several weeks, we’ll be covering the process of making all three versions of the Selene skirt. Along the way you’ll learn tons of useful sewing skills like inserting a lapped zipper, creating welt pockets, and sewing a hand stitched hem.

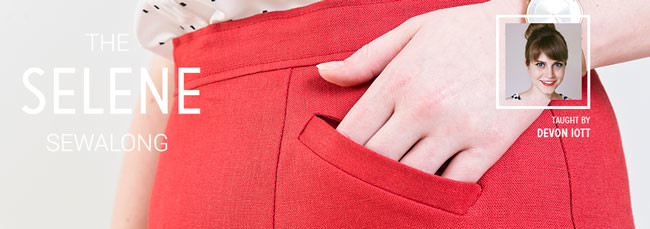
Selene is a vintage-inspired modern pencil skirt that is professional, flattering and fun. Version 1 is clean and classic. Version 2 features gorgeous angled welt pockets, and Version 3 has fun inset pockets on both sides with cute notch details on the edges.

Colette Patterns 34 copy

All versions of Selene are super versatile based on the fabric you choose and your styling. Use a metallic linen and go right from the office to a night out. Or, make a denim version to pair with chucks and a vintage tee for a relaxed but polished weekend look. There are so many possibilities!

If you don’t have your own copy of the pattern yet, you can pick it up in the Colette Patterns shop, or from one of our many stockists.

Read more about this sewalong →

The Selene Sewalong

  1. Welcome to the Selene Sewalong! (2 Comments)

    Selene is a vintage-inspired modern pencil skirt that will soon become your newest wardrobe staple.

  2. Gather Fabric and Supplies (8 Comments)

    We’ll get started by discussing what materials and supplies you’ll need.

  3. Basic Fitting (6 Comments)

    We’ll cover how to choose what size Selene to make, blending sizes, and making simple adjustments like lengthening/shortening.

  4. Adjusting Pockets

    If you did some fit adjustments, you might need to also adjust the pocket pattern pieces.

  5. Cut and Prep

    This post will discuss cutting out your Selene skirt and a few preparatory steps you’ll need to do.

  6. Darts and Assembling Front (2 Comments)

    We’ll dive into sewing Selene by tackling the back darts. Version 1 will also assemble the front skirt.

  7. Welt Pockets (V2)

    If you’re making Version 2, this post covers the process of creating the welt pockets and assembling the front skirt.

  8. Inset Pockets (V3) (3 Comments)

    If you’re making Version 3, this post covers making the inset pockets and assembling the front skirt.

  9. Sew Lining and Finish Vent

    All versions will sew the lining and finish the back vent.

  10. Lapped Zipper Insertion

    This post tackles the lapped zipper insertion.

  11. Attach Lining and Topstitch Vent

    We’ll finish off the zipper insertion by attaching the lining, and we’ll give the back vent a polished finish with a little bit of topstitching.

  12. Sew the Waistband

    All versions will attach their waistband to the top edge of the skirt, given everything a clean finished look with a slight overlap in the back.

  13. Hem Shell and Lining

    Both the shell and the lining need to be hemmed – both a little bit differently.

  14. Finishing (3 Comments)

    We’ll wrap everything up by attaching the trouser clasp and creating thread chains to anchor our lining…and your Selene will be finished!

  15. Your Selenes! (1 Comment)

    No sewalong is complete without a parade post – let’s show off some of your finished Selenes!