

If you are larger than a D cup you may want to perform the Full Bust Adjustment, though we have provided a good amount of ease in Hawthorn. The FBA adds extra ease in the bust, which prevents the fabric from stretching horizontally.
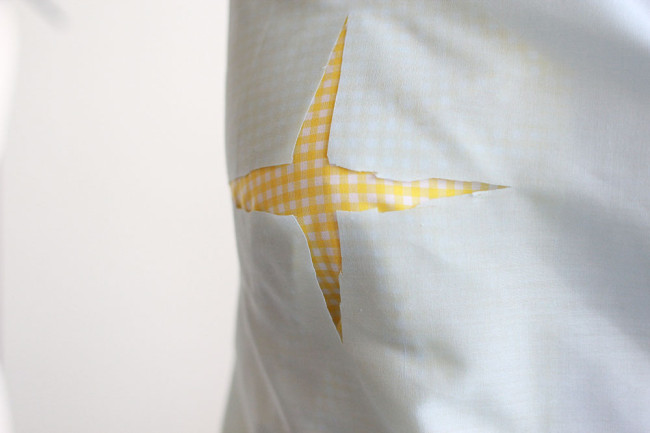
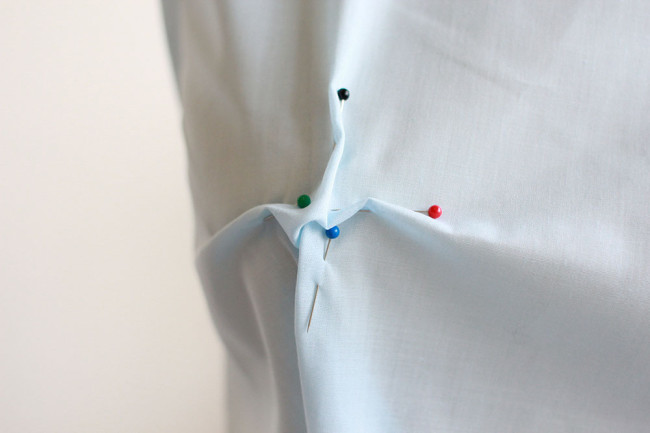
To determine how much fullness you need to add, cut your muslin in a cross shape right over your apex, and pin some fabric behind it. Measure to see how much length and width you need to add.
If you’re an A or B you will likely want to do the Small Bust Adjustment. If you make a muslin first, you may notice an excess of fabric at the apex of the dart, as well as diagonal bunching between the side and bust seams.
To determine how much fullness you need to remove, pinch out a cross shape over you bust apex. Measure to see how much length and width you need to subtract.
If you’re not sure what you’re measurements are, or if you think an DD(E) sounds impossibly large, you may want to consult the Nordstrom Bra Fit Guide. Or better yet, go get fit! I received my fit certification working in their lingerie department and I can’t recommend it enough.
Step by step: FBA & SBA
The FBA and SBA follow the same steps right up until the end. So whichever you are doing, follow along.
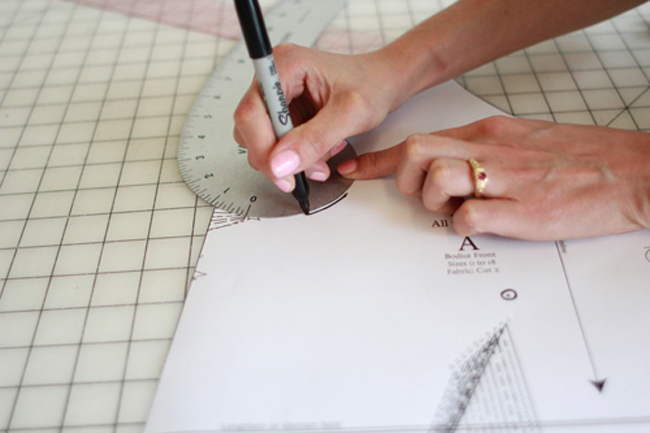
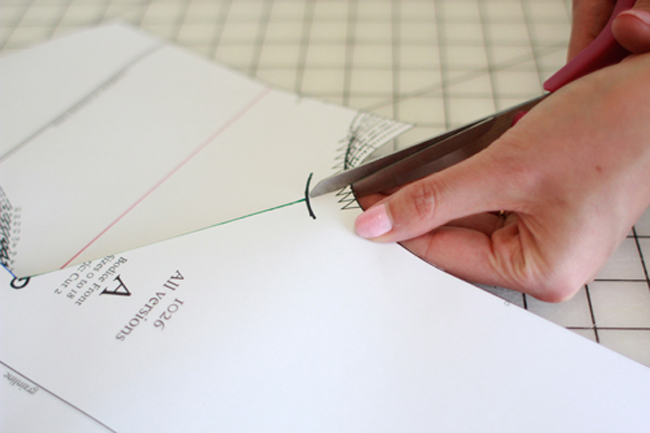
1. Draw in your bust apex (the point on your bust that sticks out the most). To figure out where this is, mark the apex of your own bust on your muslin, then measure from the waist and side seam. Mark it in the same place on your pattern.
If you are doing a bust adjustment before making a muslin, a good rule of thumb is that the apex is about 1 inch from the tip of the dart.

2. Mark a bit of 5/8″ seam allowance at the curve of the arm hole.
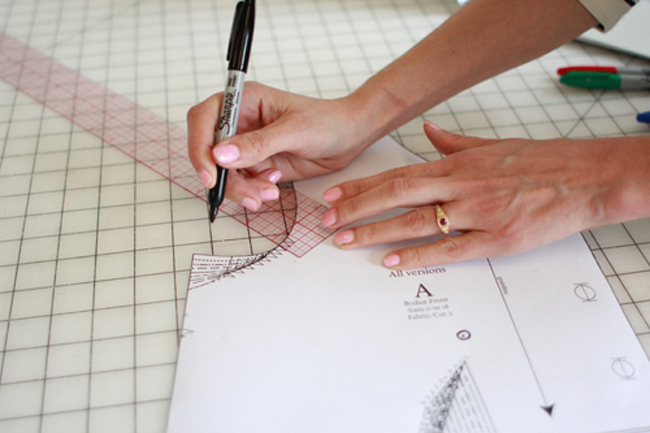
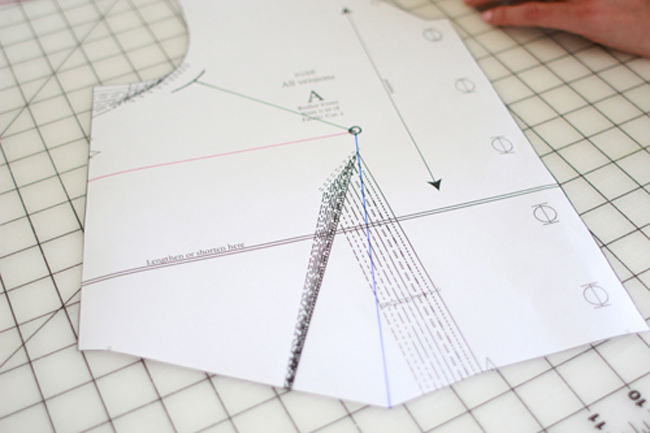
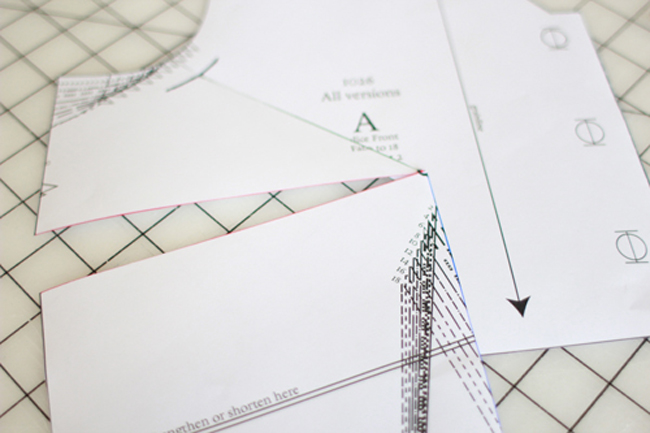
3. Draw a slash line up the middle of the dart, up to the apex point (shown in blue).
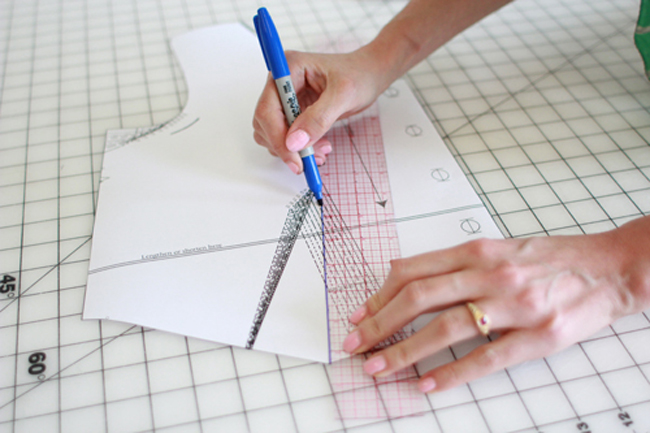
4. Draw another slash line from the apex point to the seam allowance marker at armhole (shown in green).
5. Draw final slash line from the apex point straight out to side seam (shown in red), parallel to lengthen/shorten line.
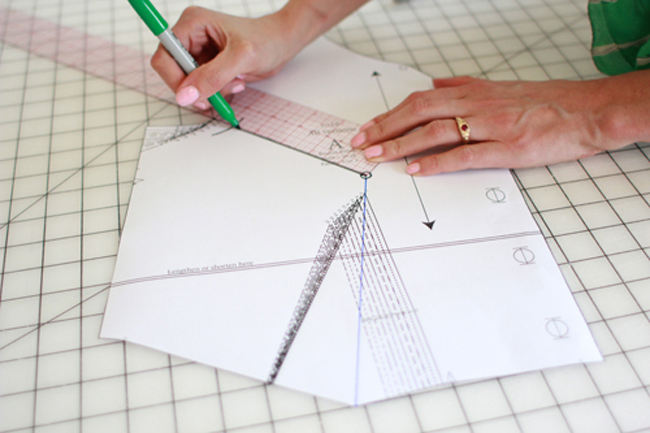
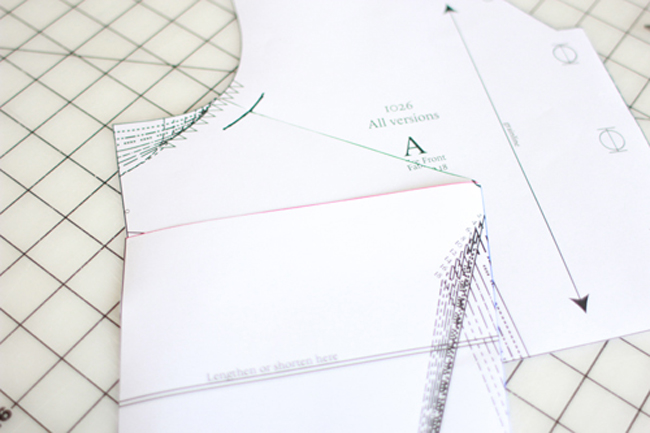
6. Cut upward along slash line 1, pivot and continue cutting along slash line 2, stopping at seam allowance marker.
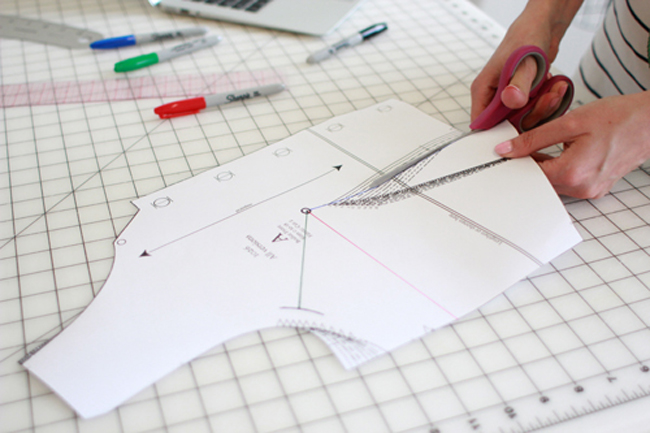
7. Snip into armhole seam allowance, up to your marker line but not through it. This will allow the pattern pieces to pivot.
8. Cut inward along slash line 3 up to the tip but not through it, again enabling the pattern pieces to pivot.
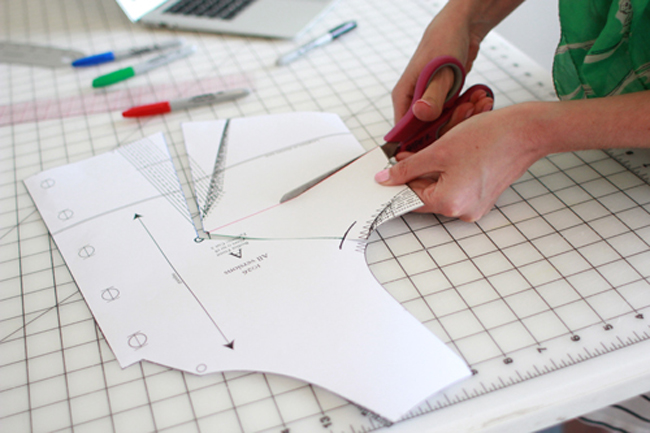
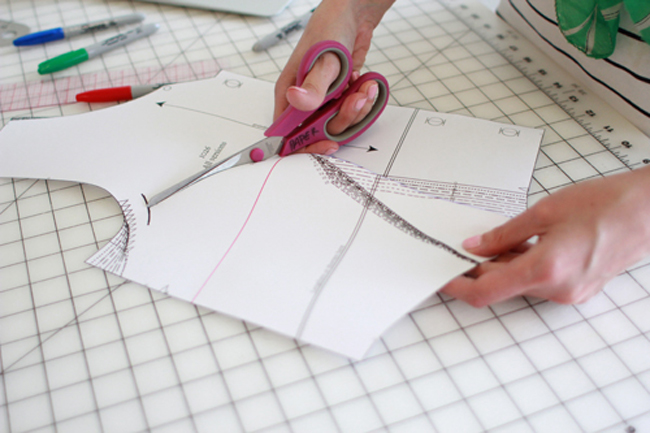
9. Cut all of the way through lengthen/shorten line on the right side of the dart.
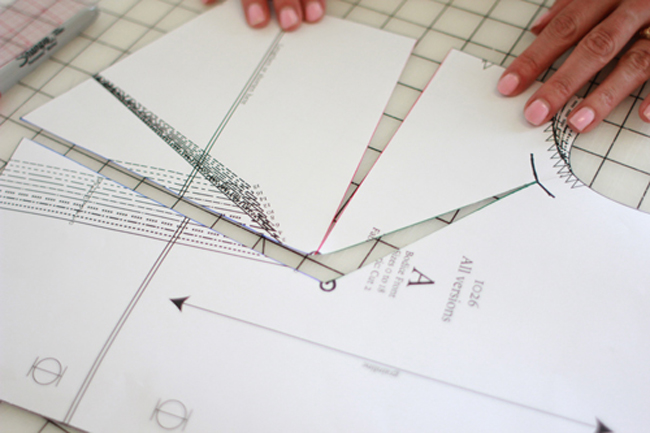
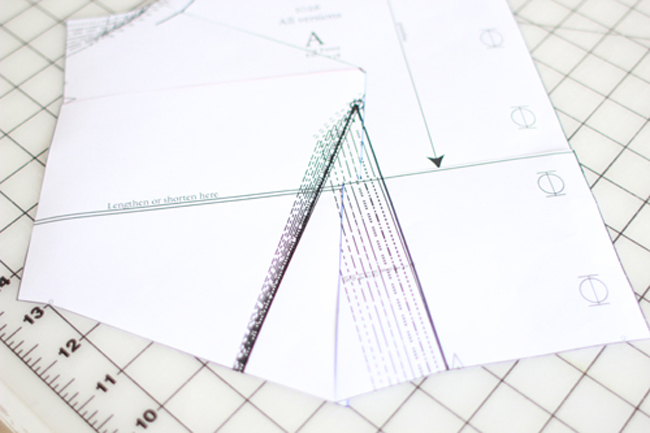
Separating this chunk will allow you to lengthen or shorten the bodice, which you need to do in order to accommodate for the length change in the side seam that happens when you add/remove ease.
10. From here you will either swing the pieces out (as shown above) adding the amount of ease you determined you needed when making your muslin, or swing them in to remove fullness (as shown below).
Note: For the FBA, you’ll notice that swinging the pieces out lengthens the side seam. For a more fitted and tailored look, convert that extra length into a side bust dart! Tape a piece of paper under that gap in your pattern. Then simply draw the tip of the dart about 1 inch to the left of the apex. Draw the legs so that they cross the gap right at the seamline. Now you’ll be sewing an extra dart, and won’t have to worry about the length of the side seam changing!
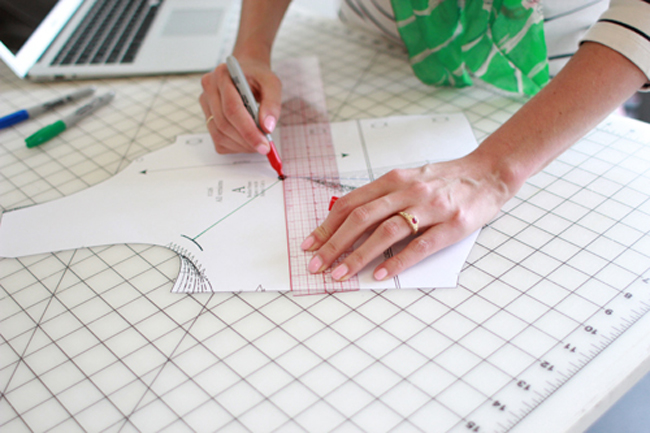
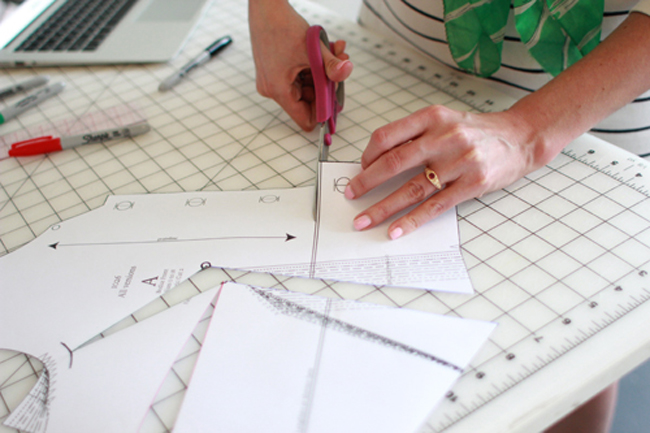
11. Draw new dart legs, starting at original dart legs at seam allowance, up to your new dart tip (shown in black).
Note: Be sure to measure your new dart legs to ensure they’re the same length. If they’re not, you will want to lengthen or shorten the bottom right corner piece, altering the right dart leg to match the left.
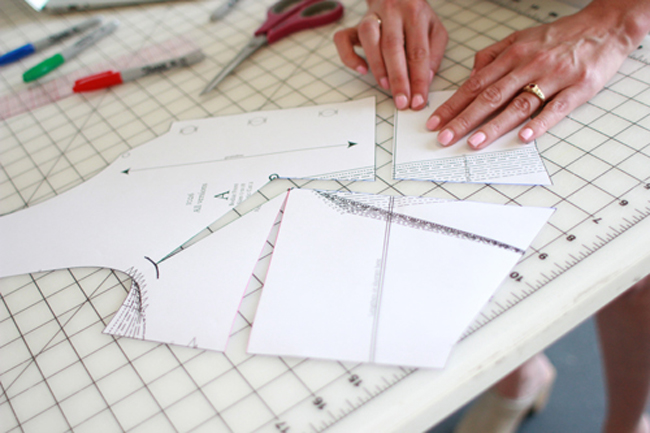
12. If you are doing an SBA, you’ll notice that the side seam is now a little shorter. Shorten the bodice back piece by the same amount by folding the piece along the lengthen/shorten line.
If you’re doing the FBA but didn’t want to add a side bust dart, same thing. You will need to lengthen the bodice back by slashing along the lengthen/shorten line, so that the front and back will match up at the side seams.
And you’re done! Bonus Tip: If you’re altering a tissue pattern that you wish to fold up and store to use in the future, you may want to use medical tape for your pattern alterations. This allows you to gently iron the fold lines out because medical tape doesn’t melt like other tape.
Tune in tomorrow for a tutorial on how to split your bust dart into two darts! This is very useful for those of you with large busts, because it will give a softer, less pointy look to your bust.
{top photo: Brassiere Fashion Show c1933}
Comments
Thank you so much for this. I am so excited to start! I have a long holiday from wrok starting at the end of the week and I plan on doing A LOT of sewing. My H cups will appreciate this adjustment. I’m so looking forward to a shirt dress that doesn’t gape! And a blouse which might actually fit well enough to be work-appropriate! So much fabric I can’t decide which to use!
I’m hesitating between two options, either doing a FBA or actually needing to go a size up with the pattern, as it seems from the first muslin that I need more space also in the back. Sew-alongers: is anyone else needing to go size up? (With Burda and Vogue, I typically go one or even two sizes down and do usually 1 inch FBA).
This is probably way too late for you – but a pivotal Broad Back adjustment would widen the space that runs across the shoulder blades nicely.
Fantastic! Very clear and well done. This is much needed tutorial.
I have only done one other FBA before (probably should have done more)…and I am not sure if that is what I need to do now or not. I cut a 16 in my muslin, which for Colette is usually perfect. It is snug at the waist, so I thought about grading up to an 18 at the waist and cut an 18 skirt. The buttons sink down in the middle (does that make sense?) instead of the bodice fitting straight across the bust line. And the arm holes gape in the front. What should I do? I get so lost with fitting!
Greetings, Kristin. I’ve only recently discovered the joy of a FBA and it sounds as though that’s the issue for you in re: the gaping arm holes. Sounds to me as if you need to cut a smaller top (which would allow the button placket to stretch across the front) and do a full(er) bust adjustment. Make sense?
Love this tutorial! I always have issues with the armhole when I do FBA’s but I think using your method will fix it!
What do you do about the difference in seam length at the waist? Does it matter where you add or remove it at the peplum/skirt?
It shouldn’t add any extra elngth at the wasit because you are putting the extra width into the dart.
Oh, I see, yes! Thanks :) I was looking at the photos where there was a gap and the dart hadn’t been formed yet. D’oh :)
Thanks so much for posting this. This is going to be so helpful for me!
I’m actually really surprised I didn’t have to do one for my muslin. I had to do quite a large one for the laurel. I’m a D cup, and I know you draft for C. Do you think it’s just the way this dress is cut?
You might be a D cup in standard bra sizes, but not in dressmaking sizes. I measured myself for a commercial pattern and was astonished to find out that I was a B in that pattern, even though I am a D or DD in regular bra sizes.
Good to know a D doesn’t need one. Some of my Sorbettos could have used one (just a teeny bit snug over the bust), but some fit fine, so I know I’m right on the edge!
Now I just need to do the narrow shoulder….
Interesting tip about medical tape. Lately I’ve been using narrow fusible web tape to hold patten alterations in place. It works great with the pattern tracing paper I use, and you can of course iron it again later with no problems!
I agree, great idea. I kept thinking there was some sort of tape that could work but couldn’t figure what it was!
This is great! I’m already thinking of pivoting the side bust dart to an armscye dart. Thanks for the tutorial.
I wonder if someone can help me. I’ve just done quite a big FBA on the Anise and wondering whether I should add the extra length at the back at the lengthen/shorten line like it says for the hawthorn above or under the arm where it’s added at the front? Does that make sense?! I have a bit of a swayback issue so can’t work out if this makes a difference. Thanks!
What did you decide on?
I’m on the same step with similar issues. Though I’m not sure if I’ve really got a swayback or it’s just a short waist and full back hips. I think I’ll just try shortening the bodice; I can always trace another pattern and make another muslin if it’s not right.
I love this stuff…it makes me wish i had a bust big enough to try it out..alas no!
LOL – me too!
An FBA is my next sewing challenge. Can I ask what cup size you draft for? Sounds like a C-D, deducing here!
This is probably the best tutorial I have seen for this issue EVER. I have been cutting patterns for industry for thirty years and very few truly understand this fitting issue. Congrats!
Keep the photo tutorials coming. I struggle with wanting to get sewing (!) and need to develop the discipline to make a muslin (!!) and do the needed alterations to the pattern (!!!). I’ve ordered my Hawthorn pattern, but since I live in MN it will be a few days before it gets here. The very good news is I’ve found and ordered my fabric after cruising websites yesterday afternoon. It is an aqua lawn with a cream pattern from Connecting Threads. I remembered they had a line of coordinating lawn fabrics last year. They have some left and, ladies, it is on sale for $3.94 a yard. Woohoo…
Thank you so much for posting this! It’s a tremendous help to me… :)
Can you give me a link to the medical tape you use? I can’t tell you how many times I’ve pressed a pattern piece and melted my scotch tape and had to clean my iron. Thank you.
Holly, The tape is 3M micropore paper tape (or any paper tape) You can buy it at any drugstore for a few dollars a roll, or you can get at 12 pack on Amazon fo less than $11: http://www.amazon.com/dp/B0006ULHLA/ref=pe_385040_30332190_TE_M3T1_ST1_dp_2
I use the one-inch stuff and it’s amazing for taping holes in tissue, reinforcing patterns, making adjustments, putting together PDF patterns, etc. Masking tape still melts, but the paper tape can get ironed. I know you asked this months ago, haha, but I had to respond!
For the larger chested ladies out there… I am a E/DDD cup with a size 8 waist, and what worked for me was to grade a size 10 bust to a size 8 waist, and to remove ~1″ from the armscye and taper to the waist. I’m still finishing my Hawthorn but if you’re interested, you can follow my blog :-)
I have struggled with understanding FBA adjustments since I started sewing two years ago. The picture of the cross cuts in the muslin just makes so much darn sense that all of a sudden the FBA tutorials I’ve been reading are in a language I can understand. Thank you!
This might be a whole other problem, But I`ll try. I have a ca. C-bust, and size 10 fitted me perfect. However, when I was trying on my muslin, I saw that the further down to the bottom of the waistline, the narrower the fabric got. In other words, I have a bit stomach. Do I need to go up a size( I am afraid it will be to big on the top) or do I just alterate at the width of the pattern around the area around my stomach?
I am confused by the part in #10 where it says “adding the amount of ease you determined you needed when making your muslin.” I find it confusing since the pix shows that ease will be needed both Horizontally and Vertically.
So do I measure ‘X’ amount horizontally PLUS ‘X’ amount needed vertically and add the combination of the two to some dart or other: whether side, split, regular or armscye?
In other words would I be adding all of that sum to one dart, or portions of it to more than one dart? I hope i’m being clear here. Help needed. Happy 4th! Hoping to sew today.
The way I’m doing it is just to spread the pieces by the horizontal width of the cross. The other pieces get pulled apart, too, so a lot of fullness gets added in.
So, additionally, I just spent 6 hours on muslin of the bodice. I actually have it without any FBA and it mostly fits except for lots of armscye adjustments will be needed tomorrow. (Enough for today!)
I always seem to end up getting folds above the bust in the armscye area, running up towards the shoulder when I get the bust area to fit right…is that cuz I really did need to do the FBA?
I am not too sure what size to use. My measurements fit pretty close to the ones shown for a Colette sz. 12 “body measurements.” I cut my muslin two sizes bigger at sz. 16 all around. Now I’m wondering if I ought to have used the 12 plus FBA. I have preliminarily pinned out all the excess and will report how much I’m going to have to remove later. Eyeballing it, it LOOKS like two sizes, just what I added!
This is my first time using Colette patterns, and the whole full bust fitting thing has been a conundrum for too long. I am hopeful as ever, and will return for any suggestions tomorrow.
Thanks.
Lots of armscye adjustments usually means that you’re cutting for full bust instead of over bust and you need to use a smaller size and do an FBA.
I strongly recommend finding a copy of Fit for Real People; the photos are dated and I found the text far more useful than the class in which it was used, and the Palmer Plesch notion of tissue fitting seems to me like a poor compromise for muslin fitting, but the FBA method is very clear.
For a summary, measure your over bust — tape measure parallel with floor, tight under arm pits, across the top of the breast. This measurement should be close to your bra band measurement. (If it’s really off, check your band measurement — lots of us are in a totally wrong size.) Now measure your full bust — again parallel to floor, across the back, with the tape measure crossing nipples and the top of the underwire at the arm pit. Subtract the over bust measurement from the full bust measurement.
Example: I wear a 38FF bra (UK sizing). My under bust is 37.5, my full bust is 45, and my over bust is 38. 45-38=7. That means that in most patterns, I need to add a 2.25″ FBA. (here’s the math: Full Bust Measurement (45) minus Overbust measurement (38) equals Adjustment (7). to calculate FBA addition, subtract standard pattern cup size from Adjustment, then divide that result by 2, since most pattern fronts are only half of the front of the garment.) In Big 4 sizing, the standard B cup means there is a 2.5″ difference between the over bust measurement and the full bust measurement. In Colette patterns, it seems to be about 3.5″.
If I build a size 12 in a Colette, it fits perfectly in the arms, shoulders and waist, but not in the bust. If I build an 18 (for my cup size), the shoulders droop off my actual shoulders, the collar is too large, the back is baggy, the waist is too big and the armscyes gape.
To pick your correct pattern size, look at the body measurement chart on the back of the pattern and circle your actual sizes — you may be a couple of them. I’m a 12 over bust, an 18 full bust, a 12-14 waist (depending on cut and time of month) and a 16 hip. With the Hawthorn, I’m most concerned with the bust, back and waist fitting; the hip matters less because it’s a full skirt and I can ease a larger skirt into a smaller waist without pleats. Note, however, that if I cut for an 18 to fit my bust, everything is going to be too big.
To use the muslin snip method of figuring out how big your FBA is, baste up the correct size for your over bust (in my case a 12) and snip the apex. Get the front plackets to overlap appropriately, snipping as needed at the apexes. The snipped apex will make a convex diamond shape. There will be a visual square in the middle of the diamond shape, with the corners at the deepest part of each convex curve. That’s the square you want to measure. Mine is about 2″ wide and tall, which is about the same as my mathematical FBA calculation. (Because the front pattern piece is usually half of the front, so you want to divide your adjustment (7″ in my case) by 2. Given that Colette patterns are already built for a bigger than B cup, the adjustment is not simply the adjustment/2, it’s more like (adjustment – 3.5″)/2.)
Hope this helps — FBA’s are intimidating until they concept finally clicks, but once it does, it’s there.
I have that book you recommend. It’s back to the cutting table for me. THANK YOU so much for taking the time to really explain it!
This is a nice explanation of why an fba is needed, but I strongly disagree that the over bust and underbust should be close in measurements. Over bust includes the very widest part of the shouderblades. The underbust of an hourglass or pear shape could be quite narrow. If you’re an apple, they might be similar. But these are two different measurements altogether.
wonderful!!!
thanks!
I’m a little confused by this method. I don’t think you should be adding length to the back of a dress in order to adjust for the bust. I certainly don’t need extra length in the back! But since the waist dart in Hawthorne is already quite large, adding any additional fullness there alone may not work. In that case, something needs to be done with the fullness like a bust dart or shoulder gathers. Which option do you think will best maintain the style lines of Hawthorne?
I cut an 18 for the muslin. It fits across my bust just fine, but it puckers up on the side by the arm hole. I have no idea how to fix this. A FBA? A side bust dart?
Your upper chest probably needs a smaller size, and then you can do an FBA to get it back to the right fit for your full bust.
Could you please add a “Pin It” button, so it is easier to pin things. When I tried to pin this article for future reference I could only pin one picture at a time. Thank you very much.
If we do the side bust dart in addition to expanding the waist dart, will that put in even more fullness? Should we spread the pattern by 1/2 the amount we measured in the cross since there are 2 darts?
Just to throw my hat into the ring on the SBA topic! Here is my latest post on SBAs:
http://belgianseams.blogspot.be/2013/11/SBA-part2.html
Hello,
I’ve just made my muslin for the bodice in a size 6. The back fits just fine. The upper bust part looks OK – not super snug, but it lays flat and is not baggy either, it leaves me just enough room to breathe and move comfortably. The fit at the waist is alright, even if it falls a little bit higher than my actual waistline – I think I’ll lengthen the bodice by an inch or maybe even less.
However the fabric looks a bit baggy in the space between my breasts and my waist. Do you think this will be solved if I lengthen the bodice, or should I make a SBA? Or yet another type of adjustment?
Thanks in advance for your answers!
I am doing a SBA, and taking out 2 inches total… Taking out 1 inch on the bodice front, and lining up the pieces using the horizontal lengthen/shorten line creates a drastic reduction in the side seam length. I notice that in the Myrtle SBA the instructions are to line up the pieces using the grainline. This would result in less change in the side seam. What is the reasoning for the two different methods of lining up the pieces after adjustment? And in the case of a shortened side seam, would it be appropriate to just add the required length back on at the bottom?
Hello. A group of us are sewing along together on this pattern. We are making SBA, but everybody finds the bust point too high. When we lower the bust point, we end up with a bit of bagginess above the bust. What is the best way to do a SBA and lower the bust point and still get a good fit?