

Now that you have your yoke assembled and sewn, let’s sew he body of the blouse together.
Today, I’ll be showing you how to assemble the blouse, and then sew the neckline and front placket. This application can get a little tricky, so tke a close look at the photos and let me know if you have questions.
Sew Side Seams
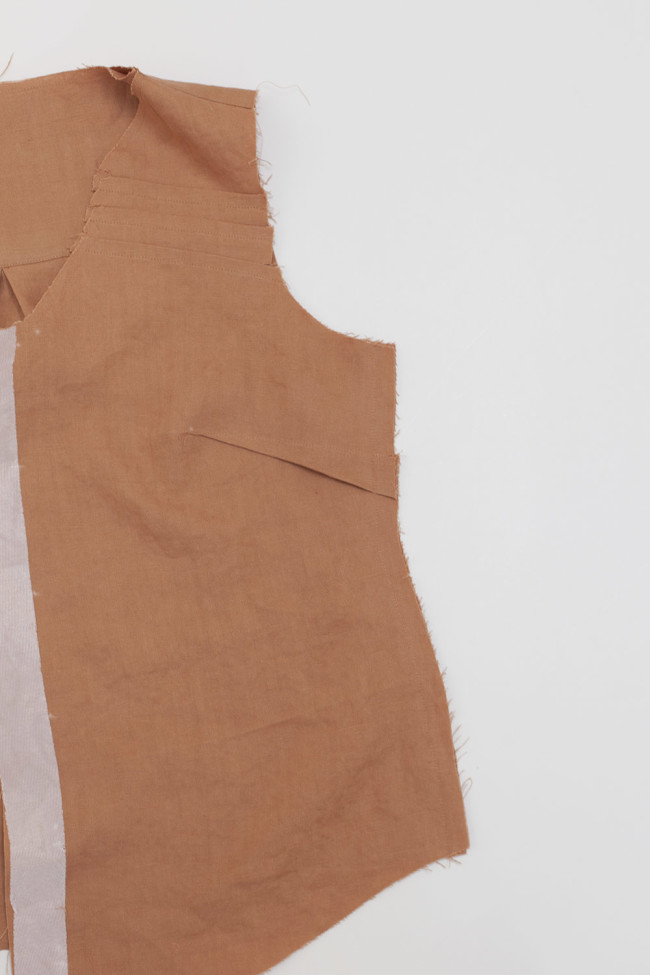
Align the side seams of the bodice front (A) or pleated bodice front (B) pieces to the bodice back (E), with right sides together and notches aligned.
Stitch along each side seam.
Finish each side seam and press open.
Finish neckline
With right sides together, align the raw edges of the bias tape and neckline. Pin the bias tape to the neckline, between the small circles, leaving 1 1/2″ tails at both ends.
Begin at one of the small circles, and stitch the bias tape to the neckline along the first fold line, ending at the second small circle.
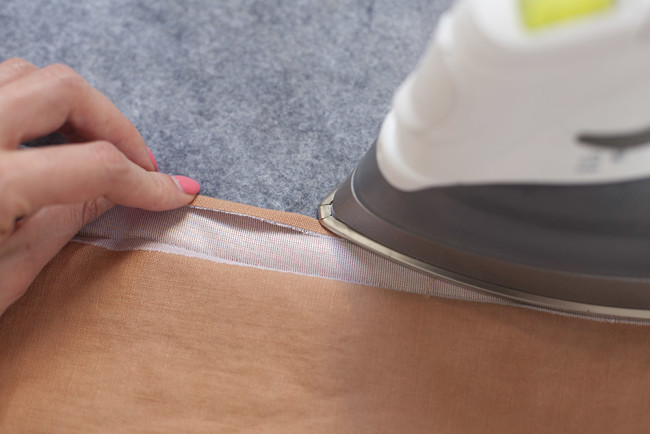
Fold the bias tape to the inside of the garment.
Edgestitch along the fold of the bias tape.
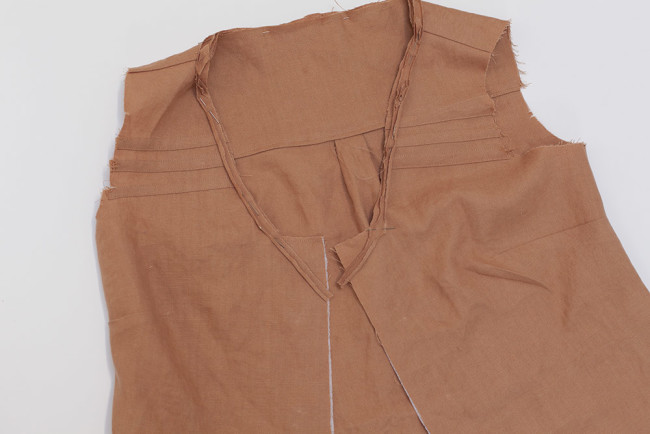
Sew Front Placket
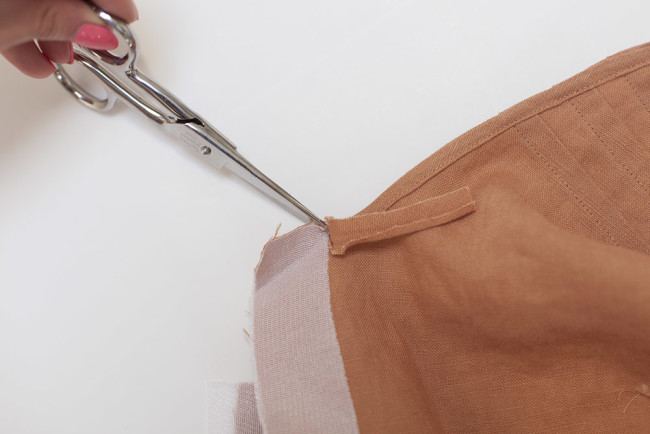
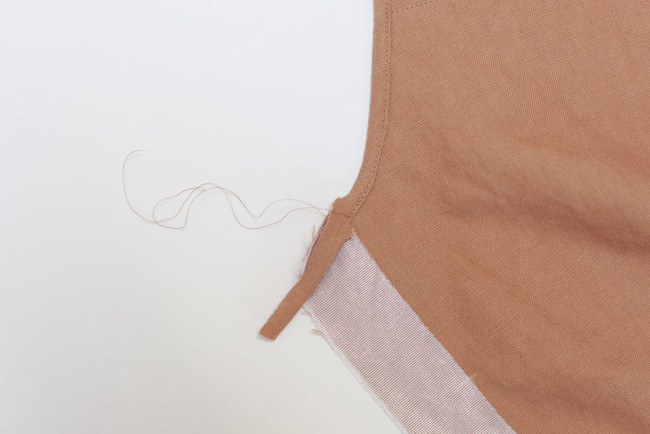
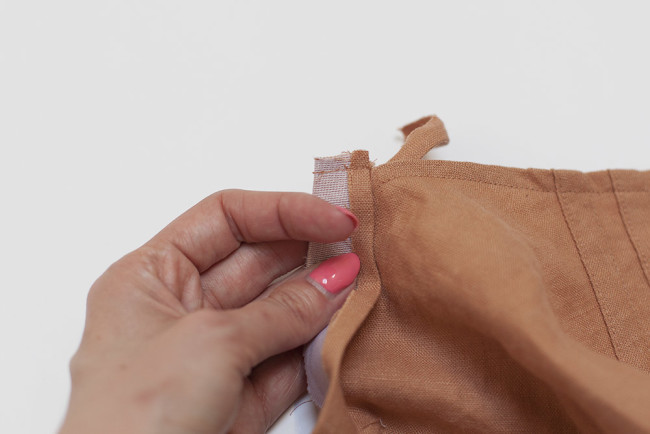
Clip the seam allowance to the small circle at the neckline.
Here’s what that little clip will look like.
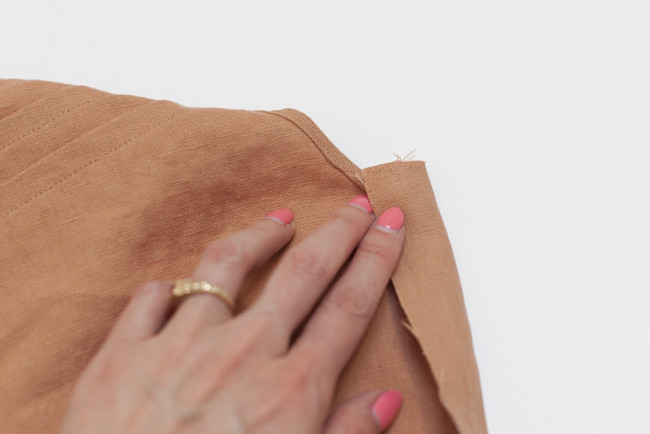
On the bodice front (A) or pleated bodice front (B) piece, fold along the fold line toward the wrong side of the bodice. Press into place. You are basically pre-pressing the center front fold right now.
Fold back along the fold line you just pressed toward the right side of the bodice. Do not press.
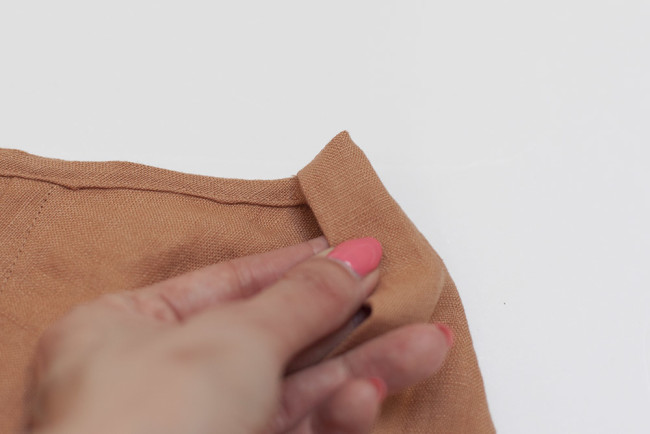
Fold the center front edge under 1/4″ toward the wrong side of the placket. Press this fold only.
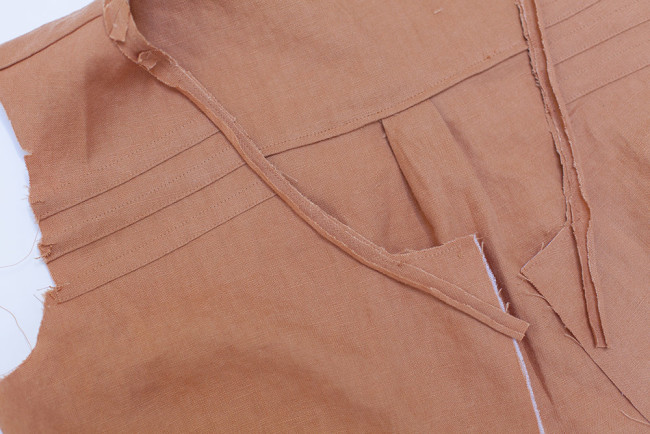
Using a 1/4″ seam allowance, stitch along the top edge of the placket. Clip the corner to eliminate bulk.
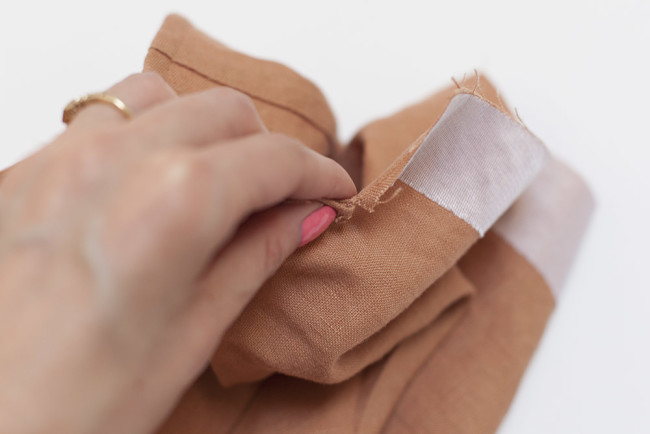
Turn the placket back to the front of the bodice along the fold lines. Tuck the tail of the bias tape into the placket.
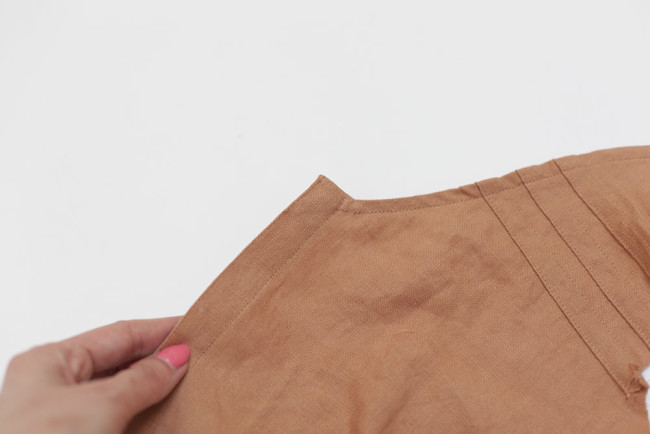
Edgestitch in place along each fold.
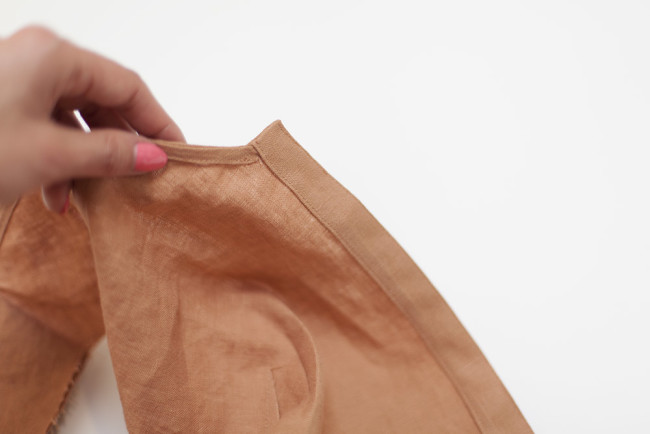
Here’s what it looks like on the inside.
Repeat steps 1 – 8 for the second bodice front (A) or pleated bodice front (B).
Your neckline and placket are done! At this point, you should have something that’s starting to resemble a blouse.
Comments
I wonder what I did wrong with my SBA to get the sides to not line up properly. There was about .5 inch on both ends in the back that were too long compared to the front. Thankfully, I’m just doing a muslin now…but it’s really weird. I had to do an inch SBA…anyone else have this issue?
Do you recommend stitching the bias tape down with the wrong side of the garment up?
Yes, exactly. You turn the bias tape in to the inside (wrong side), then edgestitch along the fold of the bias tape. The wrong side of the garment will be facing up.
Hello! I had the same problem.
I’ve made a 1 1/2 inch SBA and I’ve reduced the back bodice from 1 1/2” as well then I’ve got a difference between back and front.
As I wasn’t pleased with my darts because they were too long and as I could not find how to redraw the darts because the former darts was upside down, I sewed the new bodice without dart and it seems to be ok with a non-altered back bodice… Hope my explanations are clear (not sure!)
Hi guys,
I’m a beginner sewer but so far my muslin has been coming along great! I had to stop though because it says “finish each seam and press open” and now I’m overwhelmed by the many options available to me.
What are a few options/methods you’d suggest for finishing the seams for a professional finish? I do know how to overlock stitch but wasn’t sure if there is a preferred way for Aster. :)
Thanks!
It mostly depends on your fabric! Overlock will work for most fabrics. Men’s shirts (and many women’s) typically have felled seams, if you want a more traditional look. If you are using a light fabric, like silk or rayon, you could do french seams.
When stitching the inner folded edge of the bias I found I needed to know how far toward the front I needed to go so the stitching that shows on the outside ended in exactly the right place. I needed to go farther than I stitched the bias on the neck edge. The only way I could find out how far was to pre-fold the facing and pre-fold the 1/4 inch turn-under and see where the bias stitching had to end. I am drawing another dot on the pattern to make this easier in the future. My shirt is almost done!!!
I had the same issue…but was not as forward thinking as you. Hence, my bias did not fold under neatly. I’m still not sure I completely understand how the bias on the outside appears so “seamless” as it enters the placket.
I’m still not clear how the instructions can get you there. I actually had to add 2 more stitches to the binding to meet up with the front placket stitching. That’s not fun since it’s so hard to line up exactly and it’s right center front under your chin!! Hope there will be some advice for this difficult spot.
I see what you’re saying. The easiest thing to do is to stop stitching directly under the circle mark for the clip at the neckline. One thing that could help is drawing a straight line down from that circle with a ruler and chalk. The line would indicate where to stop stitching, and you could also use it to align the fold of the placket precisely.
Thanks, This is pretty much what I’ve been doing. Just need to get it down before I stitch the edge of the binding so I can make the final stitching continuous. It was a nightmare to have to add just 2 stitches at the end!!!!
Thank you for this tutorial. Is it necessary to clip at the small dot before turning the bias to the WS?
No, not necessarily. It’s easy to clip it afterwards, just by folding the bias tape out of the way.
Hi, I am trying to buy the bias binding (UK based) and I cannot find anywhere that sells 1/4″ single fold bias binding. Does anyone have any suggestions? Most of them that I have found are 25mm??? Thanks.
25 mm is quite wide! If you can’t find it, you can also cut a wider strip down. Just open it out, press it flat, then trim to your desired width. Fold the edges back in to meet in the middle and voila! It’s still much faster than creating your own bias tape from scratch, which is another option.
I’ve just found a Clover 1/4″ bias tape maker on amazon.co.uk.
I staystitched the neckline at 1/4″ so had to unpick those stitches after finishing the neckline. Should I have staystitched at 1/8″? Would that have done much? Thanks for this sew Along!
It’s a tough one, because staystitching at 1/8″ is so close to the edge that it doesn’t do a great job of protecting the neckline from stretching. We tried to keep the instructions simple here, but one thing I like to do with a narrow bias neckline like this is this:
Staystitch at 1/4″. Then, when I sew the bias tape to the neckline, I move the bias tape over so that there is a 1/4″ seam allowance on the neckline. Stitch so that the first line of stitching is right over your staystitching. Then trim the extra 1/8″ off the neckline and proceed as usual.
Good to hear- stitching the bias tape at 1/4″ was actually my first thought but was worried about making the neckline too open. I will try that on my next one.
I was worried about this step too. I followed your advice and got a beautifully bound neckline…..even if I say so myself. ?
Excellent!
Great tutorial. The photos really help with the neck band. I tried the blouse on after sewing the side seams and have a gaping neckline. If I pinch out fabric at the shoulder, the neckline lies much better. Is there any reason I cannot take a larger seam allowance in the shoulder seam beginning at the neck and decreasing to original seam allowance at sleeve?
Yep, you can definitely take some out at the shoulder.
I could not find 1/4″ bias tape in single fold (only double fold, which seemed too thick) so had to use 1/2″ instead. It does not really tuck into the top of the placket neatly like the narrow one does. I am unsure how to finish this area now…there does not seem to be a tidy way to finish the corner where the clip is. I’m a little disappointed :(
1/2″ is really wide for this finish. If you can’t find 1/4″ single fold, the easiest thing to do is just cut a 1/2″ strip down the middle.
Button holes and buttons? I’ve never done them. Don’t see them mentioned here. Is there a separate tutorial for them? Thanks.
Buttons and buttonholes are sewn before you hem, on this post: /aster/hem-and-finish
Sewing buttonholes is very different depending on the type of machine you have. Some have automatic buttonholes, some have 4-step buttonholes, some even have to be done in a manual way with the zigzag stitch.
If you’ve never done them with your machine, the easiest thing to do is take a look at the manual for your sewing machine and practice on fabric scraps. Every machine is a little different.
I’ve been out of town and am trying hard to play catch up! I’m trying to make my own bias tape (that’s been an experience!) To make a ¼” single fold, am i correct in my thinking that i need 1″ strips?
Do you have an online tutorial for making bias tape?
Thank you.
For 1/4″ single fold, you only need 1/2″ strips, since all you need to do is fold the raw edges towards the center. If your fabric frays at all, you might cut it just a hair wider to account for that.
Here’s the tutorial from our main blog on making continuous bias tape, my favorite method!
http://www.coletterie.com/tutorials-tips-tricks/continuous-bias-tape-tutorial
Hi! I’m not sure if it’s too late to ask a question, but I’m stuck at the part about attaching the bias facing to the neckline. I’ve made my own bias tape and applied it as facing before for some other projects, but for some reason I’m having a hard time with this one. I guess this is my first time making 1/4″ single fold bias tape and I’m having difficulties working with it because it’s so narrow. I try to get the sides of the bias tape to fold into the center line but no luck. Any pointers? Am I right in that I need to start with 1/2″ bias strips?
This can be tricky, especially if your fabric frays. If that’s the problem, I like to cut the tape a little wider so I can work with bigger seam allowances on the inside, then trim it down after the first line of stitching is done.
It also helps if you have a bias tape maker (here’s one with all five sizes on amazon, including 1/4″). If not, you can use this neat pin trick to help you fold without burning your fingers!
My problem is( if I dont count the problem with the language) that I missed to clip on top of the plackey. AND that I dont understand where on the biastape I should place my stitchline. Is the bias on right or wrong side in the photos? I would love to have a special tutorial on this! I have buyed a lot of fabric for my Asta-stash!!
Bias tape is unfolded, and then stitched on the first foldline. That is the fold that is closest to the raw edge.
It’s sewn on the right side of the garment, then flipped to the inside.
Hello! I have a question about folding the placket part. When you’re folding the placket to the right side of bodice right before you stitch along the top at 1/4″ is the idea get this fold aligned with the clip in the seam allowance? I did not do this, I followed the fold line on the pattern and it comes short of the clip. Now the clip is visible.
Yes, it should align with the clip.