

Today we’ll discuss knits vs. wovens, ease and size selection, some common fit changes, and how to cut out your pattern pieces.
Sewing with Knits
The Moneta sewalong went pretty in depth on this topic, so I’m going to just touch on the important points here, but I’d highly recommend jumping over and reading the Moneta post as well if you’d like some more info.
Use the right stitch
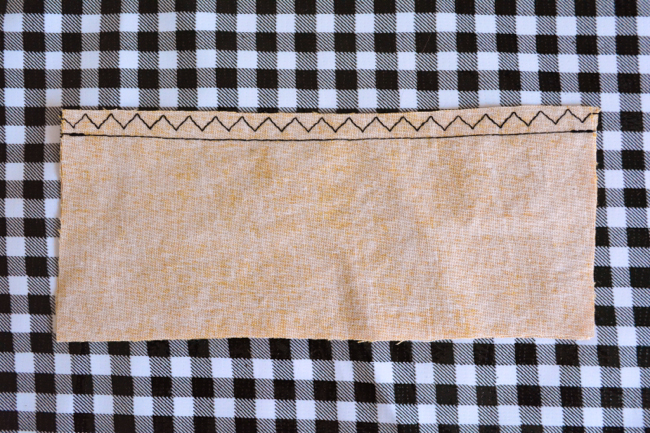
Because knit fabrics are stretchy, the seams that we sew need to be stretchy as well. If the seam doesn’t stretch but the fabric does, the thread will pop.
To achieve this there are a few different options. You can use a serger, which attaches, trims and finishes all in one step.
If you’re using a standard machine, you can use a narrow zig zag. The back and forth motion of the zig zag builds in just enough extra thread for the seam to expand when the fabric does. Set your width at 0.5 and your length to a medium length, 2.5 on most machines.
If you are sewing entirely on the standard machine, you’ll also want to seam finish the edges. You can use a standard sized zig zag, a 3 step zip zag, a mock overlock, or the seam finish of your choice.
Regardless of which method you choose, always test a scrap first! Since there is such a wide variety of knit fabrics out there, you always want to be sure your chosen stitch and settings are going to look right on the fabric you’re using.
Use the right needle
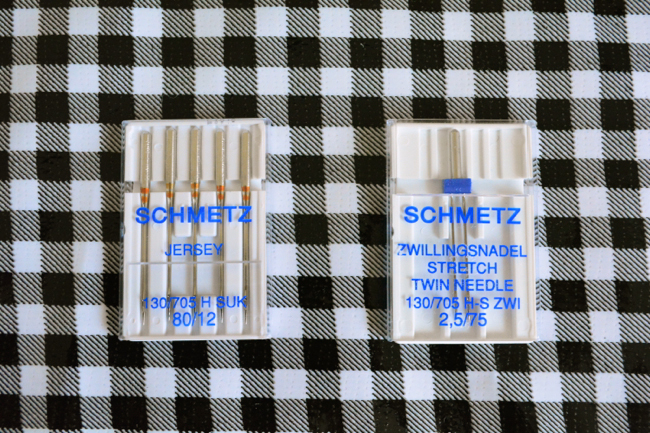
The threads in knit fabric are arranged differently than in a woven – they are looped around each other, just like a sweater is knitted. This means that it’s easier to create runs in the fabric if you use the wrong needle.
You’ll want to use ballpoint needles, also sometimes labeled as jersey needles. They have a point that is designed to push the threads out of the way instead of pierce them. A size 80/12 will be appropriate for medium and lightweight fabrics.
Unless you have a coverstitch machine, you will need to use your standard machine for hemming. A twin needle is a great hemming option. You’ll actually thread two separate threads through your machine, one through each needle point. You can buy stretch point twin needles, but if your fabric store only has universal that will work too.
For more info on hemming with a twin needle check out this tutorial on The Coletterie.
Sewing with Wovens
If you’re making the Myrtle with a woven fabric, you don’t need to worry about stretchy seams, since the fabric isn’t stretchy. A regular straight stitch will do.
You’ll definitely want to seam finish all the exposed raw edges. This will prevent the edges from fraying and turning into a tangled mess every time you wash it. A common seam finish is zig zagging along the raw edge.
If you’re using a very thin and delicate woven fabric, try using a microtex needle in a size 70/10. The microtex tip is extra sharp and pointy, and the smaller size means you’re making smaller holes in the fabric.
A few of the steps will be different if you’re using a woven, which I will point out as we go along. There is a post on the Coletterie with lots of pictures detailing the different steps for wovens which I will link back to when applicable. There is also a free downloadable instruction set for making Myrtle with a woven available in the pattern store.
Understanding ease
When discussing fit, ease is defined as the difference between body measurement and finished garment measurement. To calculate ease, all you do is subtract your body measurement from the finished garment measurement. Sometimes that leaves you with a positive number, which is called positive ease. Sometimes you get a negative number, which means – you guessed it – negative ease.
Clothes are often not exactly the same size as the bodies they fit. Non-stretchy woven garments need to be a little bigger than our bodies because we need that extra space to move around and feel comfortable. This is positive ease. Tighter, stretchy garments – like a fitted tee – are usually smaller than our bodies, because the fabric will stretch to cover the distance it needs to. This is negative ease.
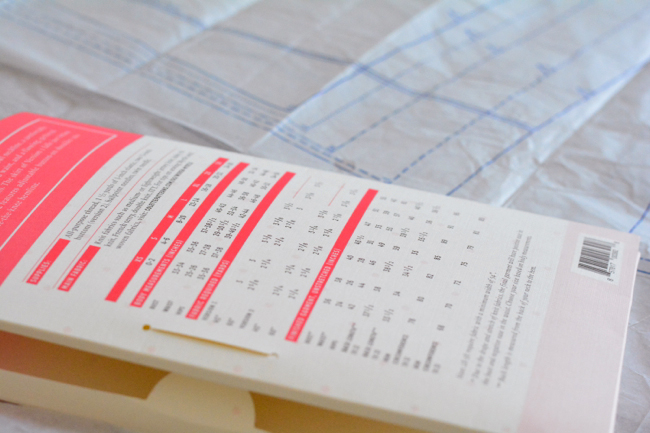
If you look at the finished garment measurements on the back of the Myrtle envelope, you will see that the bust is designed to have a couple inches of positive ease. The hips have even more. The waist has a little bit of negative ease, but this is only because of the elastic that gathers the fabric down and makes it smaller and snug around your waist.
Myrtle also has a loose, drapey and wide neckline, meaning it can fit over your head without stretching. This style, combined with the positive ease and elastic waist, is why Myrtle can be made using a knit or a woven.
Choosing your size
To choose your size, I’d recommend choosing off your bust measurement. The waist can be customized by how long you cut the elastic, and the hips have a good amount of ease built in.
If your measurements are putting you in difference size categories, you can grade between sizes when you cut to customize the fit. Before you cut, simply use a ruler to blend the lines from one size at one landmark to another. For instance, if you are a medium at the bust and a large at the waist, draw a line smoothly connecting the M cutting line at the bust to the L cutting line at the waist.
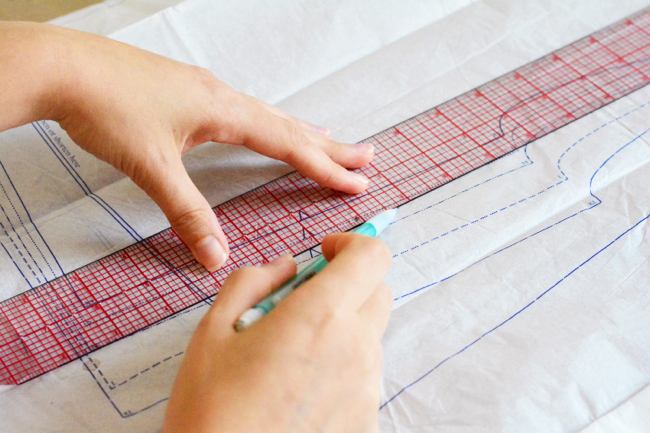
If you do cut between sizes, make sure the bodices and skirt pieces are the same size at the waist, since they need to match each other.
Length adjustments
One simple thing fit adjustment you can do is to lengthen or shorten. Check the finished back length for the version you are doing, and have a friend help you measure down that distance from the back nape of your neck.
If you want to adjust this length, simply cut along the lengthen/shorten line and either overlap or spread the pattern pieces by the amount you wish to change them. Keep the fold edges aligned and use a ruler to blend the outside edges.
Depending which kind of adjustment you are doing, you can lengthen/shorten the bodices, skirts, or both.
Bust Adjustments
Another major aspect of fit involves your cup size.
Colette Patterns are drafted for a C cup for sizes XS-XL and a DD cup for 2X-3X. Your pattern cup size may or may not be the same as your bra cup size, so don’t use that for reference. Instead, it’s determined by the difference between your high bust measurement (just under your armpits, across your upper chest) and full bust.
A C cup is a difference of 3”, and a DD cup is a difference of 5”. If your difference is more than an inch or two above or below those differences, you may want to do either a Small Bust Adjustment (SBA) or a Full Bust Adjustment (FBA). There will be a post for each one published tomorrow that will go into full detail of how to take measurements, choose your size and do the adjustment to your pattern pieces. It’s a little different than usual since there aren’t any darts.
To muslin or not to muslin
If you’d like to make a test Myrtle, feel free, especially if you are not sure how it will look or you’re making a ton of fit changes. If you are using a knit, be sure to make the muslin out of a knit too.
When making knit patterns, I usually consider my first go a wearable muslin. This means I use something inexpensive that I can keep if I like it, but that I won’t be heartbroken about if I decide I need a lot of changes.
If you’re using a woven, you can use actual muslin for the muslin, just keep in mind that the cowl will look a little funky.
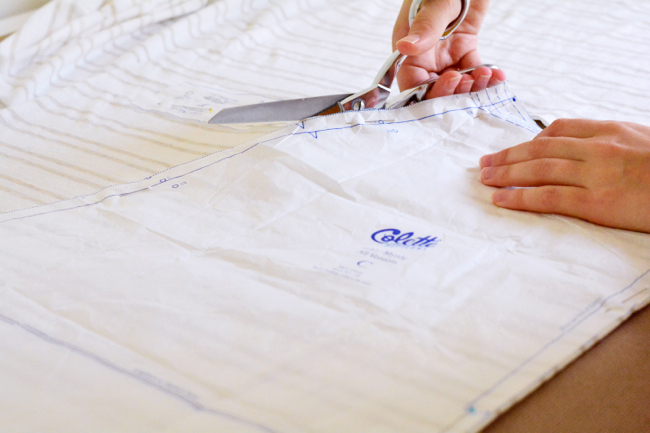
Cutting
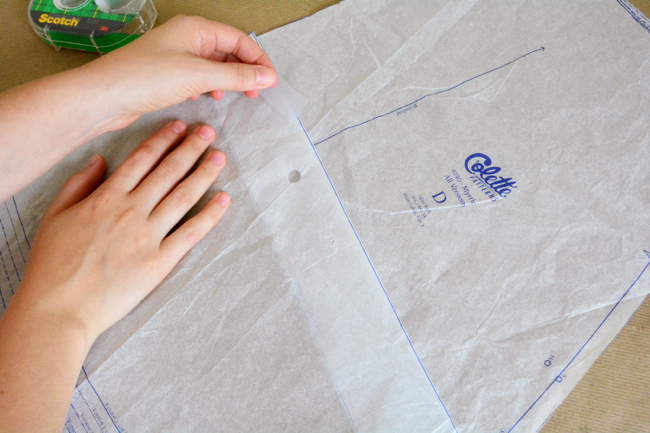
Once all your fit adjustments are done and your paper pieces are cut out, it’s time to cut your fabric!
Fold your fabric in half on grain, making sure it is smooth. For knits, on grain means that the columns of knit stitches (the little “V’s”) are running parallel to the fold.

Using the cutting layouts in the instructions, pin and cut all the pieces. You can either pin or use pattern weights, and cut with scissors or a rotary cutter. For very thin and slippery fabrics you’ll find pattern weights to be easier than pinning.
If you’re using directional fabric, make sure all the pieces are going the same direction on the fabric. This might mean pinning some of the paper pieces on with the printed side down.
For knits and finicky slippery fabrics, I like to work in small sections, adjusting and pinning and cutting as you go. Just double check that you’re sure about the layout before you start cutting!
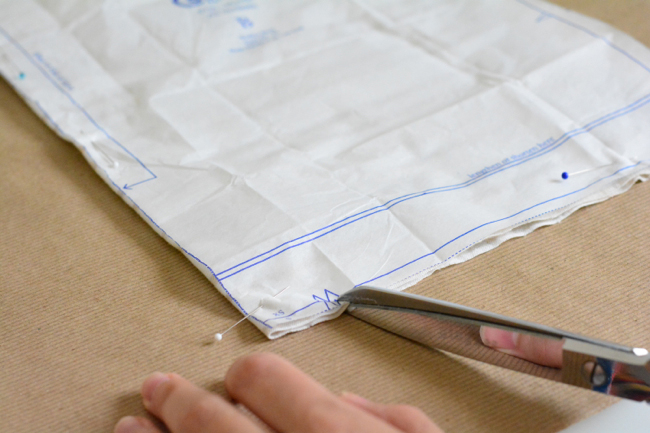
One all the pieces are cut, snip out any notches. The seam allowance is only 3/8”, so don’t snip too far into the fabric. Dainty snips.
Transfer all other marks. One easy way to do it is to stick a pin right into the circle and then use its placement to mark the circle on the fabric.
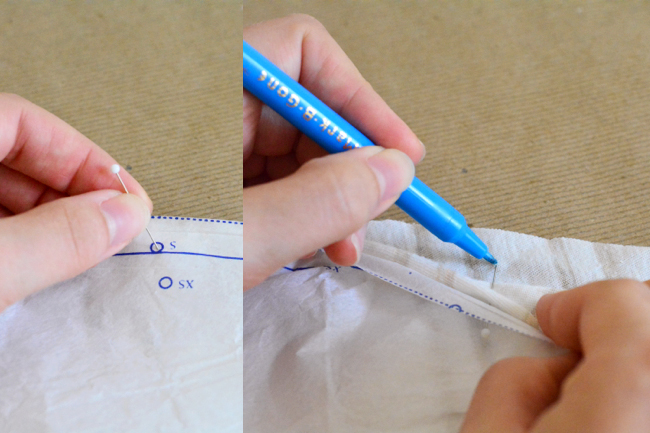
If your fabric has similar right and wrong sides – for instance, a solid color – you may find it useful to mark a small ‘x’ on the wrong sides of all the pieces.
I hope that was helpful! Tomorrow we will be back with a full post for both SBA and FBA pattern adjustments.
Comments
Hello there! I have a question about adjusting to fit.
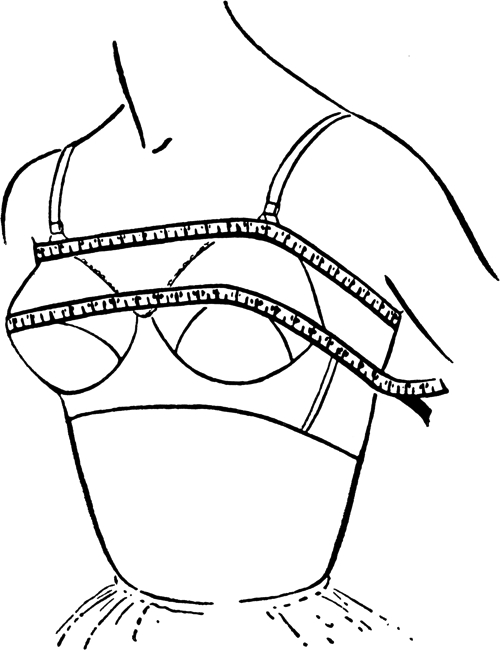
I am taller than average (5’11). I would expect to have to add some length in the bodice so that the waist falls in the correct place. The pattern measurements give the back length, which is a neck-to-hem measurement.
However, I also need a neck-to-waist measurement. At least, I think I do – I’m new to this!
How do I calculate this? I’m looking at the pattern pieces and thinking x amount for the seam allowances, but I can’t work out if I also need to allow some extra for encasing the elastic.
I do hope my question makes sense!
You are on the right track! You can measure the height of the back bodice piece along the fold, then subtract out the seam allowances:
3/8″ for the top hem
3/8″ for the waist seam
1 3/8″ for the casing
So the grand total to subtract is 2 1/8″.
Hope that helps!
Thanks, Devon!
This is great – thank you.
Sure!
And one more thing – if you’re using a woven, you’ll want to subtract another 1 3/8″ from the measurements I listed, because when you flip the elastic flap up and stitch it down, you’re taking a bite out of the bodice instead of the skirt.
That’s another useful tip; thank you. Knitted version this time, and making a muslin into the bargain, but I may well make a woven version sometime.
I am glad I checked about the measurements and how to adapt; I needed to add nearly 3″. It feels like a lot and may be too much, but I guess it’s easier to rip a seam and re-sew smaller than it is to have started off too small. Will definitely need the practice version!
Devon,
Adding 3″ doesn’t sound outrageous to me. I am 5’1″ and I have to decrease the bodice height by about an inch on everything. What I wouldn’t give to be 5’11”!!
I’d like this dimension, too! Long-torso folks unite…
Will it be possible to use french seams with a woven fabric?
All the interior seams on the bodice are covered by the front lining, so you won’t need to do them there.
You can do one when you attach the bodice and skirt together if you’d like, just remember that the overall total seam allowance is 3/8″. So you could sew the first pass at 1/4″, trim, and sew the second pass at 1/8″.
Here is a tutorial for doing pockets with french seams:
http://www.sewmamasew.com/2013/07/in-seam-pockets-with-french-seams-sewing-with-deborah-moebes-2/
Or, you could just skip the pockets and do french seams very easily on the skirt seams.
First off thank you for the information about the measurements used in the bust drafting. Turns out I don’t need a FBA! That is a first for me!
Second, with the Moneta I did a narrow shoulder adjustment and it worked beautifully. Is there a similar adjustment for Myrtle so the shoulders won’t keep falling my shoulders? Thanks. Lynnelle
You could try the same adjustment on the Myrtle! Just trace off half the front bodice, using the fold line as the top, do your adjustment to the shoulder seam, then retrace it to create the mirror image again.
You could also try slashing from the center front of the cowl over to the stitching line at the bottom of the armscye, and then rotating the whole shoulder section toward the center.
Also if you do the shoulder tabs, you can button them around your bra strap, which will also help keep them up.
Thanks I may try the slashing and rotating option as the bra straps don’t even always stay put. ( Will be attempting to make my own to remedy that in the future.)
I am busty and long-waisted.. I am happy I don’t have to do an FBA, though as a newby, not sure I would want to. But I was planning to adjust for my long waist. I read an entry on 3 Hours Past about measuring from the front instead of the back and would like your thoughts. If nothing else, I don’t have to drag a friend over to measure me. Thanks. I am excited about sewing again after 40 years!
Measuring the front is a little trickier because of the cowl. If you do measure from the front, measure from the shoulder down.
Also if you have enough extra fabric to do a muslin of just the bodice, that can be very helpful! You can cut just one half the front bodice piece to save on fabric (skipping the self lining part). Just slap together those shoulder and side seams and try it on, then fold up the bottom edge 1 3/4″ to see where the bottom edge of the bodice will land on you.
Boy, give an engineer a sewing machine and it’s real trouble. My Engineering-OCD is really kicking in.
How do I know if I need to do a shoulder adjustment, without making a muslin? I’m using jersey knit so there will be some give, but I’m definitely wide-shouldered. What do I measure, on me and on the pattern? Thanks!
LOL! I was wondering the same thing. As a mathematician, I once found myself using calculus to figure out the curve of an armscye, (armhole) of a knitting project. My mother, a lifelong knitter, just sighed and shook her head. I could see what she was thinking…”such a smart girl, no common sense!”
Calculus! That’s awesome! My mom is also a lifelong knitter but a physicist to boot, so she totally gets our kind of crazy…
Haha that’s amazing!
I recently used the pythagorean theorem when drafting a peplum and felt pretty good about myself, but calculus!
The truth is, you don’t know 100%. You can put the paper piece over yourself and get an idea, but until you make it it’s very hard to tell how it will fall on your body.
With the stretch of the knit and the cowl neck, you’ll probably be ok. If in doubt, you can do a mockup of the bodice only just to see. You can even cut just 1/2 of the front bodice – skip the lining half – to use a very small amount of fabric.
I’m using a woven, so I may just take your suggestion of making a half bodice, wouldn’t be that difficult if I have enough fabric.
My bust and hips measure for an XS but my waist is S. Should I adjust the waist size to a small. I don’t want the dress to be to small but I also don’t want it falling off my shoulders. I have not done garment sewing in years so not sure about the correct pattern size.
I would cut the XS in the bust and then cut out to a S by the time you get to the waist. Then I would just cut the S skirt to make things simple. It’s only 2″ bigger than the XS, which won’t register much different given the fuller style.
Just remember to change both the front and the back bodice pieces.
Thank you – I had the exact same question! Now I don’t need to ask it. (Thanks, Robin.)
Thanks, I think that will be easier than adjusting the bust.
Ok. I’m cutting the 2X/3X size and I have 3.5 yds of fabric but as I placed the pattern on the fabric last night it looks like it is about 1/4 yd too short. Now I didn’t go back and measure the length on the skirt pieces to see if I needed to adjust the length, I am doing the longer version but from just eyeing the pattern I don’t think so. I’m 5’7″ so I think the pattern is about right. Anyone else have this problem? Any thoughts on a work around? I’m worried I need to lengthen the bodice and so I don’t think I can cheat it much closer as several pieces have to be cut on the fold. Thanks for any help.
Hm…some knits shrink a lot when you wash them, maybe that’s what happened? If you cut the pockets out of something else (or skip them) would that free up enough room to shuffle things around a bit?
I am about 4’11” and have a shorter back measurement than most sizes. I know I can shorten the bodice, but I don’t know how much. The back length (neckline to waistline or elastic waistband) isn’t listed anywhere on the pattern. Thanks for your help.
You can measure the height of the back bodice piece along the fold, then subtract out the seam allowances:
3/8″ for the top hem
3/8″ for the waist seam
1 3/8″ for the casing
So the grand total to subtract is 2 1/8″.
Hope that helps!
I’m not sure I understand. Don’t I need to know the original back measurement (for the size of person this pattern was designed for) and then compare that to my own back length? Thanks.
Most of the time you don’t have access to that kind of specific measurement info. So it’s just easier to measure the pattern piece, determine the finished size, and then compare that to your own body measurement.
Devon- thanks for answering all these questions! Above you wrote “If your fabric has similar right and wrong sides – for instance, a solid color – you may find it useful to mark a small ‘x’ on the wrong sides of all the pieces.”
How do I know which side of a solid is the right side and which is the wrong side? thanks! *I’m new to this knits thing* :)
If you look closely – very closely – at jersey, you will see that one side has tiny “v” shapes of thread, and the other has little pebbles or points of thread. The side with the “v” shapes is the right side.
Some knit fabrics look the same from the right and wrong side, based on the way they are knitted. In that case, if you truly can’t see a difference, I usually just designate one side to be the wrong side as I’m cutting, and mark it accordingly. That assures that if there are any mirrored pieces, you end up with a right and left of each one!
Question about lengthening/shortening…on the pattern the line to lengthen or shorten is about 2″ higher on the back pattern than it is on the front….is this normal? I sort of thought they should be at the same level, or the front and back flare don’t match up??
No, it’s ok if they aren’t in exactly the same spot! As long as you lengthen/shorten by a consistent amount. It’s in a place on both where the shape won’t really be changed once you blend the line together.
thanks, I should have known that after all my Craftsy classes, duh. Now one more question…I noticed my bodice is not symmetrical in length when I fold it at the shoulder fold line…one is 1/2″ longer…was it drafted that way, or is that a poor printing/taping job on my part? Thanks for your time. Good to have a chance to ask the questions that come up, less guess work next time.
They should be the same. It might have happened when you cut it out. To check the pattern piece, fold the paper in half and see if it lines up with itself.
To fix it I would just trim the longer one to be even with the shorter one. No biggie!
Hello dear Myrtlists !
That’s it, I have the right fabric, I still have to adjust the length (I am 6ft). One question I have is : why is the seam allowance so narrow ? 3/8” is very unusual…