

In this post we will cover how to do a Small Bust Adjustment for the Myrtle. You’ll find this helpful if your pattern cup size is smaller than a B cup for XS-XL and D cup for 2X and 3X.
Pattern Cup Size
When sewing, your cup size is determined by the difference between your high bust (also called upper bust) and full bust measurements. It may or may not correlate with your bra cup size, so you should not use your bra size for reference.
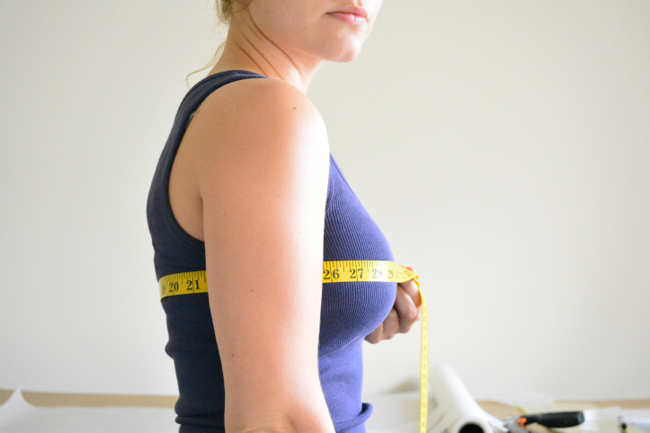
Your high bust measurement is the distance around your chest above your bust, under your armpits.
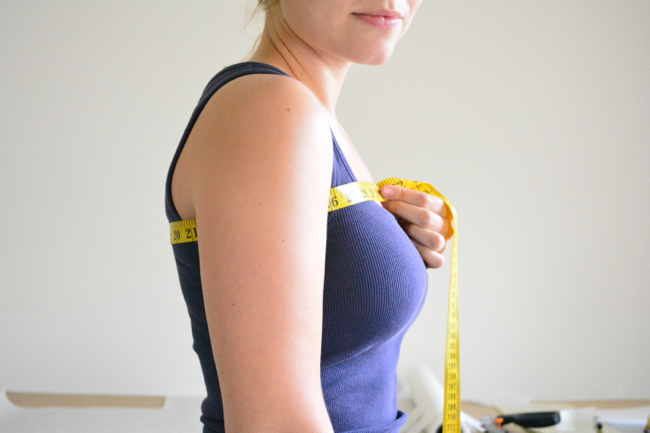
Your full bust measurement is across the fullest point of your bust.
A difference of 1” is an A cup, 2” is a B cup, 3” is a C cup, etc.
Some fitting problems that may indicate you need a SBA:
- When you choose a size based on your full bust measurement, the finished garment is too tight in the shoulders/armscyes/upper back.
- When a garment fits you in the shoulders and across the upper back, across the bust it is baggy, gaping and too loose.
Most sewing patterns are drafted for a B cup, but Colette patterns (XS-XL) are drafted for a C cup. That means they assume a 3” difference between your upper bust and full bust. If you have a difference of 2” or less, then you are a SBA candidate.
Colette’s plus size patterns (2X and 3X) are drafted using a different fit model with DD cups, meaning they assume a difference of 5″. So if you have a difference of 4″ or less in those two sizes, you are a FBA candidate.
Choose a size and SBA amount
For this post, I’ll be working with measurements of a 32” high bust and 34” full bust to illustrate. Just substitute your own measurements in as you follow along.
To choose our size, we are going to select based on our high bust measurement so that it fits in the shoulders. Take your high bust measurement and add 3” for the assumed C cup. This is your imaginary full bust measurement that you will use to pick your size. So, if my high bust is 32”, my imaginary bust measurement is 35”, so I will choose a size Small.
Now we have to figure out the difference between the imaginary and real full bust measurements. If my full bust is 34”, that means I need to subtract a total of 1” across the bust. Because we are only going to be doing the SBA on one side of the bodice – the front bodice is cut on the fold – I need to subtract half that amount, since it will be doubled when the fabric is cut. So I will subtract 1/2” when I do the SBA. Whatever your measurement is, we’ll call it [X].
Do the SBA
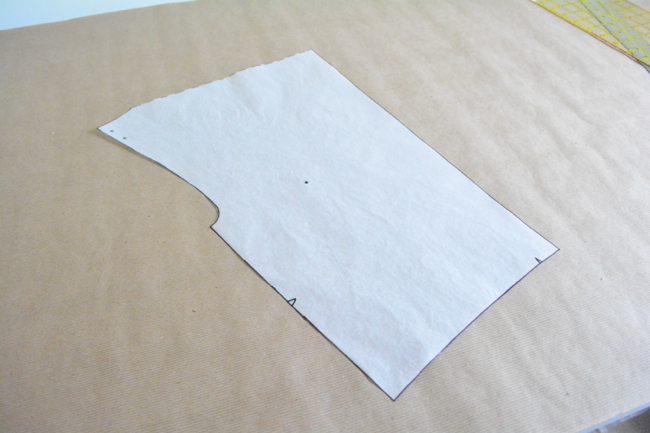
Myrtle’s front bodice is unique in that it’s a mirror image that will be folded in half to create a self lining. For the SBA, we are only going to work with half, then retrace it when we are finished to recreate the fold line.
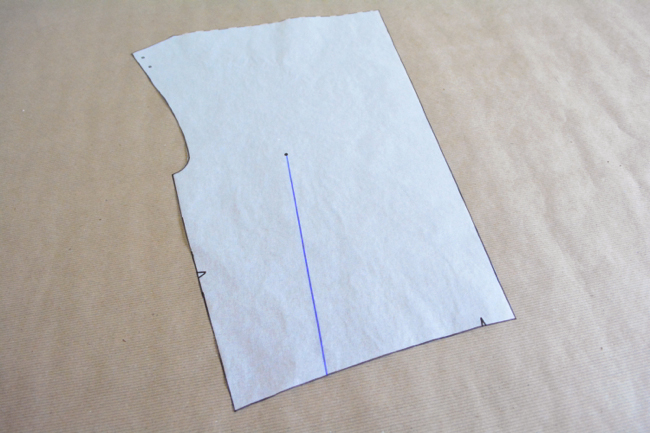
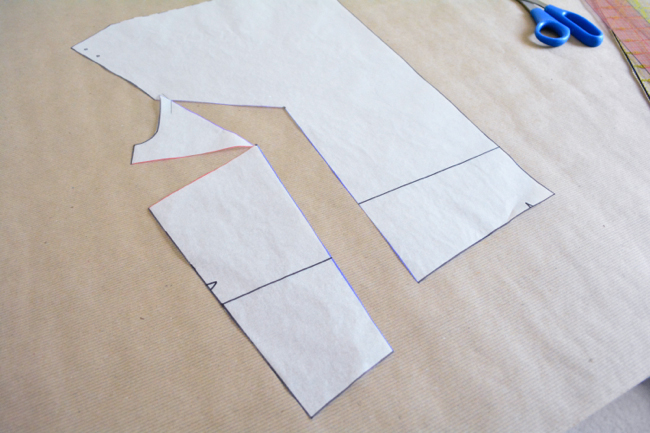
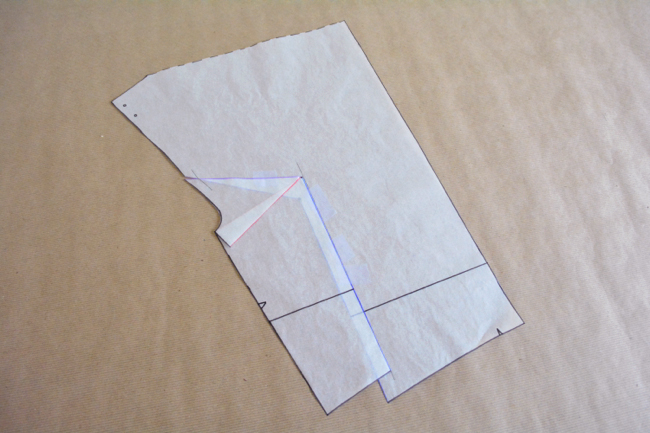
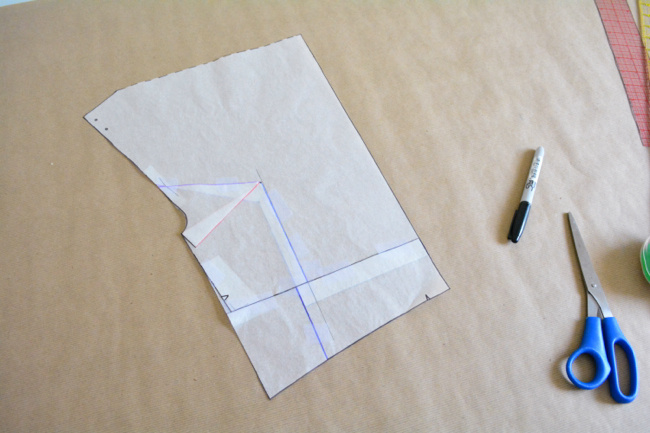
Trace off the front bodice in your size, using the dotted shoulder fold line as the top edge of the pattern piece.
Hold the pattern piece over your body and mark your bust point, which is the fullest part of your bust. Use the side seam and armscye to make sure it’s properly positioned.
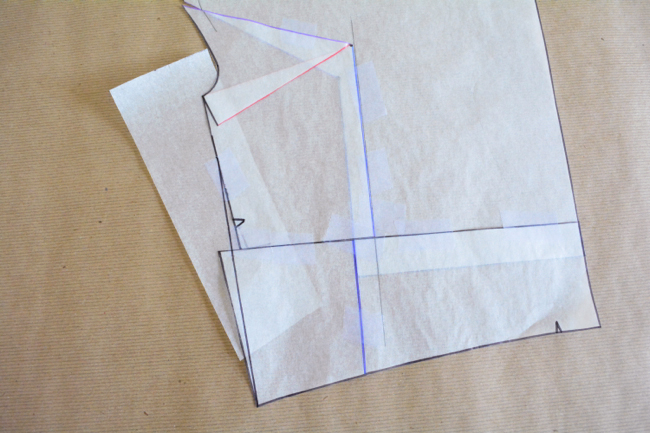
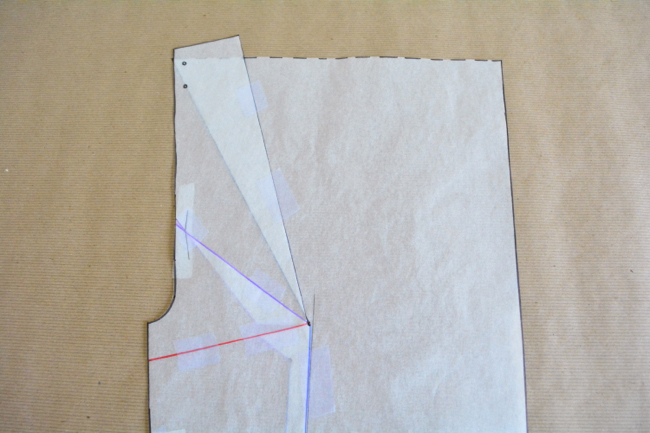
Now we are going to draw some lines. Draw a line from the bust point down to the bottom, parallel to the center front edge. This will be line A.
Draw a line from the bust point out to the armscye, about a third of the way up. This will be line B.
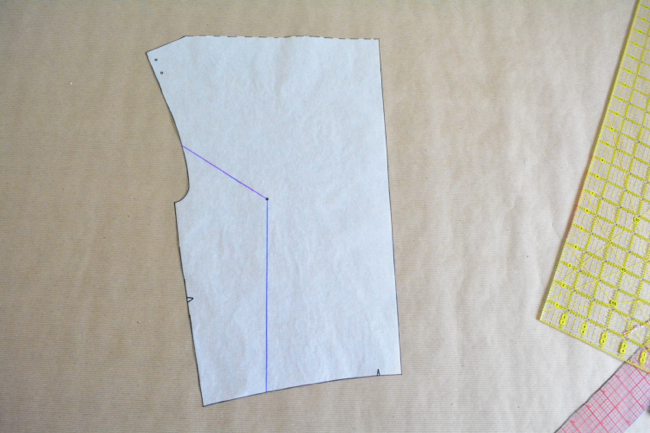
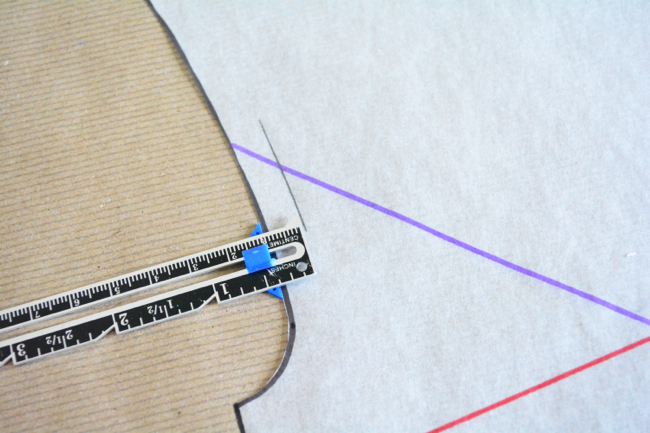
Draw a line from the bust point out to the side seam, about where there would be a bust dart (1-2″ from the top of the side seam). This will be line C.
Draw a line perpendicular to line A, right under the notch on the side seam. This will be line D.
 (Note: You can also use the lengthen/shorten line as line D.)
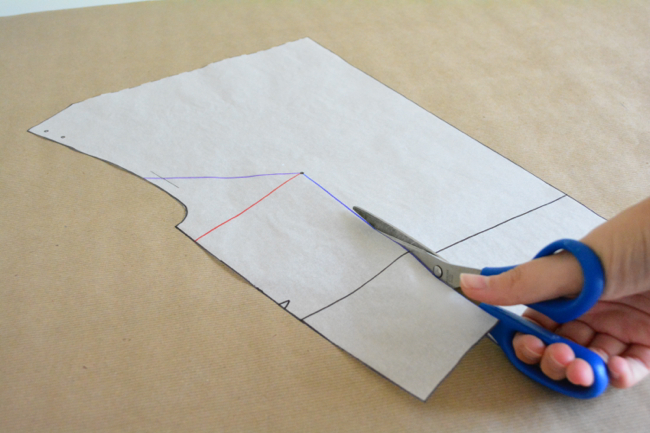
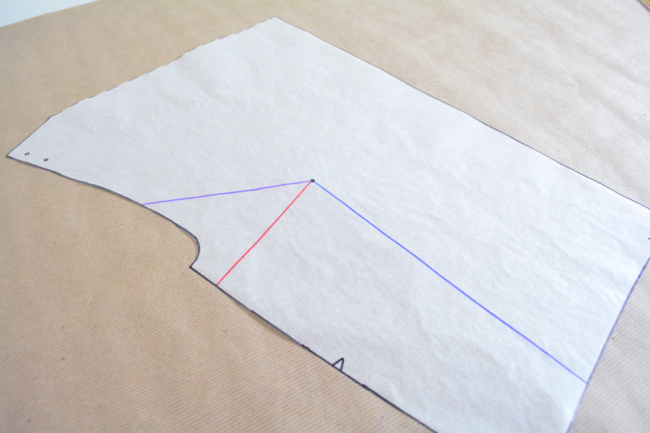
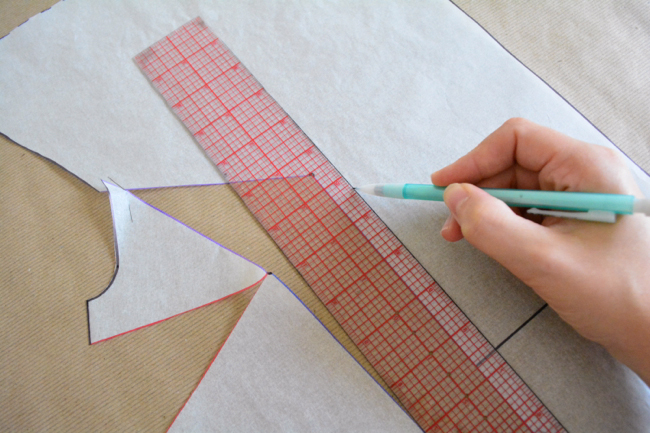
Lastly, draw a line along the stitching line at the armscye, across line B. Since our seam allowance is 3/8”, this means 3/8” in from the edge. Draw several short little lines to make it an accurate curve.
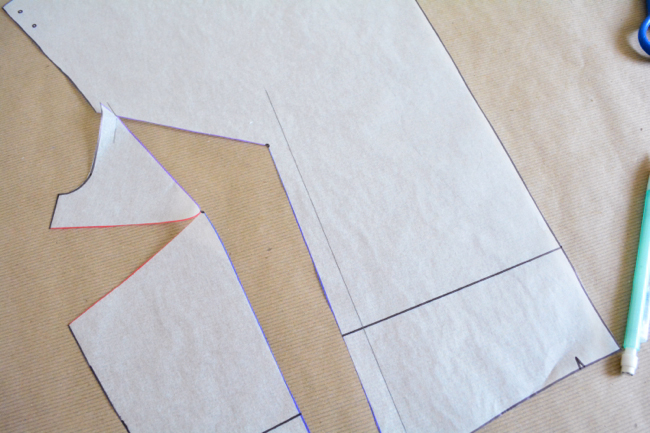
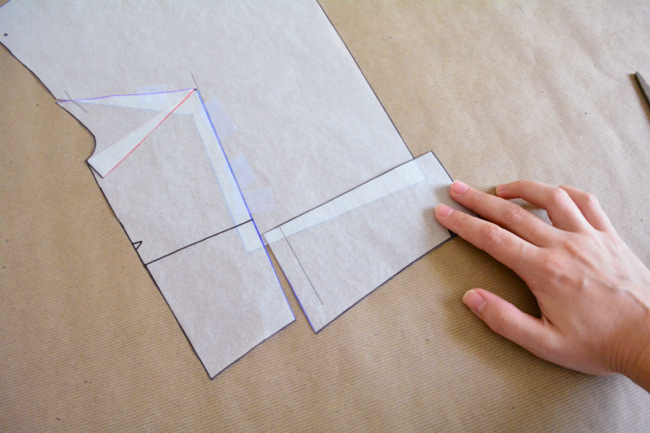
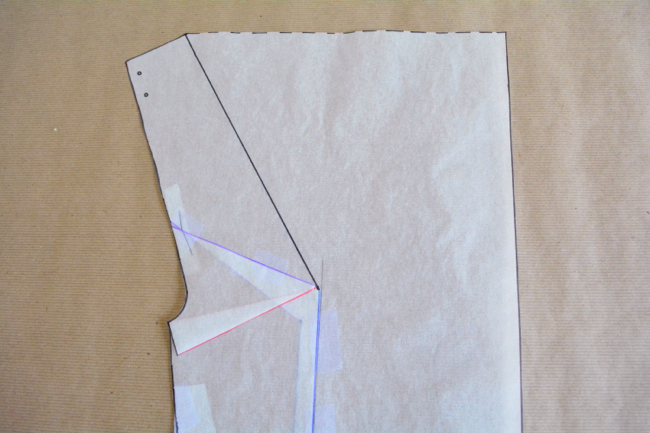
Ok now we are ready to slash! From the bottom, cut up along A, then onto B, all the way up to but not through the stitching line.
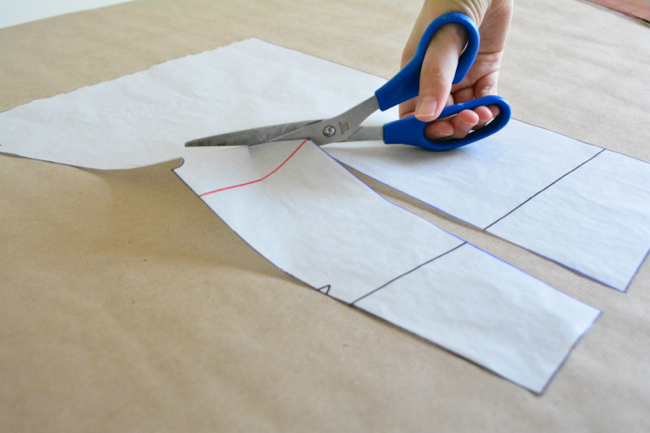
From the armscye edge, cut to but not through the stitching line. The goal is to leave a little bit of paper intact so that you have a hinge.
From the side seam, cut along line C to but not through the bust point, creating another hinge.
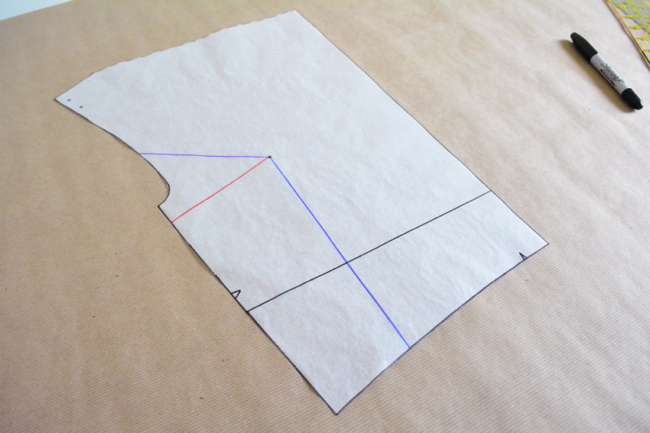
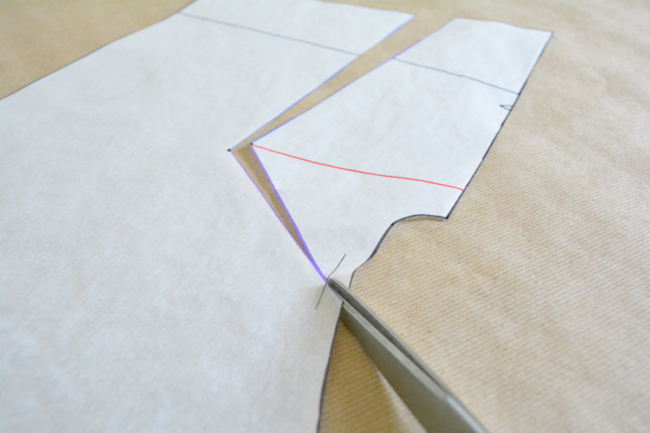
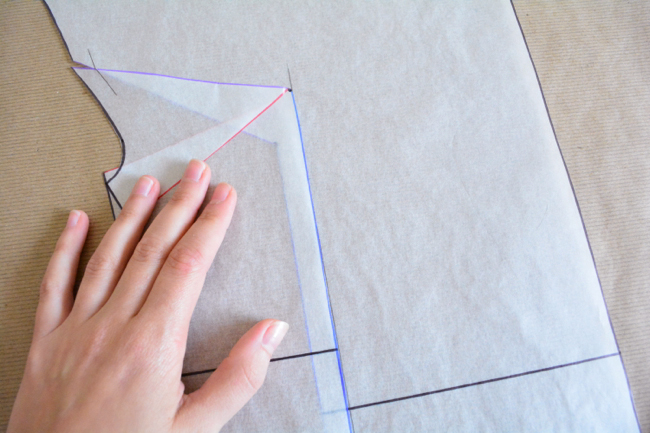
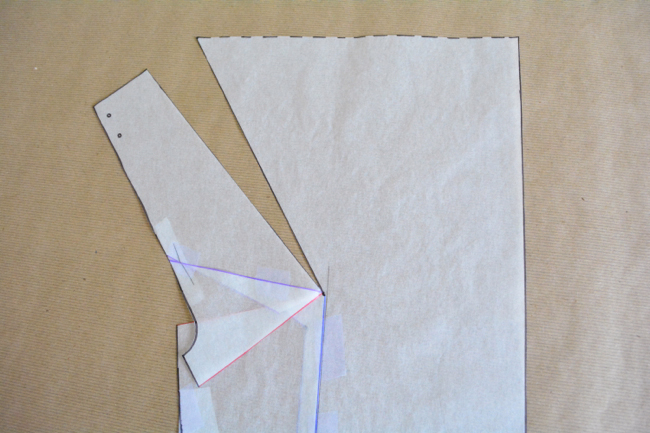
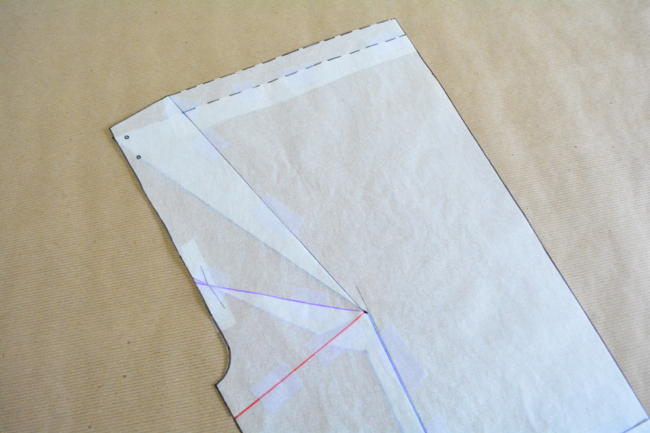
Now is the time to remember your SBA amount, [X]. Draw a line to the right of line A, parallel to the cut edge, [X] distance away. Mine is 1/2”.
Use the hinges to overlap the left side of the pattern piece and position the cut edge along the line. Tape in place above line D.
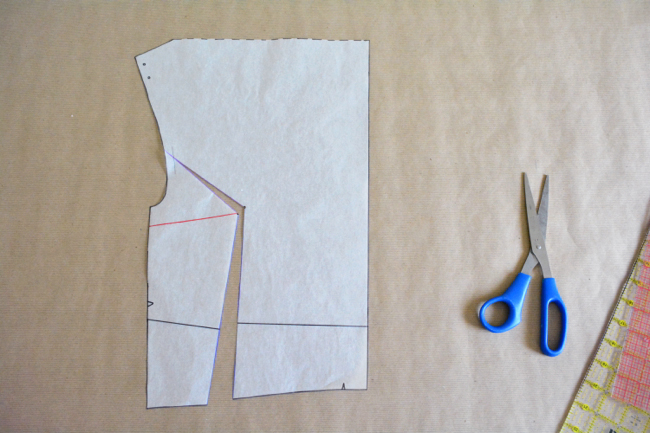
Now we must account for the length we’ve taken away and even up the bottom edge. Cut the right side of line D, and reposition so that it lines up with and is parallel to the left side of line D. Tape in place.
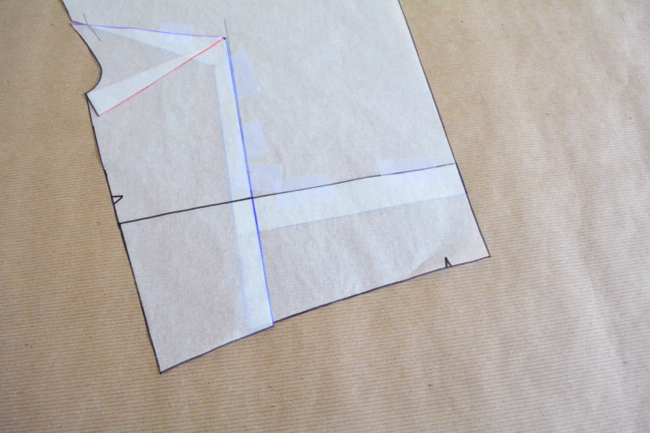
Lastly, we will readjust the waistline. We want to keep our decreased width across the bust, but we want our bodice waist to still match our skirt waist. Cut along the left side of line D and slide the bottom piece over to the left so that the lower half of the bodice is no longer overlapping. Tape.
Redraw the side seam edge with a curved ruler, blending from below the bust to the bottom.
Use a ruler to neaten up the armscye and trim all paper.
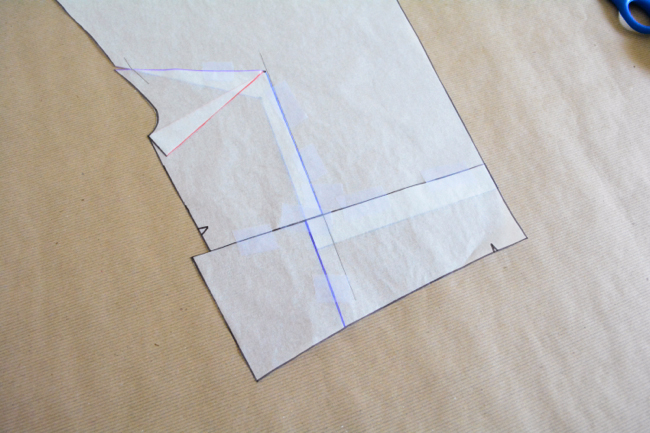
Finishing
We have decreased the fullness across the bust, but we also shortened the length of our side seam. Since we’re working with a knit, we have a couple different options for how to deal with this.
- Ease it in. You should be able to ease the back side seam into the front as you sew. If you feel like the difference is too great, you can cut a piece of clear elastic the length of the front side seam and baste it to the back side seam while stretching it, then sew the edges together. Check out this post on The Coletterie for more help with clear elastic.
-
Rotate the bust reduction into the cowl (detailed below). This will take a bit more patternmaking work, but it will move the side seam change into the cowl. This will return the side seam to its original length without changing the amount of fullness, but it will slightly change the scale and size of the cowl.
Rotating the SBA into the cowl
Draw a new line from the shoulder point down to the bust point.
Slash along this line up to the bust point to create a hinge. (You may also have to cut through a layer of paper that is now under line C.)
Rotate the shoulder on the hinge to return line C to its original place. Tape.
Draw a new top edge from the shoulder to center front, perpendicular to center front.
Wovens
If you’re working with a woven, follow the main instructions. Then you can either rotate the SBA into the cowl as detailed above, or you reduce the length of the back side seam to match the front.
Redraw bodice piece
Once you are completely finished doing any adjustments to your pattern piece, retrace it on a new piece of paper, then flip it over the top edge and trace again to get your entire front bodice piece. Transfer any fold edges, dots and other labels.

If you have any questions, please ask away in the comments!
Comments
This was super thorough. Thank you! I’m going to make my first Myrtle straight through and then see if I really need the SBA. I’ll know where to find the directions when I need them.
Glad it was helpful!
Thanks for this. I just finished a pattern fitting class and learned a lot about adjusting for my particulars. I didn’t realize that Colette patterns were C cup! That explains why all of my old blouses have such weird bust darts! Question: couldn’t you just add back the length that was taken out of the center front/side and avoid having to ease it in?
Part of doing the SBA is decreasing the amount of fabric going across the bust, because if there is less fullness that means it takes less fabric to travel over the bust. So if you were to add length back in you would kind of be undoing some of the SBA adjustment you just did. It would be better to shorten the back side seam to match the new front, then blend it back down to the original back bodice length.
Hi Devon, Once you’ve rotated the SBA into the cowl, will the pattern piece lower left front edge now be longer than the lower right front edge? The photos above don’t show what happens to the lower edge once you have returned line C to its original position.
On the suggestion above to ‘shorten the back side seam, then blend it back down to the original back bodice length’ … what do you mean? If you’ve shortened the side seams, does blending back down mean adding length back in starting at the side seams and grading to a longer center back? Thanks!
The left edge [the side seam] will be returned to its original length. Nothing changes in the lower half of the pattern. If you go back up to the picture right before “Finishing,” the final pattern piece will look just like that, except with the upper right part rotated so that the overlap of “C” is no longer overlapping.
For the back side seams, you can shorten them at the side seam to match the new length of the front bodice if you don’t rotate the adjustment into the cowl. However, presumably the back bodice fits, so you don’t want to shorten the whole thing. Instead you want to blend from the newly shortened side seam down to the cutting line for your original cut size on the back bodice.
I would still try easing together first.
I hope this answers your questions!
I am doing a SBA and am following your instructions. I am reducing to an “a” cup, and I would like to add length to my bodice and skirt. I have already lengthened the skirt pieces by 1 inch and would like to do a similar length adjustment to the bodice. Should I just add length to the front bodice pieces after I have completed the SBA? The difference in length between the front and the back bodice pieces is not quite significant after I completed the SBA to a “a” cup.
Sorry, I meant to say that the difference in length between the front and back bodice pieces is quite significant :)
I think it would be technically better to do the lengthening adjustment first, then the SBA.
I will do a SBA on the medium size ( I am 34″ above bust and 35″ around the bust). However, size M will be large through the hips (mine are 37″ around). I think I probably want to make it smaller. What is a good amount of ease there?
Next, the instructions say to mark a line from the bust point to 1-2″ from the top of the side seam. What is the effect of marking at 1″ vs 2″, if any?
And a really basic question. Any recommendations for tracing paper?
Hi Anne!
The pattern is designed to have 6-7″ of ease at the hips. If you’d like, you can cut down from a size M to a size S by the time you reach the hips. That will keep the style lines of the skirt consistent with the pattern samples. If you cut a straight size M skirt, it will give you 9″ of ease at the hips. So it will be fuller than the pattern samples, but it would still be well within the realm of reasonable skirts.
There is really no difference between the 1-2″. We just need to slash the pattern at that point to allow it to spread or overlap. If we were to slash down to the bottom of the side seam, there would be a bigger discrepancy between the overlapped corners, because the slash would be longer. So it’s just easier to clean up the edges if we have a shorter slash, which ends up being about 1-2″ below the armhole.
I get tracing paper at my local art supply store. They sell it in big rolls of many different widths and different yardages. I got a 36″ wide roll for under $20. Unfortunately I can’t remember the brand, sorry!
Does this result in a shorter length from shoulder to waist? Should I just add the amount back in to the bottom that the overlap took out?
Yes, you can do that, as long as you blend it back to the bottom edge [as opposed to evenly adding the amount across the whole bottom]. You can also just ease the edges together if you’re working with a knit and the difference isn’t too great.
Also part of doing an SBA is to decrease the length from shoulder to waist across the bust, because it takes less fabric to travel the distance of a smaller bust.
So in my previous reply, I was referring to drawing the side seam longer to account for the overlap, but blending that back to the new shorter bodice length determined by the SBA. I hope I didn’t make that sound more confusing that it needs to be!
Anne,
We have the same measurements! I’m going to try the SBA and will decrease down to small for the hips.
I am excited to make the SBA adjustments, sadly I do struggle with the instruction to draw line A: “Now we are going to draw some lines. Draw a line from the bust point down to the bottom, parallel to the center front edge. This will be line A.”
Could you tell me please which line the “center front edge” is?
thank you with all of my heart!
Of course! The center front is the edge labeled “place edge on fold of fabric” on the pattern piece. In the photos, it’s the right edge of the pattern piece.
Thank you so much Devon!
Love this tutorial! This is the most clear SBA tutorial I’ve read, and I love that making the SBA doesn’t require a muslin first. Will this technique (subtracting the cup size difference) work on non-cowl SBAs as well?
Yes it will! If you’re doing a pattern with bust and waist darts, then the lines A and C are drawn right through their centers.
I’d still do a muslin after you do the SBA, just because you’re doing kind of drastic things to the pattern piece. But yes, it’s nice to be able to do the changes first before you even sew anything!
Remember too that most pattern companies draft for a B cup, which will change the amount that you’ll need to adjust for a SBA.
Thanks so much!
I measure the same for my bust and high bust measurements. 37″ So just to check, I should make a large and remove 1.5″? Thanks!
Yes that sounds right!
I’m having trouble getting the 1.5 in to come out… my hinges just don’t seem to allow for that. Any thoughts?
Also, pivoting this much to the cowl will make it barely a cowl, won’t it? So, I’ll need to add back?
What a great tutorial! Since this is for the front, how do you shorten the width in the back, so that it won’t bulge? Will there be a tutorial?
Thanks! There won’t be a tutorial for that, but if you need to take width out of the back you can just take it out at the center.
This has been really useful; thank you.
The guidance about using the high bust measurement to select the size, because that meant it would fit across the shoulders, was a complete revelation. I was on the borderline between sizes and I shifted down a size, from 2XL to XL. I decided I probably didn’t need to make an FBA (there was only an inch in it), but I did add 3 inches for height. I made a muslin last night to see how it fits, thinking that I might need to make further amendments, but in fact it fits neatly across the back, no slipping at the shoulders, no gapping at the arms, and a lovely amount of drape at the front. I might add a bit more height in the bodice, for the final version.
I am completely thrilled!
I am going to have to complete the muslin; it may have been made from the cheapest jersey in the shop, but the top looks fantastic. Definitely wearable.
That makes me so happy to hear!
And now you get two new dresses instead of one!! :]
So excited about this tutorial! I’m wondering what’s the best way to handle concavity? haha! (37.5 high bust and 33.5 full bust) I’ve been sewing for years, but never had this particular issue. I never realized I need to fit the upper bust so it will fit the shoulders. Such a bummer, since the first blouse I cut for “her” used a Liberty print! With gratitude, Becky
Will reducing the large by 3.5 inches distort the lines of the completed garment too much?
Hi Becky! It may, but if those are your measurements I would try it and do a muslin of just the bodice to see. Based on your first post it sounds like you should do a SBA.
Your front side seam is going to be quite short after the changes, so you may need to redraw it a bit longer when you are finished.
Also, the cowl might help you get away with doing a slightly less drastic alteration, since the final product doesn’t have to fit like a glove [like, say, a woven bodice with darts.]
Thanks! I’ll give it a go!
I have a difference of no more than 1 inch between my high bust and full bust measurement, but I am definitely not an A cup! I’ve been measured before as B or small C. Do I need a bust adjustment?
Is that for bra size? Bra cup sizes are determined by the difference between your full bust and under bust, while sewing patterns go off the difference between full bust and high bust. And to make things more confusing, bra cup size letters change based on band size. So a 34C cup is the same as a 36B cup.
So you could very well be a bra cup B or C, but a pattern size A. It sounds like you could do an SBA, but if you want you can always do a mockup of just the bodice to see how the straight size fits. If you choose based off your full bust size, the dress might be slightly snugger than intended in the shoulder/armpit area, but since it’s a knit and the front is loose and drapey with the cowl, you’ll probably be ok.
High bust was 32.5, full bust 33.5 and under bust approx. 30. I was thinking since the pattern is based off a C cup and I can wear a B or C depending on band size, I would be able to get away without doing the bust adjustments.
Yes, you can give it a shot without any changes! The knit and cowl neck factors mean the fit doesn’t have to be as precise as if you were making something like a fitted woven bodice with darts.
I have adjusted 1inch for SBA and lined up D so bodice is the same length. I am not clear on the waistline adjustment. If I cut across line D and slide the bottom piece to the left it will no longer line up to the fold line. I am confused as to what to do.
First, cut the right half of line D and move that loose piece directly up to make the bottom edge of the bodice even, keeping the fold edge lined up. Then cut the left half, and slide the lower left piece horizontally to the left to bring the waistline back to its original size.
Hi Devon, I made two muslin bodices. The first with the SBA taken out of the side seam with additional length added so the bodice bottom would fall at my waistline.
The second with the SBA taken out of the cowl. I actually like the fit of this adjustment better, except that it significantly reduced the effect of the cowl … essentially minimizing that design detail. Is that to be expected? Or, possibly I did not do the adjustment correctly?
Thanks!
That sounds correct! You essentially added fullness back into the side seam by borrowing some from the cowl.
If you wanted to experiment more, you try slashing the cowl from the top center front corner down to the stitching line on the armscye, and then hinge it to open the cowl back up, and redraw the top line. This could add back in a little more of the fullness!
Brilliant! That final adjustment of opening the cowl up via a slash from top center/corner and hinge at armscye has restored the integrity of the design … the cowl is back! THANKS!
Oh good!!!!! Hooray!