

In this post we will cover how to do a Full Bust Adjustment for the Myrtle. You’ll find this helpful if your pattern cup size is larger than a D cup for sizes XS-XL, and larger than an E cup for sizes 2X and 3X.
Pattern Cup Size
When sewing, your cup size is determined by the difference between your high bust (also called upper bust) and full bust measurements. It may or may not correlate with your bra cup size, so you should not use your bra size for reference.
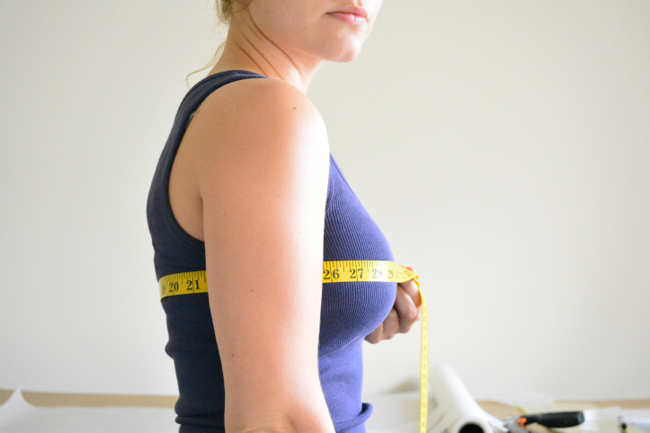
Your high bust measurement is the distance around your chest above your bust, under your armpits.
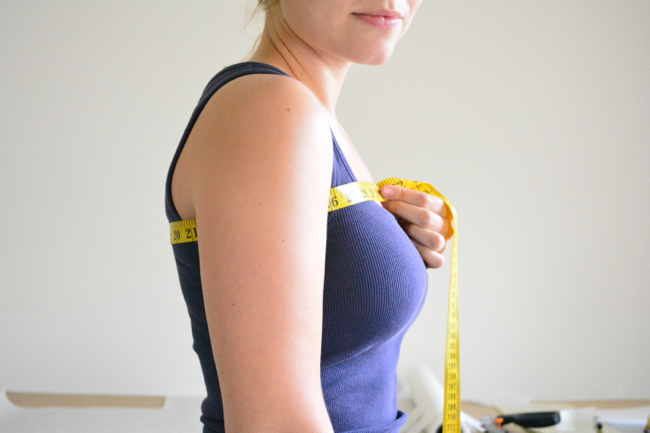
Your full bust measurement is across the fullest point of your bust.
A difference of around 1” is an A cup, 2” is a B cup, 3” is a C cup, etc.
Some fitting problems that may indicate you need a FBA:
- When you choose a size based on your full bust measurement, the finished garment is too big in the shoulders/armscyes/upper back.
- When a garment fits you in the shoulders and across the upper back, across the bust it is straining and too tight.
Most sewing patterns are drafted for a B cup, but Colette patterns (XS-XL) are drafted for a C cup. That means they assume a 3” difference between your upper bust and full bust. If you have a difference of 4” or more, then you are a FBA candidate.
Colette’s plus size patterns (2X and 3X) are drafted using a different fit model with DD cups, meaning they assume a difference of 5″. So if you have a difference of more than 6″ with those two sizes, you are a FBA candidate.
Choose a size and FBA amount
For this post, I’ll be working with measurements of a 32” high bust and 37” full bust to illustrate. Just substitute your own measurements in as you follow along.
To choose our size, we are going to select based on our high bust measurement so that it fits in the shoulders. Take your high bust measurement and add 3” for the assumed C cup (or 5″ for 2X/3X). This is your imaginary full bust measurement that you will use to pick your size. So, if my high bust is 32”, my imaginary bust measurement is 35”, so I will choose a size Small.
Now we have to figure out the difference between the imaginary and real full bust measurements. If my full bust is 37”, that means I need to add a total of 2” across the bust. Because we are only going to be doing the FBA on one side of the bodice – the front bodice is cut on the fold – I need to add half that amount, since it will be doubled when the fabric is cut. So I will add 1” when I do the FBA. Whatever your measurement is, we’ll call it [X].
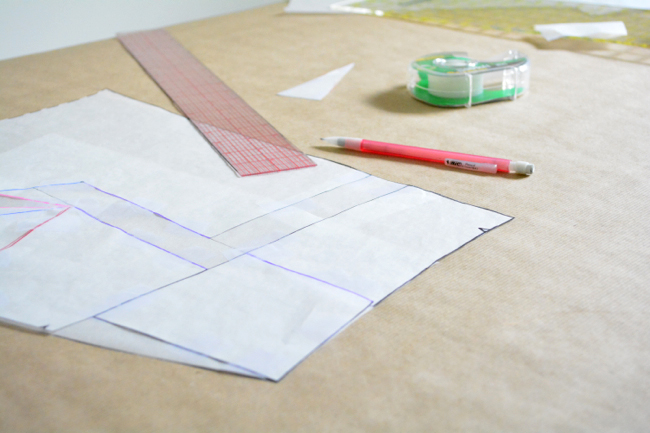
Do the FBA
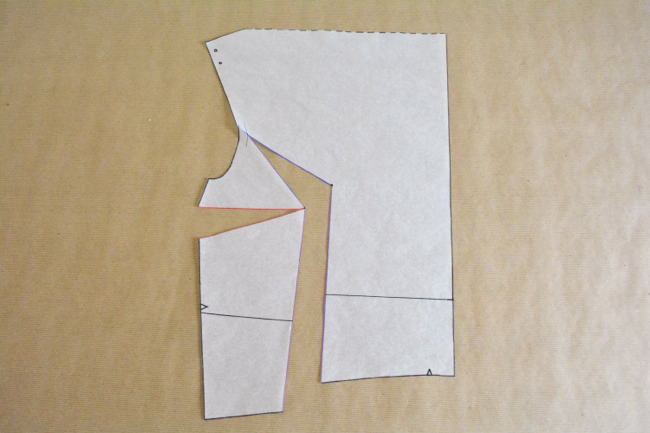
Myrtle’s front bodice is unique in that it’s a mirror image that will be folded in half to create a self lining. For the FBA, we are only going to work with half, then retrace it when we are finished to recreate the fold line.
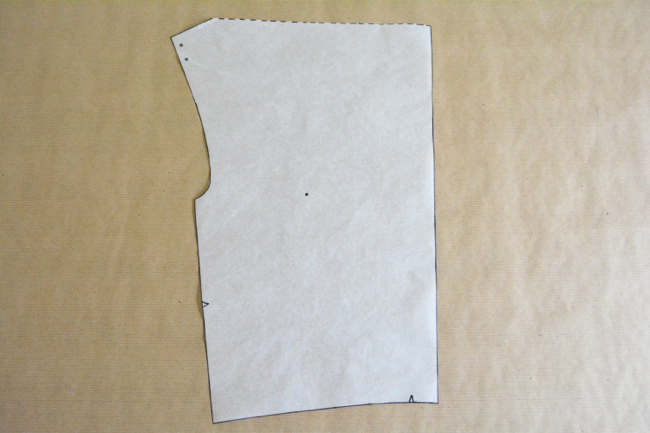
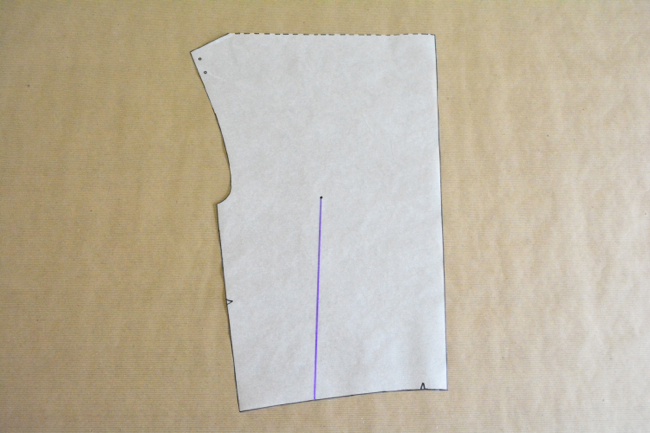
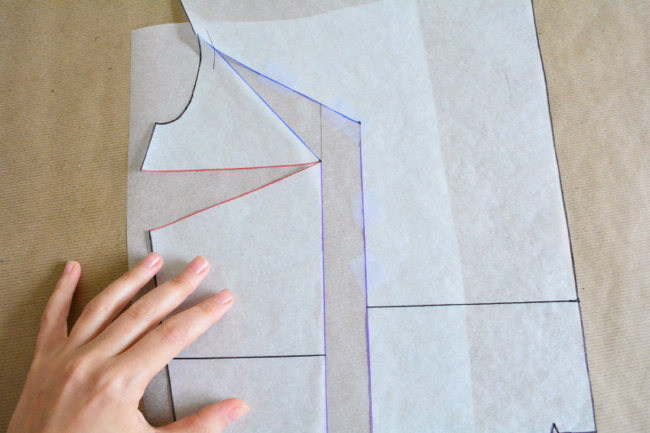
Trace off the front bodice in your size, using the dotted shoulder fold line as the top edge of the pattern piece.
Hold the pattern piece over your body and mark your bust point, which is the fullest part of your bust. Use the side seam and armscye to make sure it’s properly positioned.
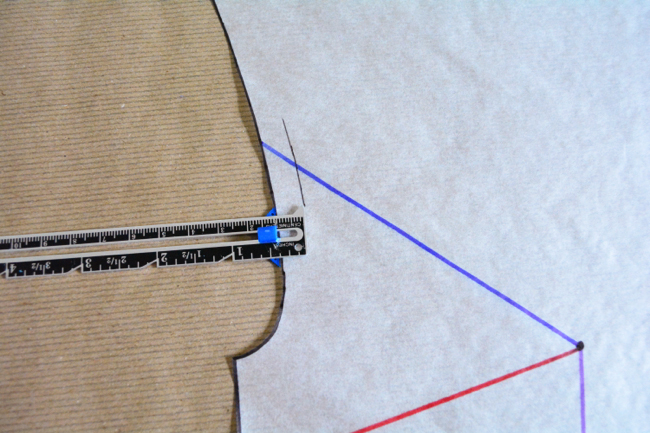
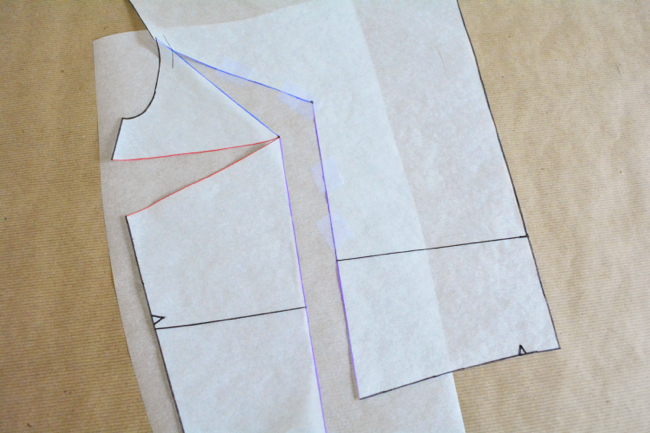
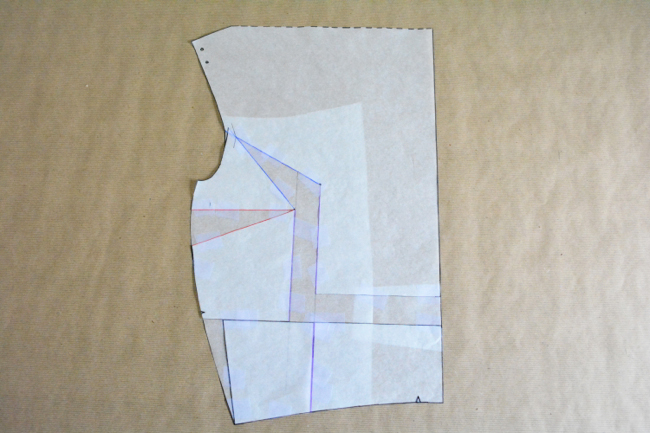
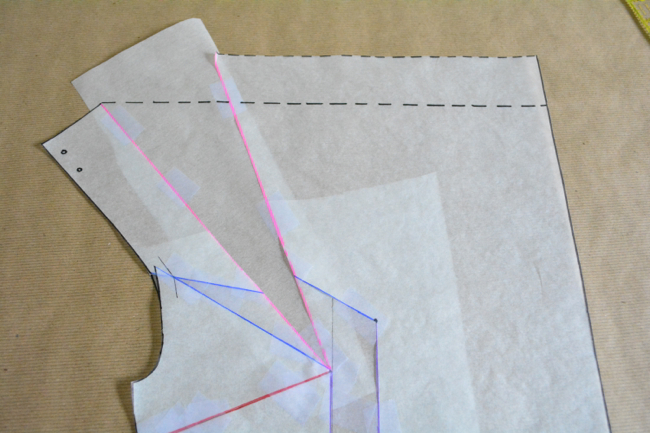
Now we are going to draw some lines. Draw a line from the bust point down to the bottom, parallel to the center front edge. This will be line A.
Draw a line from the bust point out to the armscye, about a third of the way up. This will be line B.
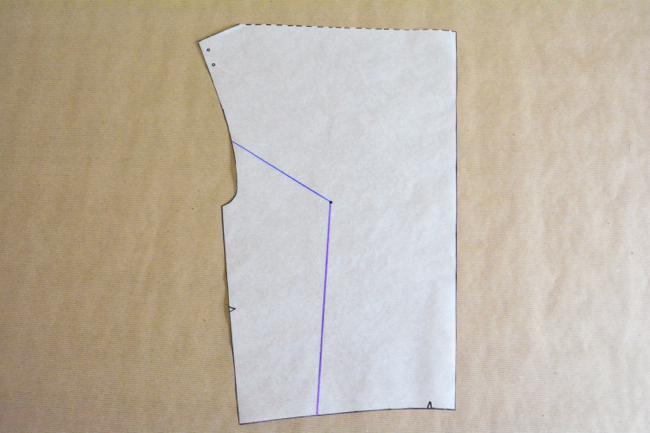
Draw a line from the bust point out to the side seam, about where there would be a bust dart (1-2″ from the top of the side seam). This will be line C.
Draw a line perpendicular to line A, right under the notch on the side seam. This will be line D.
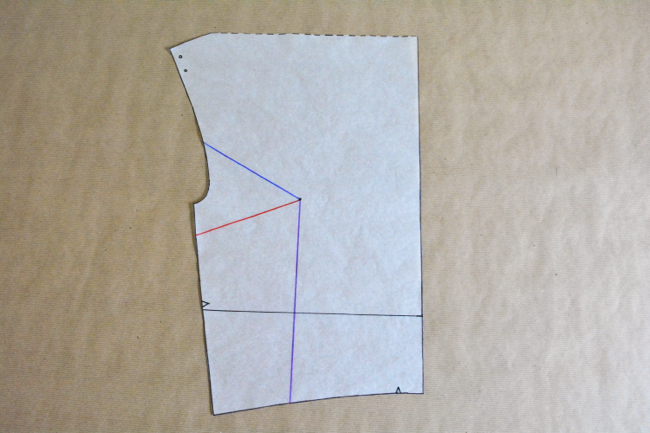 (Note: You can also use the lengthen/shorten line as line D.)
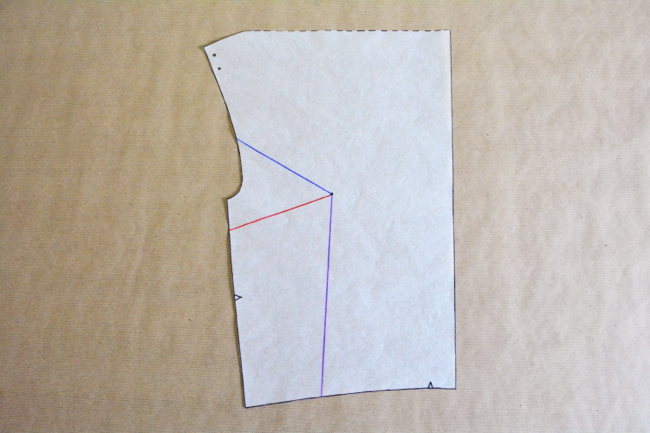
Lastly, draw a line along the stitching line at the armscye, across line B. Since our seam allowance is 3/8”, this means 3/8” in from the edge. Draw several short little lines to make it an accurate curve.
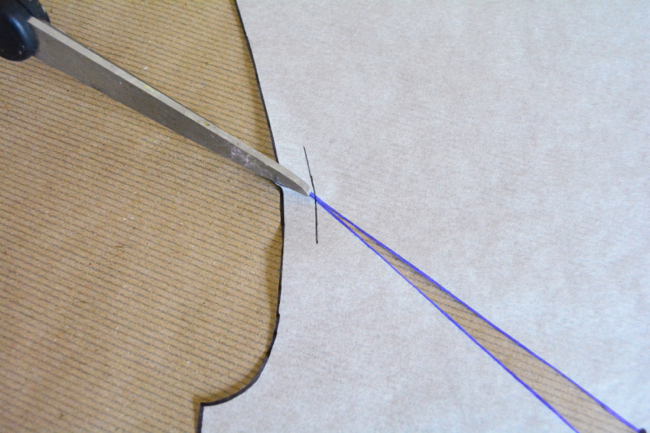
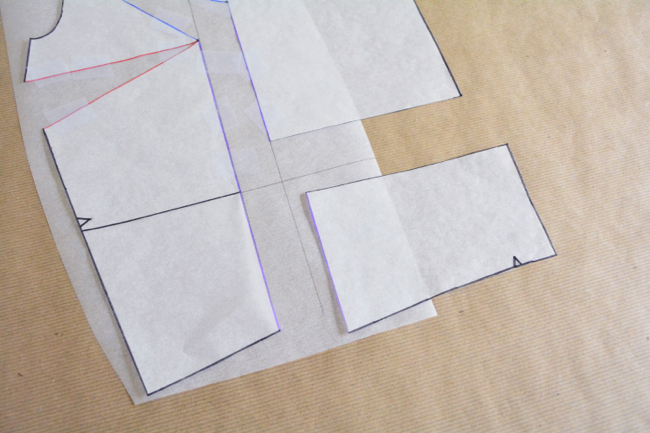
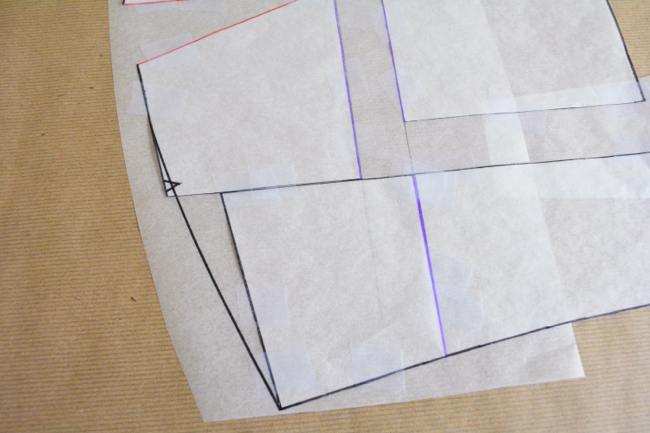
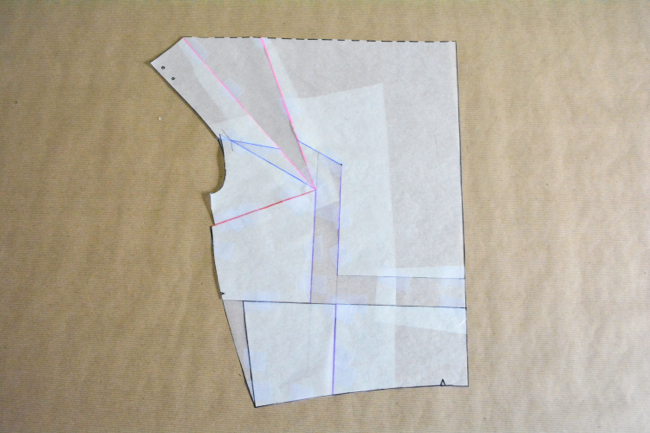
Ok now we are ready to slash! From the bottom, cut up along A, then onto B, all the way up to but not through the stitching line.
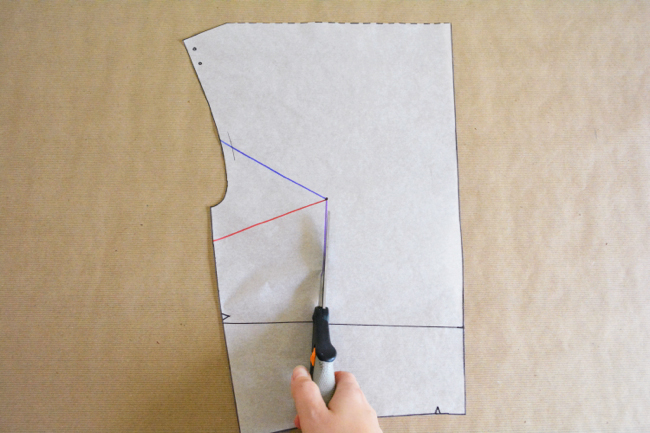
From the armscye edge, cut to but not through the stitching line. The goal is to leave a little bit of paper intact so that you have a hinge.
From the side seam, cut along line C to but not through the bust point, creating another hinge.
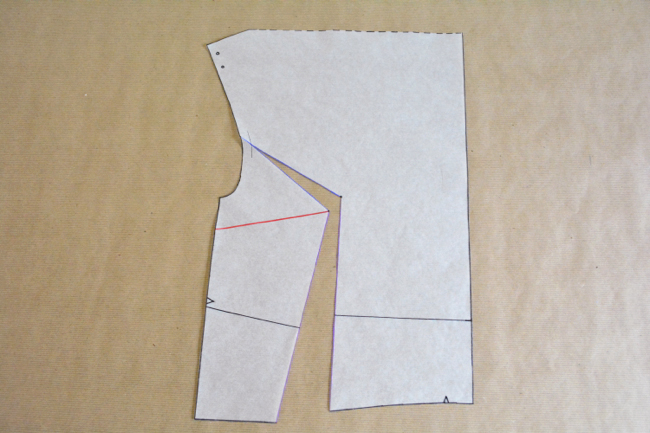
Lay some paper under the gaps you have created. Tape the bodice down on the right side above line D, leaving the left side free.
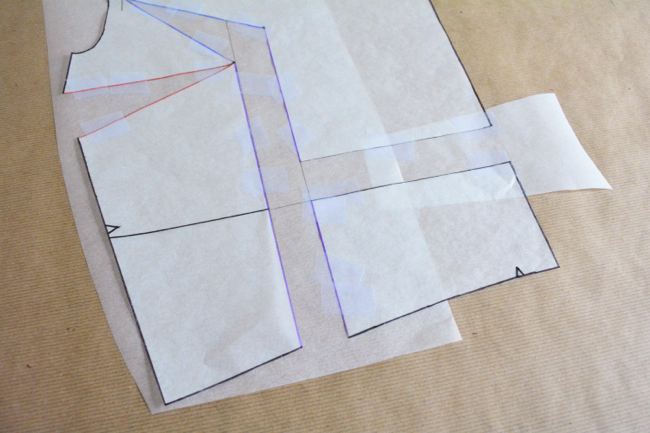
Now is the time to remember your FBA amount, [X]. Draw a line parallel to your cut line A edge, [X] distance away. Mine is 1”.
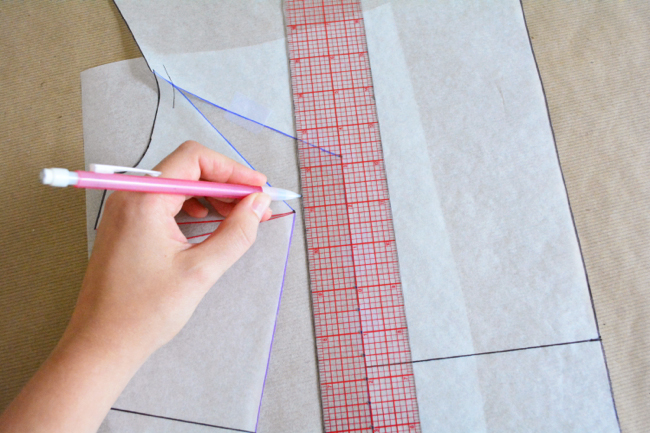
Use the hinges to position the left side of the pattern piece along the line. Tape in place above line D.
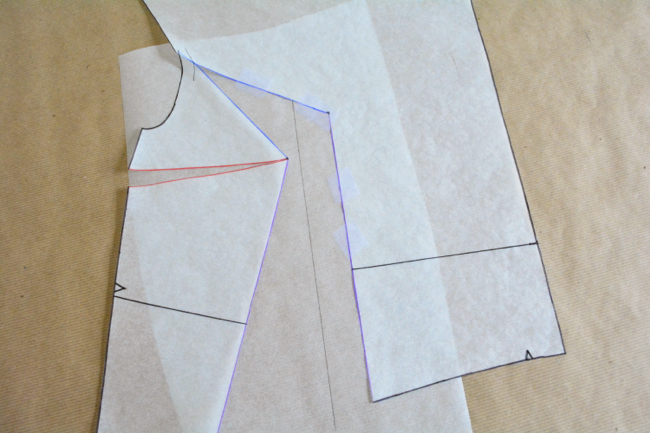
Now we must account for the extra length we’ve added and even up the bottom edge. Cut the right side of line D, and reposition so that it lines up with and is parallel to the left side line D. It will help if you draw pilot lines out from the lines A and D. Tape in place.
Lastly, we will account for the extra width at the waistline. We want to keep the width across the bust, but we want our bodice waist to still match our skirt waist. Cut along the left side of line D and slide the bottom piece over to meet back up with the other half of the bodice. Tape.
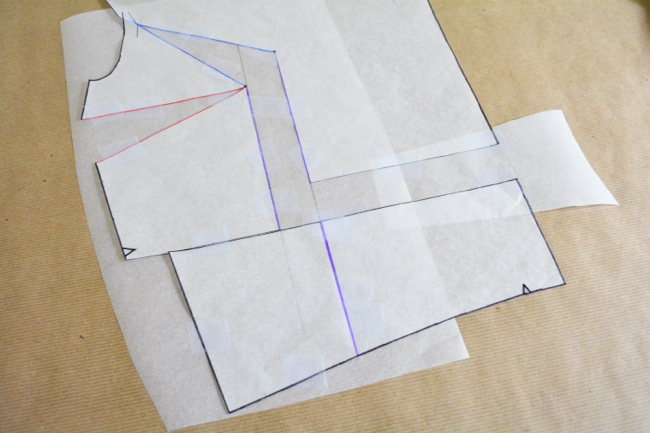
Redraw the side seam edge with a curved ruler, blending from below the bust dart uptake to the bottom.
Use a curved ruler to draw lines across the gaps you created. Cut around all the edges.
Finishing
We have added the fullness across the bust that we wanted, but we also changed the length of our side seam. Since we’re working with a knit, we have a couple different options for how to deal with this.
- Ease it in. If your FBA is only accounting for a few cup sizes, you should be able to ease the front side seam into the back as you sew. If you feel like the difference is too great, you can cut a piece of clear elastic the length of the back side seam and baste it to the front side seam while stretching, then sew the edges together. Check out this post on The Coletterie for more help with clear elastic.
-
Rotate the bust dart uptake into the cowl (detailed below). This will take a bit more patternmaking work, but it will move the fullness of the dart uptake into the cowl. This doesn’t really help with adding fullness across the bust, as the fullness of the cowl lands above the bust, but it will return the side seam to the original length. Keep in mind that it will also change the size and scale of the cowl.
Rotating the Bust dart into the cowl
Cut out the paper from the bust dart uptake (or do this step before you add paper in.) Draw a new line from the shoulder point down to point of the open bust dart.
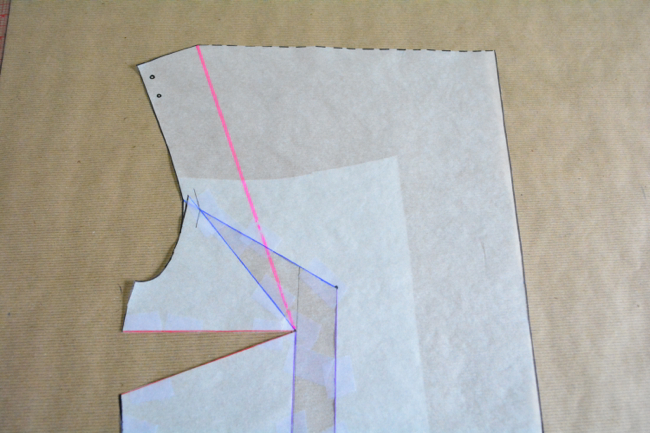
Slash along this line up to the bust point to create a hinge. Rotate the hinge to close the bust dart. Tape in place.
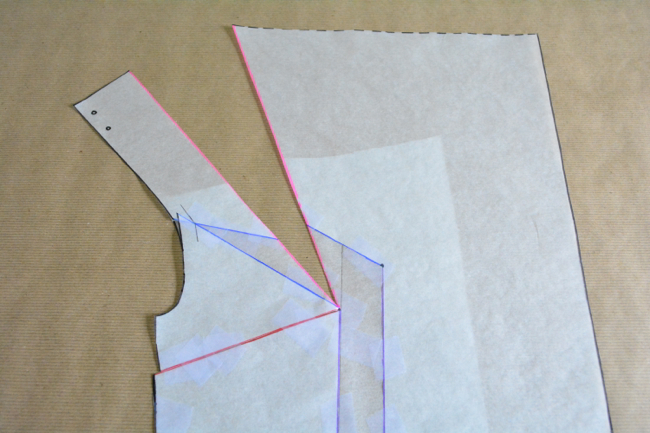
Put paper underneath new opening. Draw a new line from the shoulder point to the center front, parallel to the center front. Cut.
Wovens
If you’re working with a woven, follow the main instructions. Then you can either rotate the excess into the cowl as detailed above, or you can sew a dart. To create the dart, mark the dart point about 1.5″ out from the bust point, and draw dart legs out to the side seam so that they cross the gap right at the seam line.
Redraw bodice piece
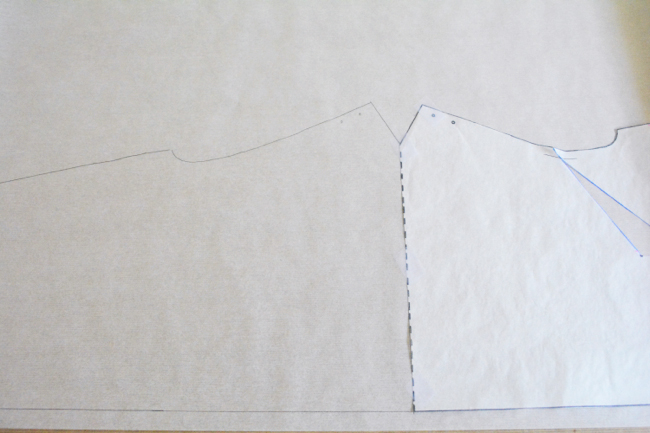
Once you are completely finished doing any adjustments to your pattern piece, retrace it on a new piece of paper, then flip it over the top edge and trace again to get your entire front bodice piece. Transfer any fold edges, dots and other labels.
If you have any questions, please ask away in the comments!
Comments
Wowzah! Thanks for the tute. Question — if I rotate the side seam dart into the cowl, won’t that show a serious amount of cleavage (since the cowl gets longer)?
It will get longer, how much cleavage it shows will depend on the size of your adjustment and your own proportions. So it could potentially!
You could always rotate just some of it into the cowl, just to get the side seam to a length that can be easily eased into the back.
Hmm. Maybe I’ll do my woven version first, use a dart like you recommend and check the risque factor. Thanks!! Now my woven/knit debate can be laid to rest.
that sounds like a good plan!
“as the saying goes, Knowing is half the battle!!” Thanks so much for this clear tutorial on the FBA. I look forward to using it!
What size pattern should I buy? I am 5′ 3/4″ which makes me a petite in arm length and shoulders. However, my measurements ( I feel funny putting them in the comments section, however, hopefully it may helpful for other short women as well. Bust is 46″ with the difference between the upper under the armpits and bust is 6″ Waist is 39″ and hips are 44. Thank you in advance for the help. Pat
All the sizes are included in the one envelope, so you don’t have to worry about it when purchasing.
It sounds like you should try cutting a L at the bust to an XL at the waist. To keep things simple you can then just cut an XL skirt, even though it will be a couple inches bigger, with the fullness it won’t be that noticeable. Alternatively, you can cut from an XL at the waist back down to a L at the hips.
Once you cut it sounds like you should also do a 3″ FBA. So that means your [X] measurement when following the instructions above will be 1.5″.
Lastly, you may end up wanting to shorten it. Check the length by the back length measurement to get an idea. Depending where you want the bottom hem to fall, you may be able to do Version 2 as is. It falls above the knee on an average height, on you it might be just below the knee.
Hope that helps! :]
Thank you so much.
Ummm, I’m not sure which post to ask this, but I seem to have fat armpits and my upper bust is 1″ smaller than my full bust (34.5″ upper bust, 33.5″ full bust), and I’ve double checked a bunch of times. If I squeeze the measuring tape, I can get it to maybe an A cup (the tape isn’t uncomfortable, but it definitely looks like it’s squeezing my armpits).
In the past, I have had what seems like the symptoms of needing a FBA in the past (although w/ a Sewaholic pattern). I have been able to successfully make some Made by Rae and Liesl patterns w/o requiring a bust adjustment. Not sure what to do here? My waist/hip measurements are 28/37 so I seem to fall somewhere either in S or M?
Everyone has different combos of measurements, it’s totally ok! :] Are things often tight on you in the shoulders? It sounds like you might have a broader shoulder/upper back in relation to your other measurements.
I would start by cutting a M at the bust down to a S at the waist and hips, then do an SBA. Try doing a 3″ overall SBA [so 1.5″ would be your “x”].
This is going to make your side seam significantly shorter, so it might be helpful to redraw the front side seam a little longer and the back side seam a little shorter [blending between the two] to make them even. So basically split the difference of the discrepancy between the front and back SS.
I’d definitely do a muslin of the bodice, even if it means going to get some extra inexpensive knit somewhere. And trace your pattern off so you can redo it if you want to!
I hope that all makes sense!
Thanks Devon! :)
I’ve had conflicting results with patterns. When my bust fits correctly, the armscye sometimes feels a little tight at the bottom like it’s not deep enough. Usually not enough for me to want to do anything about it. Recently I had a dress where the shoulders fit, but the bust was a hair tight. However, I have had an instance where the bust seemed to fit, armscye was not deep enough, but the shoulders were huge requiring the shoulder seams to be adjusted. I actually just had all sorts of issue with that muslin. So I just get confused if I need a SBA or FBA.
My torso is short, I usually have to shorten a dress bodice by a couple inches if I want the skirt to hit my natural waist. Is there a way to check if the bodice is the appropriate length?
Based on just your measurements alone, it sounds like you need a SBA. Unfortunately without seeing the fit on you in person it’s hard to say beyond that! There is fit variation from brand to brand. Do you always choose the size you make in a consistent way?
To check the bodice length, you can measure the height of the back bodice piece along the fold, then subtract out the seam allowances:
3/8″ for the top hem
3/8″ for the waist seam
1 3/8″ for the casing
So the grand total to subtract is 2 1/8″. That will give you the finished back length of the bodice.
I think you’ll know a lot more after you do a muslin.
Thanks I’ll give the adjustment a try along with the muslin. I usually base my size off my waist since I tend to make dresses that have more ease in the hips. Lately it hasn’t given me problems, but I have had issues when it comes to fitted bodices. Hopefully since Myrtle is looser up top, I won’t suffer too much!
My high bust is 40 and full bust is 42. With a waist of 38 an hips of 44 I was thinking that I do not need a FBA or the small bust adjustment. I plan on cutting an Extra Large. Am I in the ballpark? Just want to make sure I am understanding.
Thank you so much for providing this tutorial. It is greatly appreciated
Karen
Yes that sounds great!
I have a similar situation mentioned above. I have a broad upper back so my upper bust and full bust are the same at 38″. (My regular bra size is a DD and my under bust is 34″). I’m working with a woven so I’m going to make a muslin but I’m not sure what adjustment I should make for my bodice.
Thank you.
Based on your measurements it sounds like you should cut a L and then do a SBA. What size category is your waist falling into? If you can grade down to a M in the waist then maybe you can get by without doing a SBA, because as you cut to a smaller size towards waist you’ll be taking a little bit off the bust in the process.
Either way I’d recommend doing a quick mockup of just the bodice so that you can check the fit!
That makes sense for the bust. Thank you. My waist is in the XL sizing.
How do I do a fba and reduce the depth of the cowl? I did a muslin with a 3/4″ fba but the cowl is far too revealing.
You could try cutting from the top center front to the stitching line at the armscye, hinging it and then bringing the shoulder in more to reduce the width at the top of the cowl. Just make sure you do it above the bust so you’re not changing the fit you just adjusted there.
My fit issue is that I am full at the front but am small across the width of my back. My next mytle could probably do with an FBA even though I am a C cup and size M. So I would also take an inch from the centre back seam.
Thanks for the feedback! There are so many different aspects to our body shape/size that you never totally know about fit until you make something up the first time.
So we shouldn’t pick the pattern based on our upper bust but the imaginary full bust? I usually buy according b to my upper bust then do the FBA. Buying for the imaginary full bust and not the upper bust is different than most patterns. I think that would be too big if I did that.
Hm…if you pick with your high bust measurement standing in for your full bust, then theoretically the fit of the actual high bust on the size you choose is going to be smaller than what it’s designed to be. I know that the big 4 patterns say to do that for full busted figures, but maybe it works because they usually have a lot more ease than Colette patterns do? They are also drafted for a B cup, so in their drafting there is less of a difference between the full and high bust on the pattern.
But ultimately it all depends on your personal measurements and shape! And of course there are multiple ways to do things. So if you usually do it a certain way and it usually works, as they say, if it ain’t broke… :]
Thanks! I chose the size small instead of the recommended medium. My high bust is 34 but I’m a DD. My full bust is 38. I didn’t actually do the FBA for the knit version and it fit fine. But I did remove four inches from the waist and cut an extra small on the bottom. Too much ease and blousiness in that part for my taste. I’m thinking of cutting one in a woven and am pretty sure I’ll have to do a FBA since wovens are a lot less forgiving. I’ll stick with the size small since the armholes are perfect. I was just a little confused but my old way worked fine. PS I met you once in LA at Sew LA. I grew up around the corner there in Atwater.
I just looked at your blog, I totally remember!!! Hello again! I’m glad your first Myrtle worked out for you!