

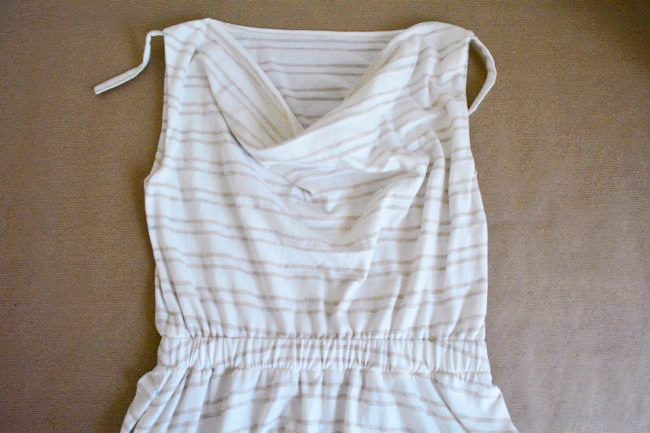
It’s our last sewing post! By the end of this you’ll have a finished Myrtle. Hooray!
Today we’ll be installing the elastic waist, hemming and finishing.
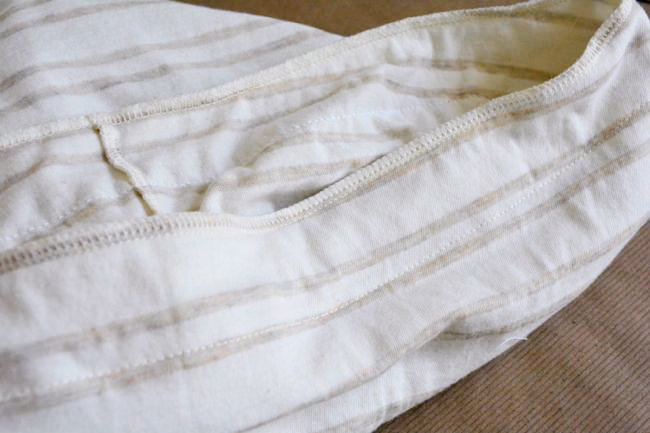
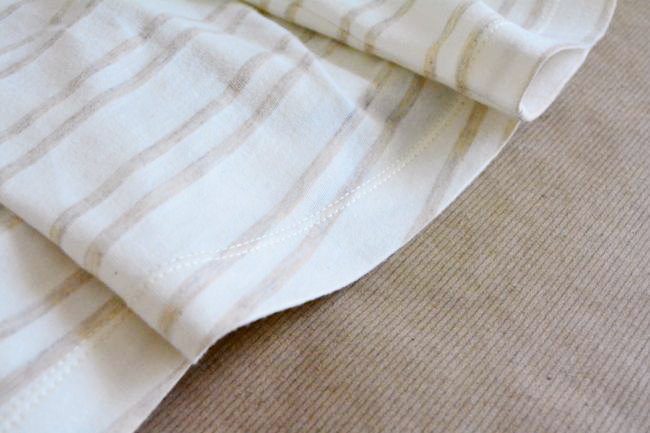
Create Elastic Flap
We will start by stitching a flap on the waistline to cover the elastic. It requires sewing in much further from the edge than we usually do, so we’ll use some masking tape, painters tape or washi tape to mark our seam allowance.
Your skirt should still be tucked inside your bodice with the waist edges lined up, the way it was positioned when you attached your skirt.
1) First, mark 1 3/8” away from the waist seam line.
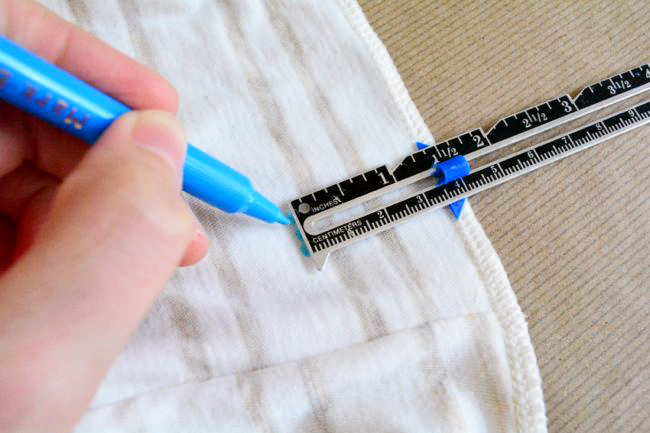
2) Put the dress in your machine as if to sew and align the mark with the needle. Hand crank the needle down towards your fabric so you can really see where the needle will hit. Put a piece of tape on your machine even and parallel with the outside edge of your fabric. Now you can use the tape as your sewing reference, and just keep the edge of the fabric along it as you sew.
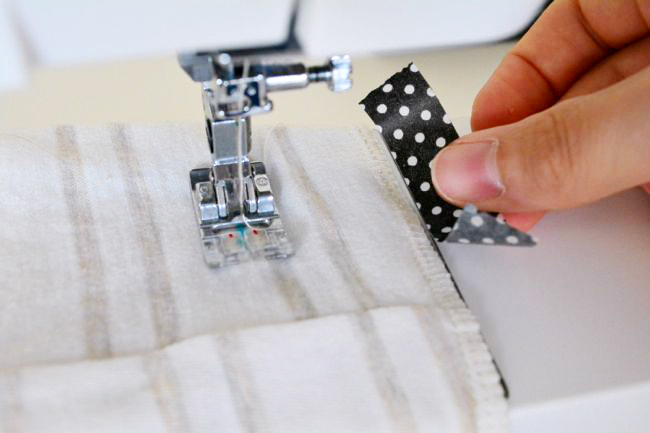
4) Pin the waist. Pin all the way around the waist edge, making sure all the layers are smooth and flat.
5) Create flap. Stitch all the way around, using your tape for reference. Make sure all three layers are smooth and flat as you sew. It will help to stretch everything ever so slightly as you sew, because the skirt is slightly bigger than the bodice pieces, and it’s easy to accidentally get little puckers on the underside.
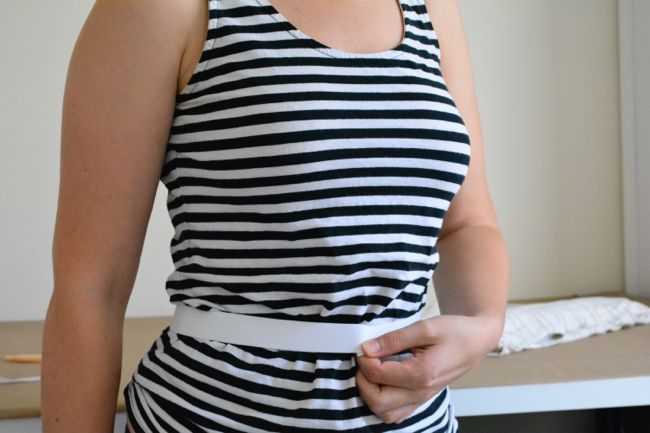
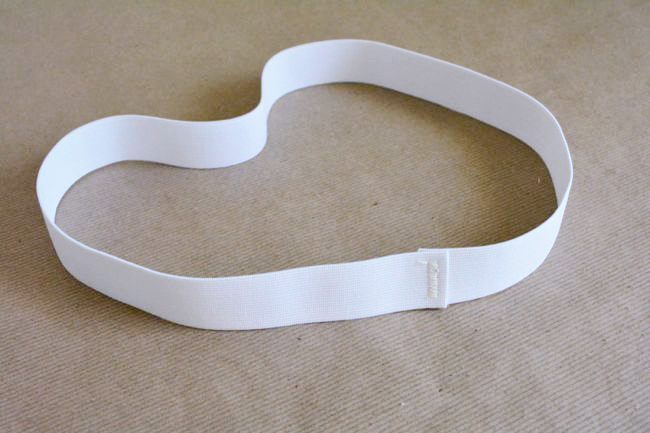
Install Elastic
1) Cut elastic. Size a length of 1″ elastic around your waist, pulling it to a comfortable snugness and overlapping the ends by 3/8”. Cut.
2) Sew elastic together. Overlap the ends 3/8” and zigzag them together. Backstitch several times to make it strong and secure.
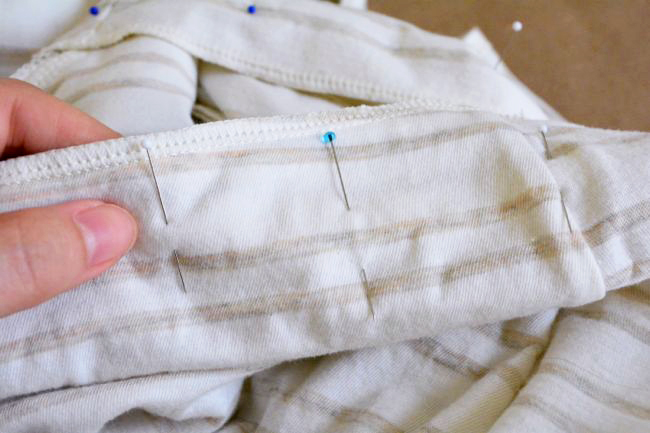
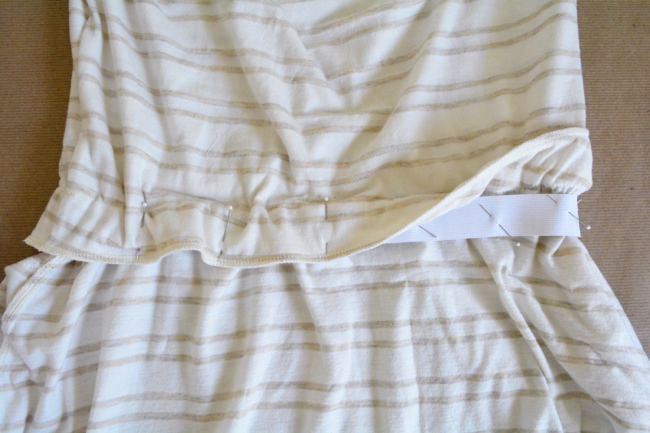
3) Pin elastic. Slip the elastic circle around the skirt. Place it so that it is just under the little waist flap you made. Align the join in the elastic with a side seam. The elastic is smaller than the skirt, so you will need to stretch it to make it fit. Stretch the elastic and pin it to the skirt.
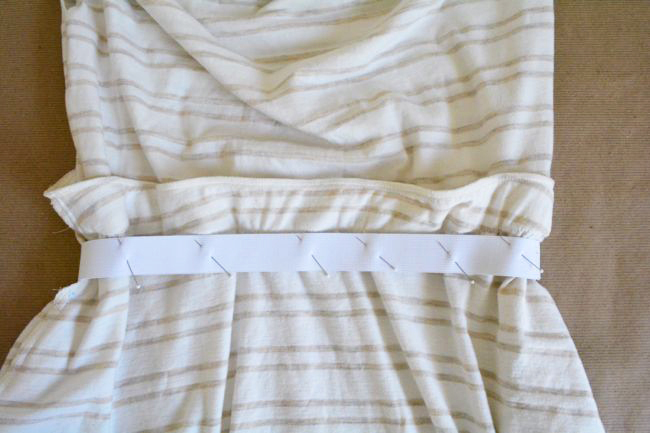
4) Pin flap. Fold the flap down over the elastic, transferring the pins as you go.
5) Sew flap down. Slip the whole dress over your machine. (It helps to slide off your accessories box if you can.) Edge stitch along the flap to seal in the elastic, stretching the elastic as you sew so that the fabric layers are flat. Do not catch the elastic in the seam. You should be able to feel the edge of it with your finger.
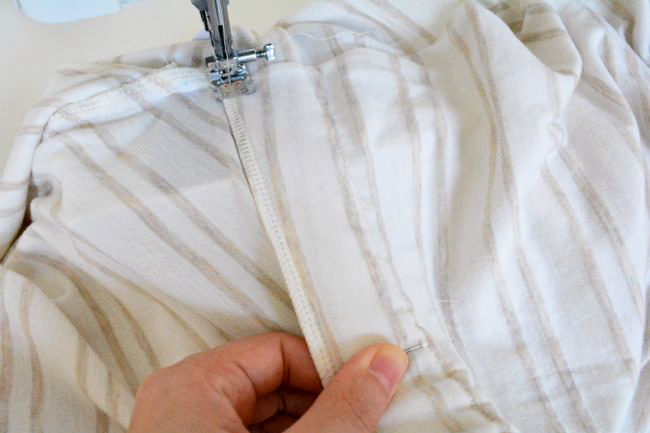
If you find that stretching and sewing at the same time is too difficult, you can just sew small sections at a time, and then keep scooting the gathers of the waistband fabric to other sections. In other words, keep the section going under the needle flat by adjusting the elastic and fabric to reposition the extra fabric elsewhere. You will need to occasionally pull more elastic out from underneath the front of the machine. (This will make sense once you are sewing.)
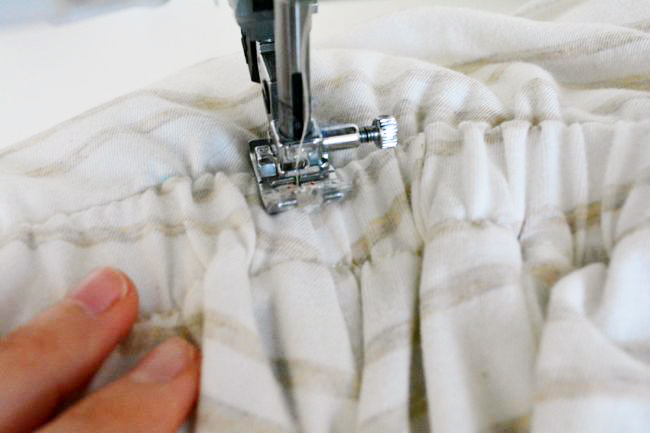
6) Secure elastic. Turn your dress right side out. Adjust the gathers as needed so that they are evenly distributed around the waist. Stitch in the ditch over the waistband in each side seam to secure the elastic. (Stitching in the ditch is stitching directly in a previous seam.)
For more help with the elastic waistband, check out this video on the Coletterie.
Hemming
1) Prep the hem. Fold the bottom edge 1” to the wrong side, pin, and press.
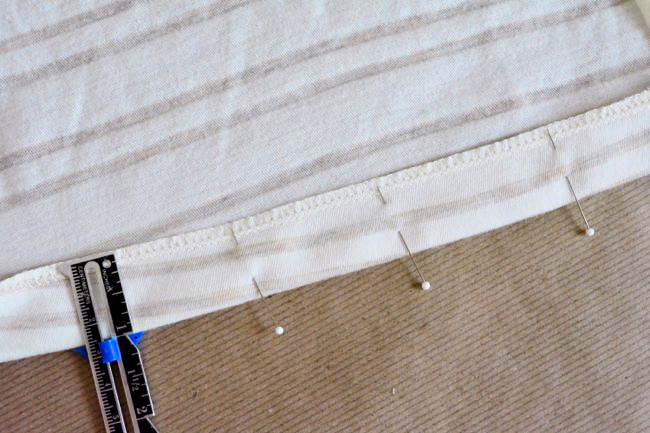
2) Sew the hem. Use a twin needle, coverstitch or hemming option of your choice to hem.
Finishing
1) Give everything a good press from the inside. Avoid pressing a crease in the top fold of the cowl, as it will affect the way it hangs.
2) For V2, hand stitch a button to each end of the shoulder tab, close to where it attaches to the dress.
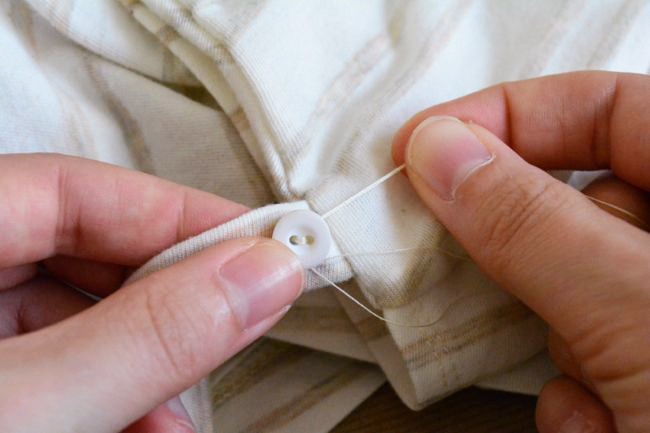
Pass the tab under the shoulder, around the bodice and back under the shoulder, then button. The button will end up on the inside of the dress.
Wovens
1) When you insert the elastic, you will place it above the flap at the waist and fold the flap up to cover the elastic. For extra help with the elastic waistband, check out this video on the Coletterie.
2) You do not need to hem with a twin needle. Simple press the bottom edge 1/2″ towards the wrong side, then 1/2″ again, and stitch down.
You can reference this Coletterie post and the woven instructions for more info.
That’s it! You made a Myrtle!
Put on your dress, do a happy dance, and add a picture to the Colette Patterns Flickr Pool! Next Tuesday (after Labor Day here in the U.S.) we’ll do a parade post of some of your beautiful work.
Comments
I was always taught that you should let a dress hang for 24 hours before hemming and that it should be marked by someone other than yourself. But are these sewing things that have gone by the wayside? Can I just turn up the hem instead?
It’s really only on very bias cut or curved hems that you need to do that. The Myrtle’s hem won’t change very much with hanging. And as long as your cutting and sewing is fairly accurate you can turn up and sew the hem yourself!
I’m curious…why is the elastic installed above the flap for wovens and below the flap for knits? Any tips for hemming with a twin needle for the first time?
The skirt pieces are slightly bigger than the bodice. For knits, it’s ok to flip the flap in that direction, because you can stretch the bodice part of it to fit the skirt. But for wovens, they don’t stretch as much, so if you try to flip it down into the skirt portion it won’t really fit together and you’ll get little puckers as you sew.
Here is a post on the Coletterie about twin needles:
https://www.coletterie.com/books/tutorial-sewing-hems-on-knits-with-a-twin-needle
Make sure you’re on a straight stitch and needle is centered before you sew, thread one thread to either side of the tension plate, and definitely do some tests first.
I could *not* wrap my brain around installing the elastic that way! I ended up having to sew my flap down FIRST and then threading the elastic into the band – worked like a charm!!
Yes that totally works too!
I’m glad I read your comment. My elastic was being uncooperative, so I did what you did. Worked really well!
Devon, Thanks for doing this. I found it very informative and helpful. I will be finishing after the “big reveal”next week, as I am uncertain of how I will attach the skirt….want to see more photos first. But the bodice came out incredibly well, despite all my lengthening and widening, and my doubts about how the back and front armhole seams were ever going to match up!! It is my first Colette pattern. Monetta next.
I’m so glad! :]
I haven’t sewn mine yet, but am reading thru and hopefully asking any questions I might have before the sew along is over.
How many thickness, including the elastic and the double layer of the front bodice is at the waist? I’ve been trying to work it out in my head, but I’m not sure.
Thanks!
From outside to inside along the waistband: skirt, elastic, flap consisting of three layers [skirt, bodice front, bodice lining.] So a grand total of five layers!
Made this today and am pretty happy with the results! I think the installation of the elastic is more difficult than it needs to be. Next time I will follow Whitneys lead and sewing a casing first, then thread the elastic – much quicker!
This was so much fun! I just finished. I am returning to sewing, and being largely self taught (aside from some summer enrichment courses in 8th grade, and I’m over 40 now) I am so thrilled to be able to learn to do this right. Probably being a bit older and better at practicing patience helps. Also, really taking my time, and giving myself permission that perhaps getting it done tonight, at 11:45 pm is NOT the best plan. I work in education, so I now have a great “1st day of school” dress. Thanks for the great instruction-
So glad you enjoyed it!
Thank you for another sewalong. The waistband attachment seemed a bit confusing at first but thanks to your explanations it seemed a bit less daunting.
I made the Myrtle as a top and I’ve blogged about it in mu blog here: http://needleforthoughts.blogspot.com/2014/09/rosy-myrtle.html
I’m still working on mine. My bodice piece looks how it’s supposed to, but when I tried it on, the neckline is too wide (sliding off the shoulder on one side). What adjustment can I make to correct this? (if I sew 1/2 inch into the shoulder seems, that would bring everything up and it would fix the problem, but the armholes would be tighter and the neckline would move up – I’m not sure that’s the best option). Any advice?
You could do the shoulder seam adjustment. Or, if you don’t mind having a seam down the center back, you could cut it apart there, remove some of the excess, and resew it together.
I had the same problem with my bodice. The back was too wide, so I solved it by putting a pleat in the center back. That way I didn’t lose any width in the waist and it really looks great!
I had the same issue plus my armholes gaped a bit too much. I ended up pinching out a bit in the shoulders and it solved both those issues, but the result is a bit less blousy. It’s work-appropriate, though, so I don’t mind. I might add a bit of length to the bodice next time. Probably I should do an sba but I’m not sure I could wrap my brain around that yet!
I’m a little late to this step and not sure if you’re still replying to comments, but I am completely stuck on the elastic step. I have already ripped out my seam 3 times! First I tried as directed, then I made the channel first but that turned out worse, then I tried again as directed. My issue seems to be that since the skirt is a bit bigger, I end up catching some of that fabric in my stitching (or the skirt fabric creeps up into the channel) and causing unsightly puckering. I’m not sure how much more seam ripping my bodice can take. Are there any tricks to keep everything lined up and even? I’ll be trying my 4th time tomorrow.
Are you using a knit or a woven? If you’re using a knit, you should be able to stretch the bodice portion of the casing to make it the same size as the skirt to avoid the puckers. If you’re having trouble, I would try just sewing the casing first and then inserting the elastic. Go slow, and stop often with the needle down and lift everything up to check the underside.
If you’re using a woven, you should be flipping the waist flap up to avoid the skirt issues. In fact, if you’re using a knit and still really having trouble, maybe try flipping the waist flap up and that might make it easier!
Thanks! I am using a knit. I actually found it harder to sew just the casing, as without the elastic there to stabilize the whole thing, I found my underside (the lower – skirt – fabric) would shift even more. I will try your tip of flipping the casing up. I was also starting to do some research on whether it would help to use another type of presser foot.
Finally got it! (After two more tries.) What really worked for me was taking more time up front, and getting everything nice and flat and lined up with pins. I used twice as many pins as on previous attempts and it really made all the difference!
Now I have a myrtle to wear out tonight.
Thanks for the sewalong!
Sylwia
Thanks so much for putting this together! In the pattern instructions it says to sew the flap down with a narrow zig zag, but here it says to edge stitch – I’m not sure I liked how the zig zag shows up on the outside of my dress, so it the edge stitch instructions here using a straight stitch?
Thanks!
Is there a different waist option? I don’t love the thickness of the elastic but am having a hard time figuring out an alternative.