

In this post we’ll be covering some miscellaneous pattern adjustments, muslins, and cutting.
For bust adjustments, there’s a whole separate post also published today. You can check it out here.
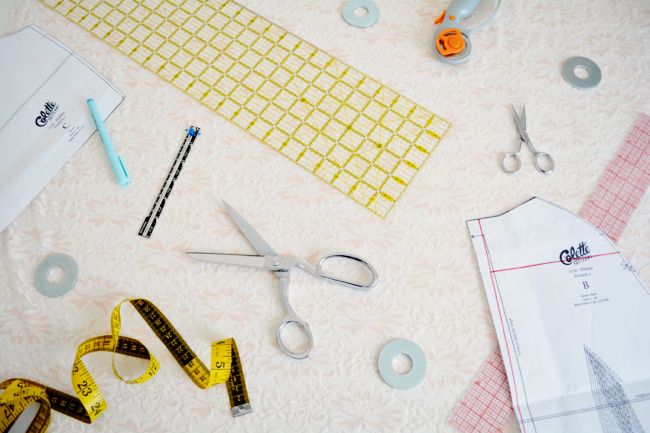
MUSLIN
There are some things we can adjust in the flat paper before we cut any fabric, but at the end of the day, numbers can only tell us so much, as we all carry weight, length and width in different places. So it’s always helpful to make a muslin (also called a toile).
When making your muslin, remember that you do not need to do things like finish seams. It’s meant to be a quick and dirty mockup so that you check the fit. Be sure to sew accurately, however, so that you’re getting a good idea of how a finished garment will look. You will also want to staystitch the neckline so that it doesn’t stretch out as you’re trying it on.
Often times you can get away with just making a muslin of the bodice. It’s useful to still put a zipper in the side seam so you can really see the fit. Remember, it can be a quick (baste it in so you can easily take it out to reuse it) and dirty (it doesn’t have to look good) zipper installation.
CUTTING BETWEEN SIZES
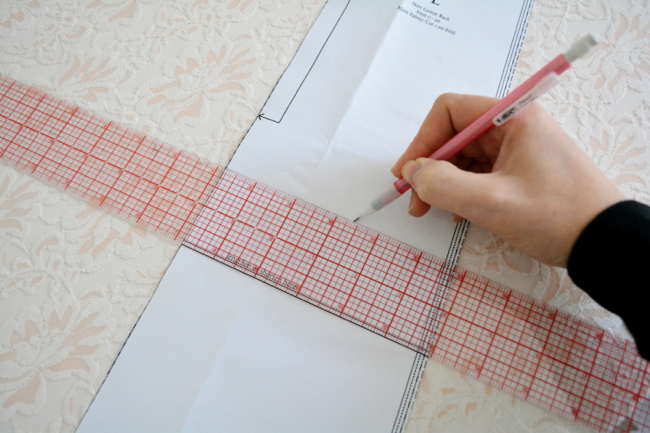
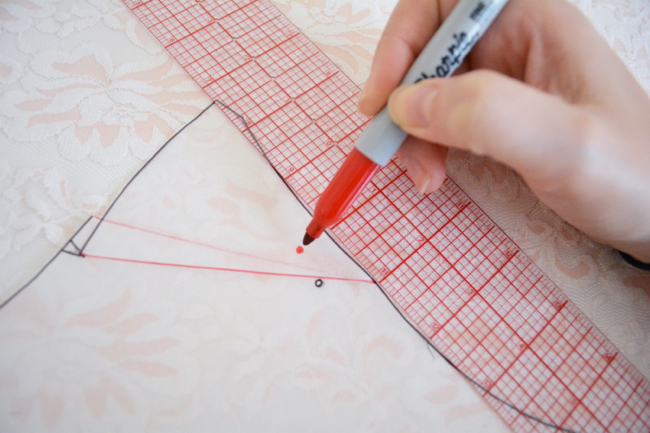
If you are falling into different size categories for your bust, waist and hips, one simple fix that you can do before you even make a muslin is to grade your paper pieces between sizes while cutting them out.
From the bust to the waist, use a ruler to draw a line blending the cutting lines between your two sizes, ending at the waist size at the bottom of the bodice. This will be your new cutting line.
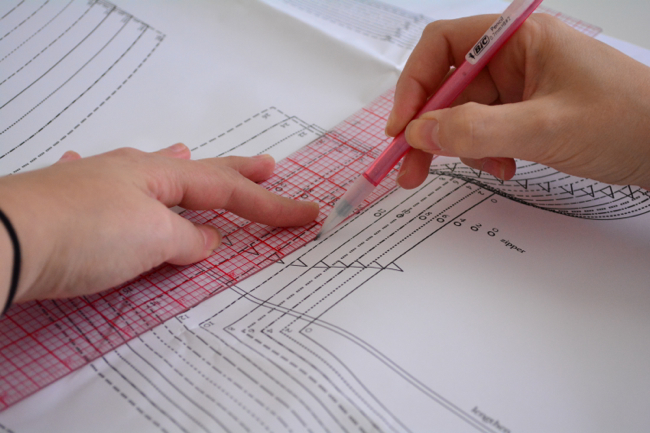
Then cut the waistband in your waist size.
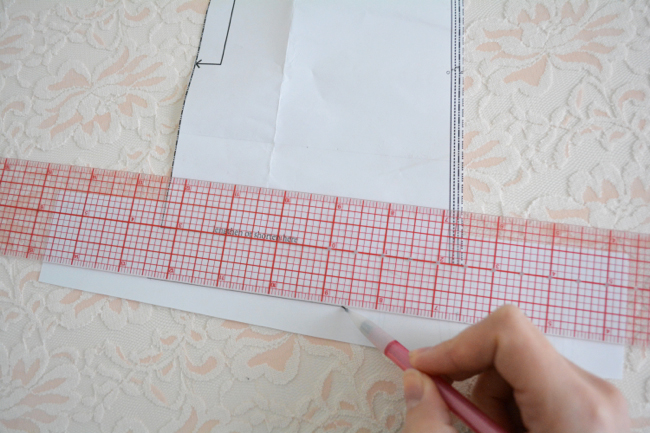
To go to a different size from waist to hips, start at the waist edge of the skirt pieces and use a ruler to blend out to the new size line at the hips.
Be sure to do any grading on all relevant pattern pieces (ex. both front and back skirt).
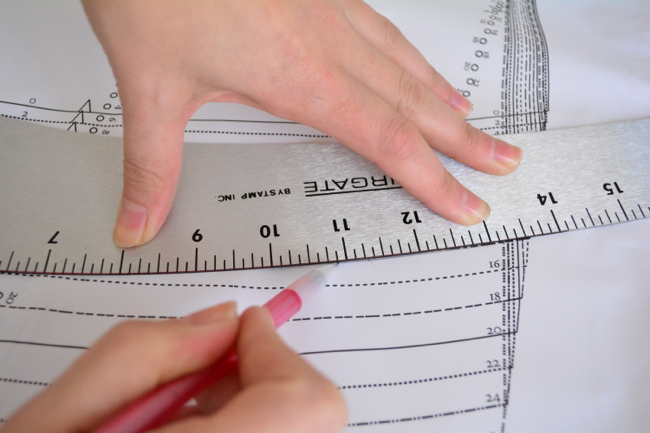
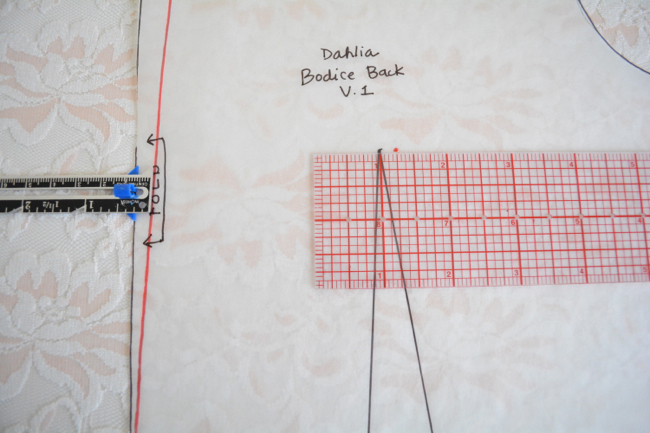
LENGTHENING/SHORTENING
If you’d like to shorten a pattern piece [for instance, if you are short-waisted], draw a line above the lengthen/shorten line the amount you’d like to shorten it.
Crease the lengthen/shorten line and fold it to your new line.
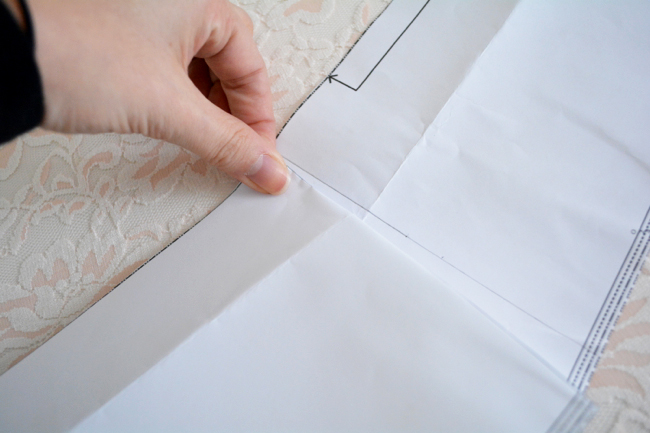
Tape and blend jagged edges.
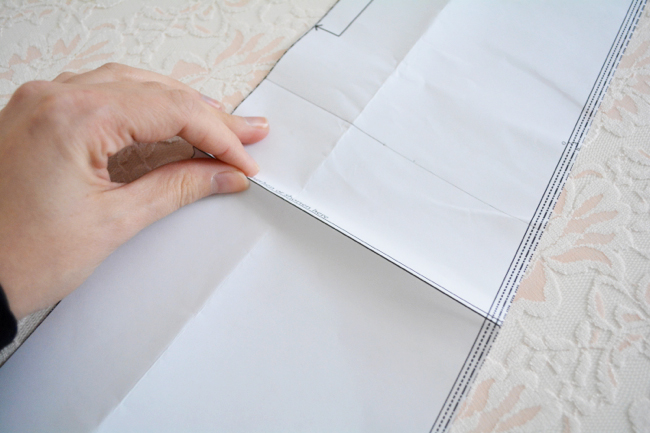
To lengthen a pattern piece, cut it apart between the lengthen/shorten lines. Put paper behind and tape one side down. Draw a line parallel to the lengthen/shorten lines the amount you’ll be lengthening.
Align the fold edge or grainline and tape down the other side along the drawn line. Blend jagged edges and trim.
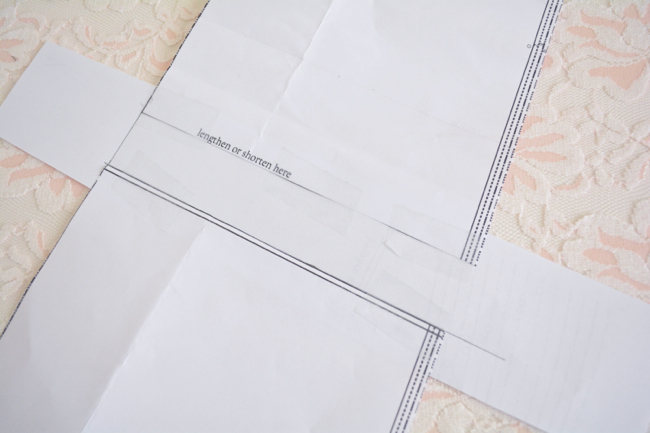
Again, remember to do the adjustments on all related pieces (ex, front AND back bodice).
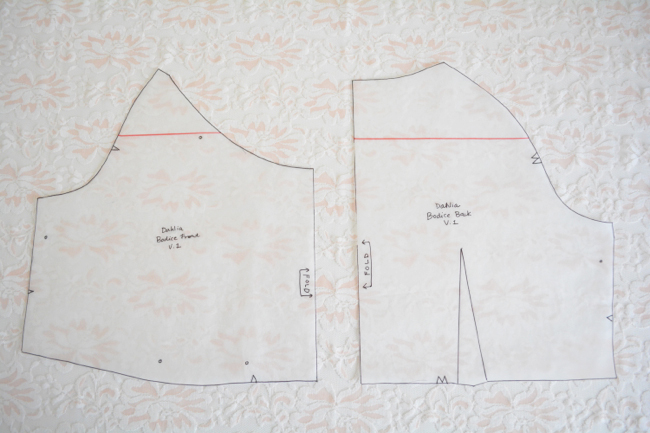
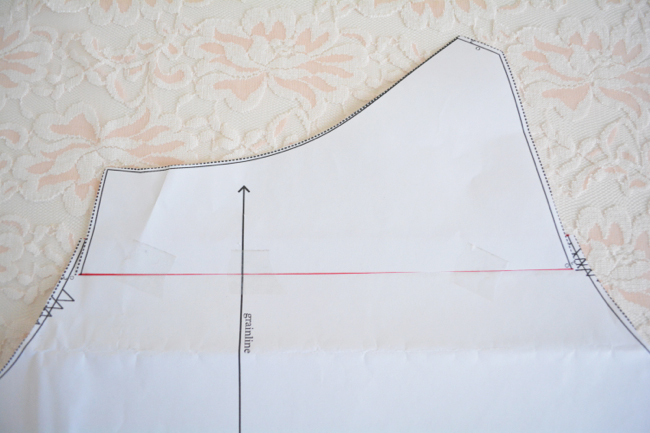
NARROW SHOULDER ADJUSTMENT
Because of the raglan sleeves, a narrow shoulder adjustment has a bit more going on than usual. You will need to make a muslin and try it on to determine the amount you’ll need to adjust, but first read the explanations below so that you know where to pinch and pin.
The narrow shoulder adjustment will involve the front and back bodices and the sleeve pieces. First, draw a line across the shoulder portion of each bodice piece, above the raglan notch.
Cut from the raglan edge all the way along the line, to but not through the other edge so that you create a hinge.
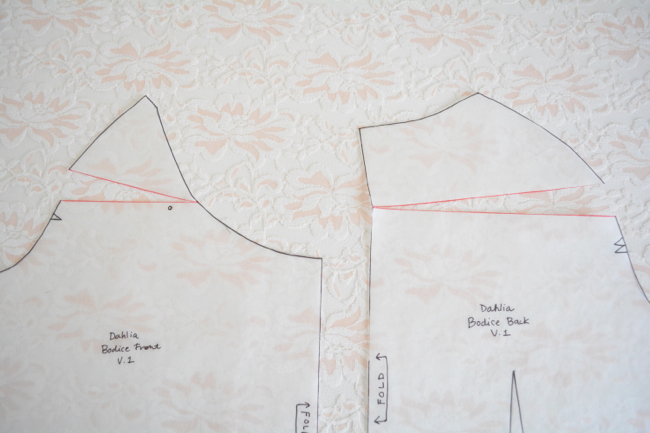
Rotate the hinges down. This is where you will adjust based on how much you pinched and pinned on your muslin. You’ll want to measure the adjustment amount on your pattern piece at the stitching line at the raglan edge.
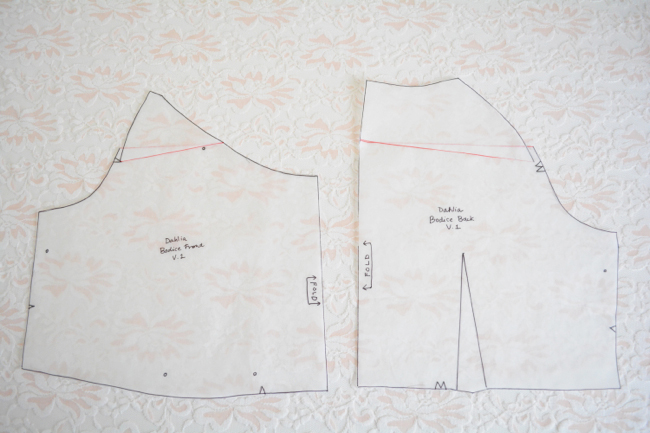
Tape and blend edges. On the back bodice, redraw the center fold line to be straight (I didn’t in the photo because it will be redrawn below in another step).
On the sleeve piece, draw a line across top of sleeve above notches, perpendicular to grain line. Cut apart.
Overlap pieces the same amount that you adjusted the bodices. Tape and blend edges.
One final adjustment you can do for narrow shoulders, or alone for a gaping neckline, is to remove a wedge from the center back and/or center front. To do this, simply draw a line from the top at the adjustment point, blending down to nothing at the bottom.

On the front bodice, move the neckline dot away from center the same distance as your wedge adjustment. If you don’t do this, your wedge just takes some of the fullness out of the gathers and doesn’t change the finished length of the neckline.
On the back bodice, if your adjustment is more than about 1/2″ at the top, your darts will become slanted. To fix them, measure the wedge width at the same height as your dart point, and redraw the dart point that same distance over to the right.
Redraw the dart legs to the same points.
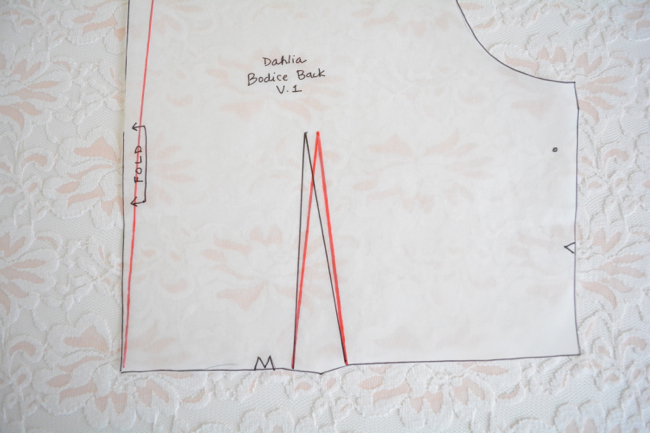
They will now be slightly different lengths. True them by adding extra paper to extend the shorter one to match the longer one (it will probably be a very small distance). Blend to the bodice edge and trim.

Trim your center fold edges along your new adjusted lines.
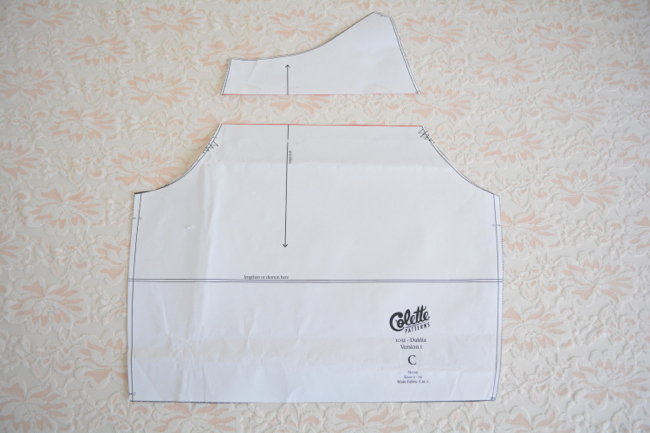
CUTTING
Once your muslin and pattern alterations are set, it’s time to cut your fabric! Refer to the cutting layout for your size and view. If you are cutting stripes or plaid, be sure to download the free pattern matching guide here.

One you have your pieces cut, transfer all marks to the fabric. You will also find it helpful to snip the center fold on the bottom of the both bodices, top and bottom of both yokes, and the top of both skirts.
lining
We will be covering lining briefly in the zipper post. You can cut sleeves, bodices and yokes out of your lining fabric if you’d like a lined bodice, and also skirts if you’d like it completely lined.
Please comment below with any questions. We’ll be back a week from today, Monday Nov. 17th, to start sewing our Dahlias!
Comments
Hi Devon, I have made a Dahlia already and am going to do a plaid one with you on the sewalong. The neck was enormous on me (photos on my blog) – what adjustment should I do for that? Another blogger put darts in the back neck as she had a similar problem but I would rather make an adjustment at the pattern stage. Thanks,
I had the same problem. I increased the gathers in the front, and added gathers in the back, which helped.
Does pinching out some at the center back fix it? If so, then you can take a wedge out of the back at the top center, blending to nothing at the bottom.
On my muslin, I found that it was helpful to fill in the hollow at the top of the sleeve between the front and back edges. So basically straightening that curved line a bit. I also trimmed off a little at the top raglan edges of the sleeve at both front and back. which shortens the neckline across the shoulder. Try pinning your first version that way and seeing if it helps.
Lastly, on the one you already made you could try pulling up the sleeve a bit then making a dart at the shoulder to shape it a little.
Hope that helps!
I have the same issue with the neckline and tried what you’ve suggested (trim the top of the raglan & fill in the gap). After a few days of obsessing over how I was going to fix the bodice, this seems to have done the trick!! Thank you :)
Thanks Devon, that’s ace, I can see this combination of fill in and trim is going to solve the fitting of the shoulders on my muslin too!
Hello Devon,
Sorry if this is a stupid question – I am still a newby sewer! I made my first Dahlia and liked it very much, however I would like to make a narrower neckline for the next one, I think it is too wide esp. at the back. I guess I will have to work on the small shoulder adjustments? Also one question about your suggestion of removing a bit from the center back and blending to nothing at the bottom. This changes then your grainline as well as the piece is cut on fold – is that what it is supposed to be or is there something else to do? Thanks for the excellent sew-along and for your help!
Valeria
Thanks so much for the shoulder adjustment. I have average shoulders but my daughter has more narrow shoulders. I am doing this for the both of us and that was a really helpful bit of information.
My shoulders are not so much narrow as they are low. I think I need to lower the shoulder slope. Any tips? I’ve done this before on more traditional inset sleeves, but not on raglan sleeves. Thanks!
I would try trimming off a bit at the top of both front and back raglan edges of the sleeve pieces, so it other words narrowing that part so that there is less fabric going across your shoulder at the top. And if you find that there is extra fabric on the top of your shoulder, you can always create a small dart in the top of the sleeve to help shape it to your shoulders.
That makes a lot of sense–thanks!
Your sba instructions are very clear. Many thanks.
I usually have to lengthen the bodice of patterns. Since this is raglan, what is the best way to figure the back length to waist? I can’t just place my tape measure down and go :-)
It is a bit trickier! The finished bottom edge of the front bodice should hit just below your bust. You could also measure the center back bodice and assume that it will hit at approximately 1″ below the nape of your neck at the top, and go from there. Otherwise I’d add what you normally add and muslin the bodice/yoke.
Is it too extreme to try to grade from a size 8 waistband to a size 0 hip (version 1)? When I look at the lines on the pattern, I can’t quite come up with a reasonable looking line. Corollary rhetorical question, when did my body become so oddly shaped??
Flippant question remorse – lest it seem otherwise, I am not really disparaging either my own body or anyone else’s who might be similarly shaped…
Like Karen above, I also am trying to grade from a larger waist size to a smaller hip size (and from a small bust to a large waist). Should I do the size grading first and then the SBA, or the other way around? Thanks!
Just found this excellent post on how to grade from larger waist to smaller hips: http://www.afashionablestitch.com/picking-your-ginger-size-dilemma-b/
Help! After much thinking, I still can’t figure out what sizes to cut. My measurements are high bust 33, waist 28 and hips 35. I was thinking I would do bodice 6 (plus SBA), yoke 8 to accommodate my waist and then skirt 0 for hips – but that doesn’t really seem right since the yoke sits higher than my waist. Maybe yoke 6 grading out to 8, and then skirt grading from 8 to 0 from waist to hips?
It sounds like you should actually cut 6 in the bust and the waist (28 waist falls into the size 6), and then down to a 0 at the hips. If that line looks too drastic, you can always just grade down to a 2 at the hips and then take it in later once you try it on.
Oops, put comment below in wrong place. Thanks for posting link to that tutorial – very helpful! Sounds like our dress alterations are going to be quite similar.
thanks for the share!! :]
That is a terrific post – I have to adjust my hip size a similar amount and was really wondering how to manage it!
Based on your picture, Devon, I’d guess I’ve been sewing since before you were born, but I’ve already learned more from your tips and responses to other sew-along participants than I could have imagined. In working with my knit “muslim” mock-up, at your suggestion, I’ve already learned to work with clear elastic (much easier than I’d imagined) and inserted my first invisible zipper using just a regular zipper foot (thanks to great online tutorials). My adjustments weren’t completely on target, but I know what fixes to make. And I especially like the fact that the raglan sleeves are flattering, not baggy, which is why I’ve consistently steered away from raglan sleeves in the past. Kudos to all. And I know there’s more to learn!
that’s so good to hear, i’m glad things are working out!!
also if your knit is stretchy enough, you might be able to skip the zipper! you could try on your muslin zipped up to see.
Thanks for the great sewalong and to all posters for the helpful comments so far!
I am planning to make the version with sleeves and would prefer to make it with the first skirt option but I want to be able to ride a bike in it. I’m wondering whether I’ll need to use the second option of the gored-skirt from the sleeveless version instead? Any advice on whether the skirt from the sleeved version is wide enough to be bicycle-friendly?
Thanks in advance and happy sewing to all :)
You might have to hike it up a bit when you bike if you make version 1. The best thing to do would be to compare the finished hem circumferences, which are listed with the size chart. Use a tape measure and hold it at the circumference for your size, put it around your legs at your knees, and see if it feels like you can still move your legs enough.
Good suggestion – thanks.
I’m a bit confused looking at the narrow shoulder adjustment. The neckline is too wide on me. I have tried a slight gather at the top of each sleeve and that seems to help.
I’m a bit worried at doing this as the diagrams as it looks like it would make the armhole smaller.
My brain is wanting to tip it the other way to shorten the neckline length instead. I saw that ‘Lime Scented’ online took a dart in the top of each sleeve. I tried a tiny gather at the top of each sleeve and it did seem to take it in a bit.
Not sure though if I would be better trying the proper ‘fix’.
The adjustment on the bodice will shorten the neckline…you could try starting with just that and seeing if it helps.
Another thing you could try is trimming off a bit at the top of the front and back raglan edge of the sleeve. This will shorten the neckline across the shoulder.
Hope that helps!
I second Mary Kay’s comments above about your helpful tips!
I have a question about the skirt version with the gathers. I love it, but will probably make the 6 gored skirt version for the simple reason that while I love the front gathers and know they’ll look good on me, I have large high hips. I go into my widest hip measurement about 3 inches under my waist – and those gathers will be very unflattering on me. Do you think it would be possible to turn the back gathers into a dart, or is there too much width there for it to work?
Thanks very much for this and all your other great sewalongs:)
Sure, you could turn them into a dart! The best and most accurate way to do it would be to make a muslin, leave the gathered portion unattached to the yoke and pinch it out into a dart. Then you’ll know how wide and long to make it.
Thanks so much Devon!
Hello, Another narrow shoulder query I’m afraid. I have just cut out and made a size 6 muslin bodice. As the shoulders were too wide on my first attempt (slipping right of my shoulders) I pinned the muslin to make it fit better and followed your instructions to taking an inch out the shoulders and a further inch out of the back and front. I’ve just tried on the altered version and the neck is still too wide, with the sleeves still slipping and sitting down off my shoulders, showing my bra straps. I think to make it fit I need to take another 2 to 3 inches out the front and another inch out the back. Can this be right, as I’m worried its feeling tight under the armpits now, with still a gaping neck line. 0r is there another adjustment I should be doing? Any suggestions welcome! Thank you, Sally
Try filling in the hollow at the top of the sleeve piece; in other words, straightening the line a bit. Then try trimming a bit off at the top raglan edge of the front and back, blending to nothing a few inches in.
You can also try putting a small dart at the to of the sleeve to help shape it to your shoulder a bit.
Hi Devon, thanks so much for all your help with this! I’m a newbie to garment sewing so I’m not sure exactly what you mean by pinching the shoulders and filling in the hollow of the sleeve, but I think that’s probably what my muslin needs for the gaping at the neckline… Do you think you could show us a picture?
Here you go!
https://flic.kr/p/q7NMrd
You may need just one or the other, depending how it’s fitting you.
Yay, thank you! So if I understand right the filling in the hollow is done at the pattern stage, and the shoulder dart I could do to my muslin or also take a wedge out of the pattern piece?
Yes, the hollow you’d want to do at the pattern stage. The dart could be either or – if you know you want it at the pattern stage you could add it then, but it could also be a fix alteration if the neckline is too wide after the fact.
When grading the skirt from a waist size 10 to hips size 6, do you just make a straight line? Or do you let it curve a while before making it straight? The ruler in the picture looks curved, but any curving I draw to go in a size looks weird. Thanks!
And is the “hip line” the notch arrows?
It doesn’t have to be curved! Straight is ok. The most important thing is that it blends between the lines smoothly and doesn’t created any jagged points.
And yes, the notch is a good landmark for the hip placement.
Hi Devon,
I made a toile in size 4, it was a little tight under the arms but bust wise it was good. It wasn’t till I read your SBA post that I think I should have gone for a size 6. There was also a lot of gaping at the shoulders. Which would I do first, the SBA or the narrow shoulder adjustment?
Another question I have, I’m thinking of widening the yoke as the high yoke can make me look pregnant again! I actually took the yoke lining, flipped it and just added it to the bottom of the yoke, then stuck the skirt on and it didn’t look too bad. But I’m sure there must be a more technical way of achieving this. Any thoughts would be appreciated. Thanks
I would do the SBA first and then see about the shoulders. You may be able to just remove a wedge from the shoulder part of the front and back bodice and then increase the neck gathers a little bit.
As for the yoke, you could just cut it apart horizontally and spread it apart, tape paper behind, align the center fold edges and then blend the other end. The only thing though is that if you extend it below your natural waist – so past your narrowest point and where you start getting wider – you might need to flare the bottom edge back out a little to account for that. You’ll also need to curve the bottom edge in the other direction – so just like it was when you flipped the lining down.
The Colette Ceylon dress comes to mind as something with a wider center yoke, if you want to look at the line drawing to get a idea:
https://www.colettepatterns.com/sewing/ceylon
Thank you, very helpful reply Devon.
This is probably is a silly question, but this is my first time sewing raglan sleeves… I only have gaping happening with the shoulders. I can pinch out about an inch and a half out of each shoulder. The chest and back necklines are perfect. Will the narrow shoulder adjustment described above affect the back and front necklines?
Never mind. I solved my problem! All I need is a shoulder dart.
Glad you solved it! Sounds like a good and simple solution.
Hi Devon,
My measurements are a bit over the place. I’m a 14 in my bust, so I’m going from that, & looking at the finish of the piece, leaving the waist at the same size instead of grading up one, but my hips are stupidly at a 8 (42 – 36 – 39). Should I just leave the hips since that’s just my body shape, or try to take it in a bit more with the gathers? And would recommend going up to the higher waist band, or leaving it?
Thanks in advance!
I would say, grade the skirt pieces down 2 sizes from the waist to the hip, and then after you make it you can take it in more if you want to, or just leave it. The waist should be fine, you’ll still have 1″ of ease which will be snug but not uncomfortable. Hope that helps!
Thank you so much Devon. I’ll try that and see how it all fits :)
Hi Devon,
Thanks so much. If I end up doing the Variation B in the skirt, do I take in ALL the skirt parts, or just the side seams?
Usually you’d want to distribute the alteration around all the seams of the skirt, but wait to try it on and see what looks best.
Great, thanks Devon.
Hi Devon! I’m crossing my fingers that you’re still reading this comment section!
So I’ve made about five muslins so far, trying different fitting adjustments to deal with extra fabric around the neckline and my hollow, forward shoulders. I finally have the muslin almost perfect, except there’s lots of pulling at my shoulder that’s causing drag lines and making the armhole uncomfortable. I can’t figure out how to add fabric at the shoulder without adding back the width at the neckline and shoulder seams that I took away! Any suggestions?
You might try lowering the seams at your underarm. Also, you might try slashing the sleeve like this:
http://www.craftster.org/pictures/data/500/17377_20Jun10_Untitled_2.gif
Where it says ‘dart’ that will just be the pattern pieces overlapping, not an actual dart.
Also remember that since it’s a woven raglan sleeve without any top seams, you can’t really avoid a few drag lines. It’s a flat piece of fabric going around a round shape (your shoulder), so it won’t look perfectly smooth everywhere. But you definitely want it to be comfortable!
Thank you so much!
Hello Devon, your tips are really clear and useful.
I’ve been working on my muslin, and I think I’m nearly done with it. I combined a SBA and a rather drastic shortening of the bodice (4 cm). I may have to do a slight narrow shoulders alteration too, but as I’m sewing version 2 I’ll do that at the last moment I think.
What should I do with the darts in the back of the bodice after shortening ? Just redraw them from the same point to the bottom, or should I redraw them from a point 4 cm above the original one ?
(sorry for the centimeters, I’m French ;) )
Hi Elina! Glad you’re finding everything useful!!
You should redraw the dart legs to the same point, since moving the dart points further up would take more width out of the bodice at a higher point, and presumably you don’t need that.
And yes, version 2 is really easy to adjust right before you add the straps. In fact, I tried mine on, just drew where I wanted the neckline to be and trimmed it them.
Thanks ! I’ll just start on my definitive version then.
I feel a bit guilty doing shoulder darts and not trying the whole narrow shoulder adjustment, but it works quite well. I suppose they should be in the middle if I add them on the pattern and which length do you recommend ? I just pinched on the muslin..
You should use the pinched off amount on your muslin to mark the dart. That will determine the placement and length. It might not be in the exact middle.
Very excited and no one awake to share it with! I just (finally) put the zipper into my lining/muslin and got the first real look at how the dress will fit – pretty good! I am impressed with how well my first ever SBA worked, so thank you for the excellent instructions. One thing I am wondering about – while the bodice fit feels generally good, it is possibly a little restrictive when I bring my elbows together in front of my body, or when I imagine leaning forward to ride my bike. Does this suggest going up a bodice size, or is there another way to get a bit more movement space in the dress? It is pretty marginal, so I might just forge ahead, but wondering if you have any suggestions. Also, possibly related, I find the dress a little tricky to get out of again – maybe that also says a slightly bigger size would be good?
really, really enjoying this sew along, and learning a lot!
Ps, happy thanksgiving!
Hmm…you might try slashing a lowercase “t” shape on the sleeve and hinging at the seam allowances to widen the sleeve across the shoulder. That will add some fullness for arm movement without adding to the neckline.
You could also try a similar treatment to the back. Or you might add a pleat to the back to add some fullness there!
And happy thanksgiving to you too! :]
Do you mean a slash like the one you posted in the link above for Mary on Nov 21? Having a hard time visualizing.
thanks!
FWIW, that sleeve slash Devon suggested worked really well for me! Altering the paper pattern was a little tricky because there were so many moving parts. But it gave me room for movement without mucking up the neckline, so it was worth it!
That is good to know, thanks! For me, the pull is mostly at the front raglan seam when I move my arms forward – is that where you were feeling it? And how much did you end up spreading the slashed fabric apart?
thanks again, I really appreciate the input from someone who has tried this already.
Yes it is! I had forgotten I’d linked to something. Here it is: http://www.craftster.org/pictures/data/500/17377_20Jun10_Untitled_2.gif
Also Karen, Mary replied to you below. :]
Thanks Devon (and Mary!). At risk of monopolizing too much of your time, I have a couple more questions – disregard at will if this goes beyond the scope of an online sew-along. I have made the t-shaped slash in one sleeve and it definitely eases my arm movement, but I am not sure how to collapse the 3D shape of the extra space onto a flat pattern piece. Your comment above and the link suggests that there should be some overlap along the horizontal slash, but I am not seeing how this will work. Maybe I need to make the same kind of snip into the seam allowance on the pattern piece as described in the SBA and FBA adjustments to allow pattern pieces to pivot? Also, is there an easy way (or a good description somewhere) of how to mirror the change to an armhole line on the bodice on to the armhole line on a sleeve, if I also think about dropping the underarm seam as you had suggested as another fix above? Other options I was thinking about were cutting a size 8 sleeve to fit into my size 6 bodice, or narrowing the side seam allowances of my current set up to ~1/2 inch to give a bit more ease through the armpit…
Ok, done pestering. It is only that it is so close that it feels like ‘just right’ is within reach. A thousand thanks!
Yes, you want your slashes to go to the seam allowance, and then snip in from the outside to create hinges like you would in a bust adjustment. When you spread the piece, the vertical slash will spread and the horizontal ones will overlap slightly.
For the underarm seam, just measure the amount you want to lower it, and take that same amount away from both the bodice and the sleeve on both the front and back raglan edges, and blend back to the original line.
For me the pull was right at my shoulder blades, so I centered the slash there. I don’t have the pattern in front of me, but I ended up spreading at least 3/4 of an inch, maybe even a full inch.
This was supposed to be a reply to Karen! Oops.
Im almost ready to give up on this dress. Ive followed the narrow shoulder adjustment by one inch and now the dress is falling off my shoulders it feels like it needs lifting up and its too low in the back and a massive gaping neckline! Help……….
Try taking in the front and/or back raglan seams at the neckline. You could also add a shoulder dart or gathers along the neckline portion of the sleeve piece.
What shoulder size needs a narrow shoulder adjustment?
I think I’m pretty average, but it seems like rather a lot of people are getting very wide gapey shoulders without necessarily being people who usually find they have too narrow shoulders for standard patterns. I’ve searched the instructions, the how-to for the NSA, comments and the finished garment measurements, but I can’t find an indication of the shoulder width the pattern is made for. Can you tell me what it would be? That would also help me work out whether I can just fit a smaller bodice to a larger waist and skirt piece. Presumably that rather obvious hack only works if you can be sure the shoulders/sleeves won’t be too tight. I’m new to pattern adjustments, so tell me if that’s ridiculous and I should just pick a larger size and do an SBA and a narrow shoulder adjustment.
For the record, my measurements are: upper bust 33, full bust 34, waist 29.5, hips 39. (Sizes 0/2 for bust, 8 for waist and 8/10 for hips). My shoulder width (sleeve seam to neck) is 6 inches or (sleeve seam to sleeve seam) 14.5 inches.
Thanks!!!!