

Today, we’re talking boobies. We’ll be covering three different bust adjustments for Rue: bust height, full bust, and small bust.
We’ll start with adjusting the bust height. On a traditional full or small bust adjustment, the length of the bodice is changed to accommodate the bust size. Rue’s full/small bust adjustment is less traditional and does not add (or subtract) length to the bodice. Therefore, we need to add this length to the bodice before adding room for the bust.
In fitting, each adjustment must be made in a certain order because each adjustment affects one another. Here is the order in which the adjustments on Rue should be done.
- Blend Sizes
- Lengthen and shorten skirt
- Bust height/lengthen and shorten bodice
- Full/small bust adjustment
- Wide/narrow shoulder adjustment
Determine adjustment length
We will use our muslins to determine how much length you need. This is the simplest way to assess where adjustments should be made and to see how the garment will actually fit, rather than basing adjustments on measurements.
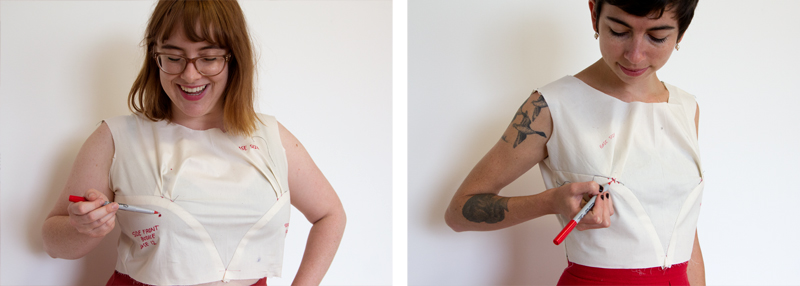 1. With your muslin on, mark where your bust point/apex is on the bodice.
 2. Measure the distance from the curved style line to your bust point.
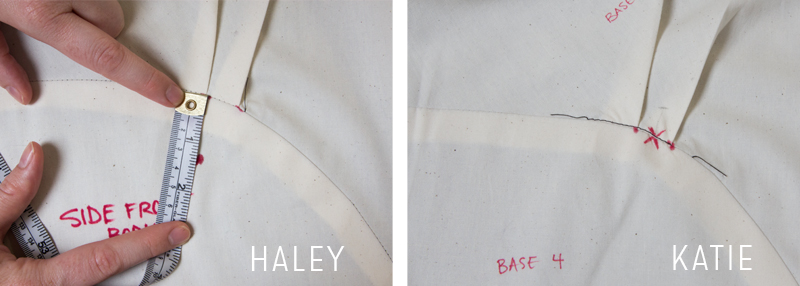
3. Your bust point should land 5/8″ above the style line if you are size 0-8. If you are a size 10-26, the bust point should land 1″ above the style line.In this above photo, I am wearing my finished bodice in a size 4 after my bust height adjustment was made.
The adjustment length depends on where your bust point lands on the muslin. If you land below the style line, use this equation to determine how much length to add to the center front bodice.
On Haley’s Rue, her bust point was 1.25″ below the style line.
On my Rue, my bust point landed right on the seam.
Distance from style line + recommended bust point placement = amount needed in length.
Let’s use Haley’s measurements as an example. She is starting from a size 12, therefore her recommended bust point placement is 1″ above the style line.
1.25″ + 1″ = +2.25″ in length
For my size 4 Rue, I just needed to add 5/8″ of length, because my bust point landed on the style line.
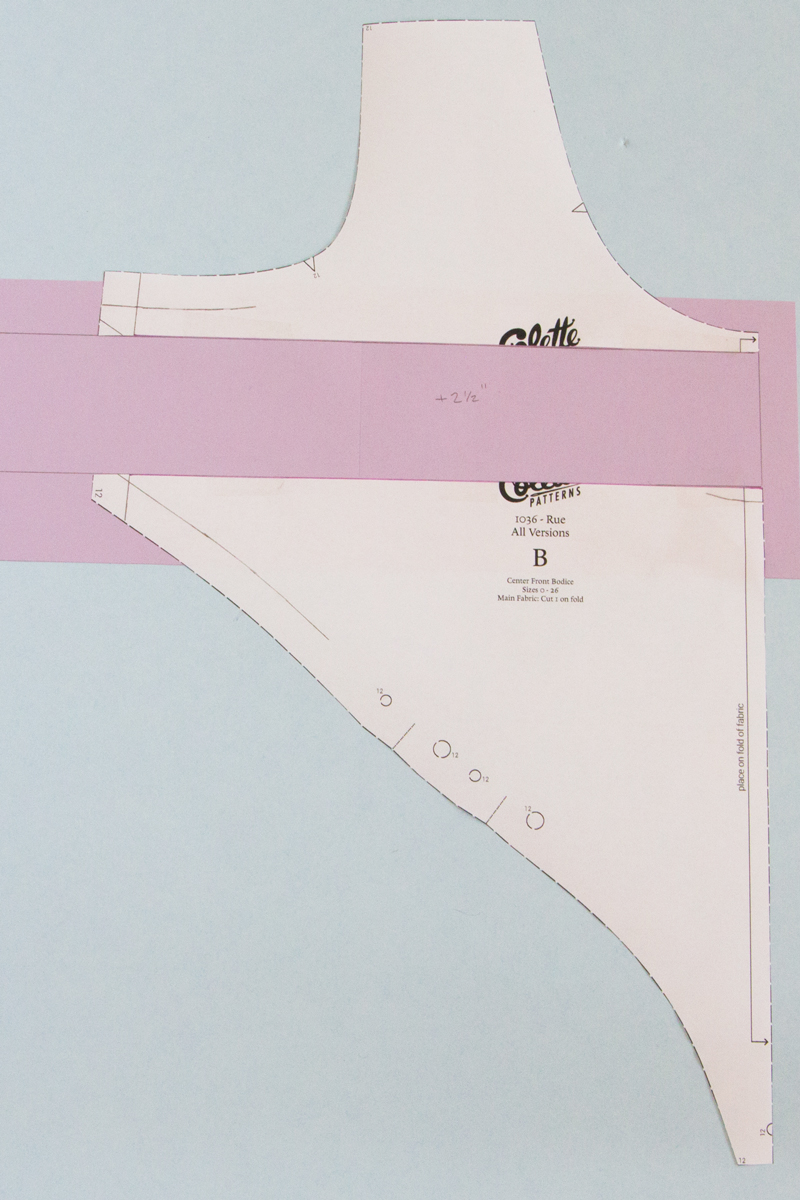
Lengthening The Center Front Bodice
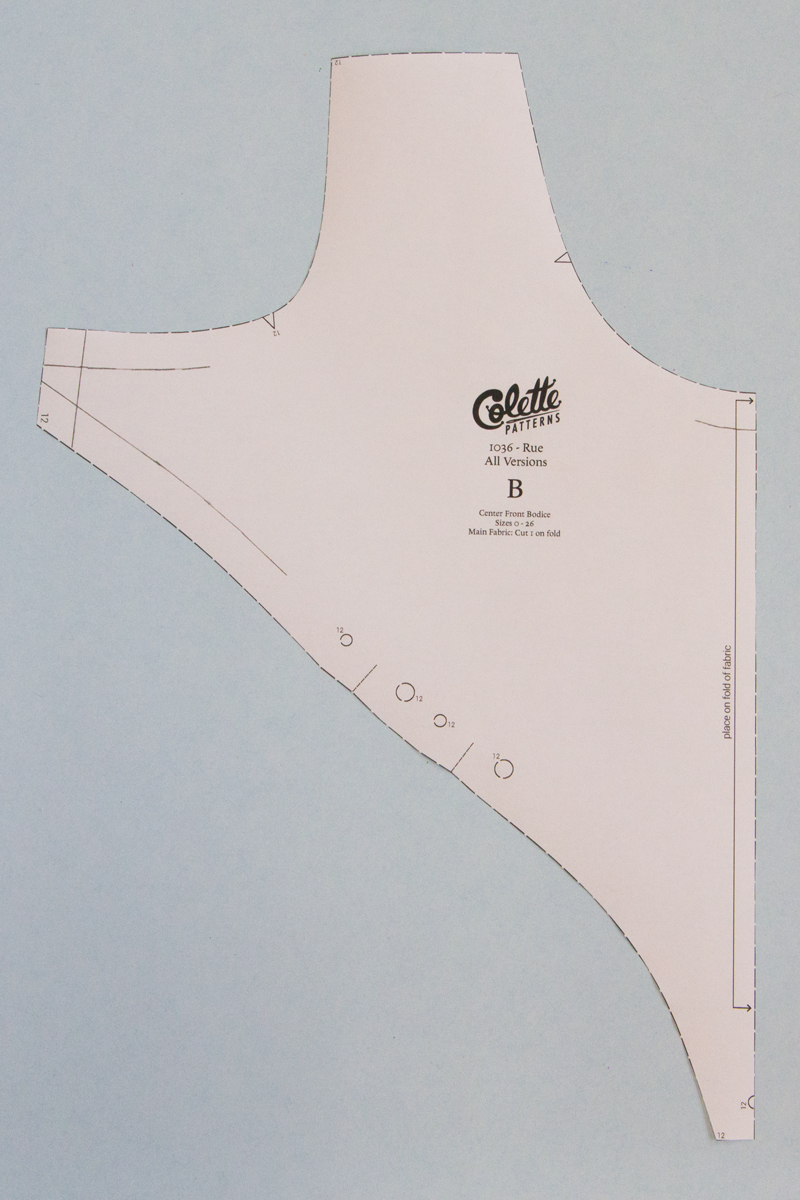 1. Draw in seamlines at the style line, armscye, side seam, and neckline. It’s not necessary to draw in the entirety of the seamline, just near the underarm and center front will do.
 2. On a separate piece of pattern paper draw two parallel lines. The distance between these two lines should be the amount you would like to lengthen. Draw a third line that is perpendicular to the previous lines this will act as a continuation of your center front.
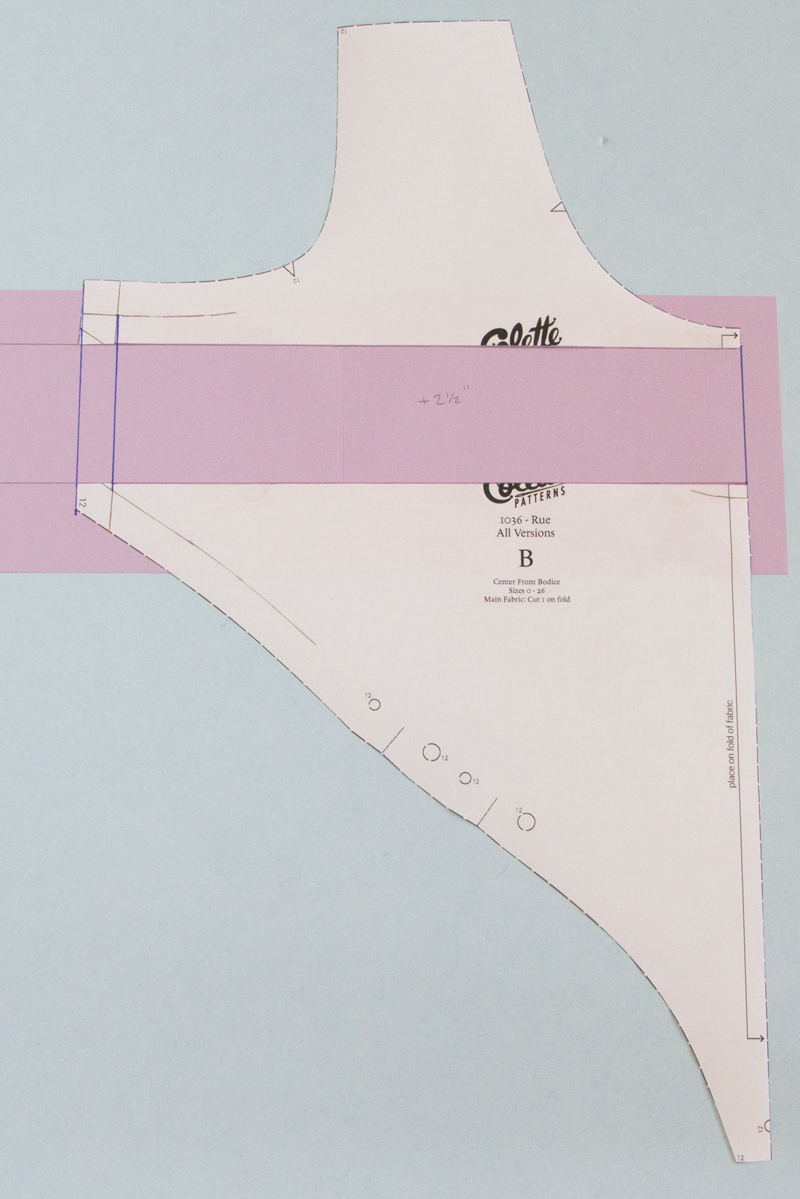
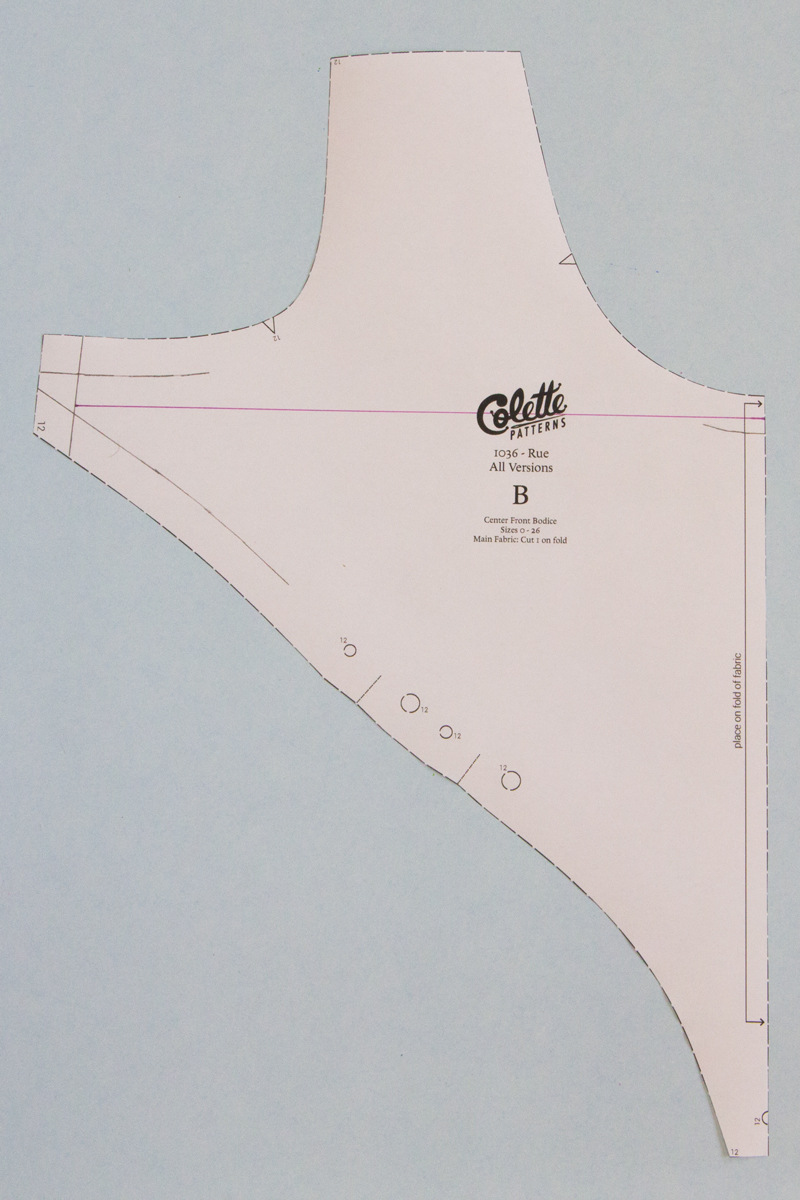 3. On the center front bodice, draw a line perpendicular to center front to the side seam. The area at the side seam is tiny, make sure your line falls between your seamline for the armscye and styleline.
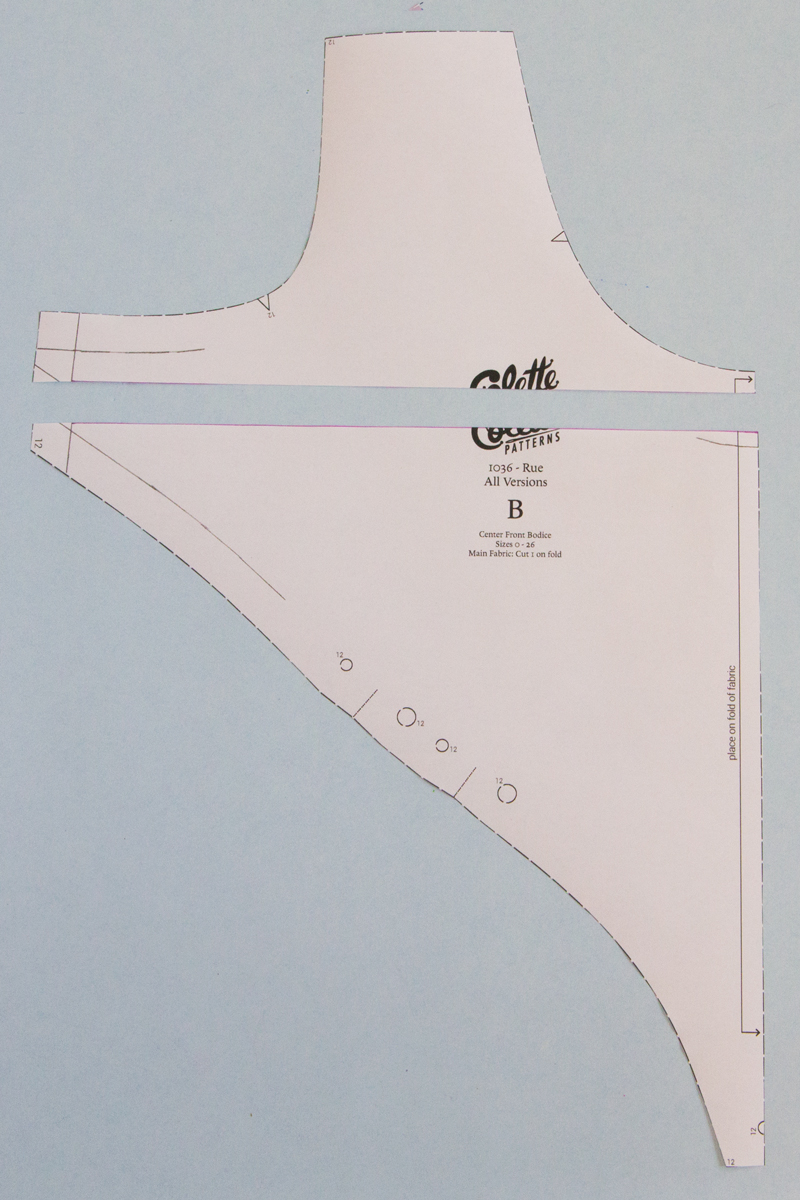 4. Cut along this line.
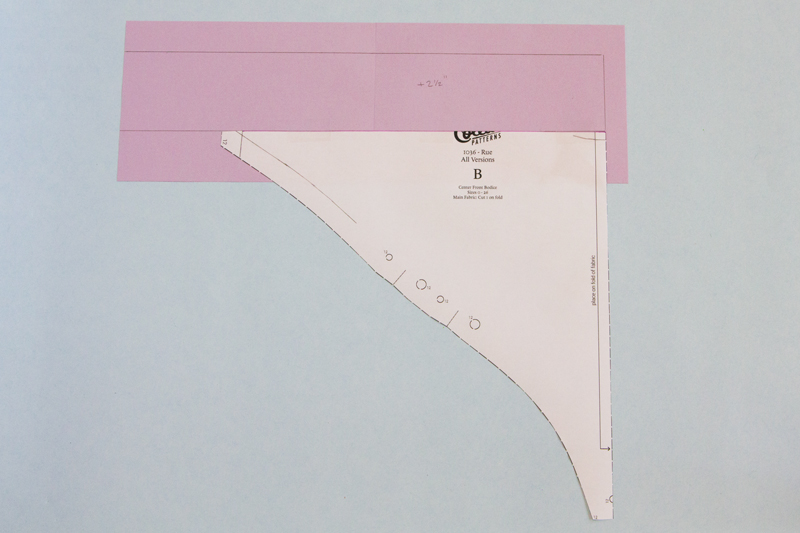 5. Bring the scrap paper behind the bottom portion of the center front bodice piece. Align your slashed pattern piece with the bottom line on your scrap piece of paper and center front line and tape in place.
 6. Align the cut edge of the center front bodice piece with the top line on your scrap piece of paper and center front line and tape in place.
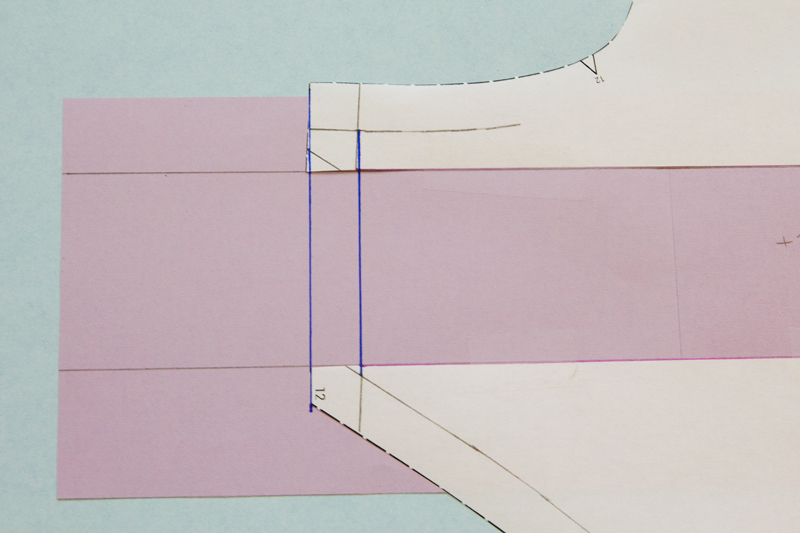 7. Blend seam allowances and seamlines through the scrap paper.
Repeat this same technique on the lengthen and shorten line on the back bodice.
Lining Pieces
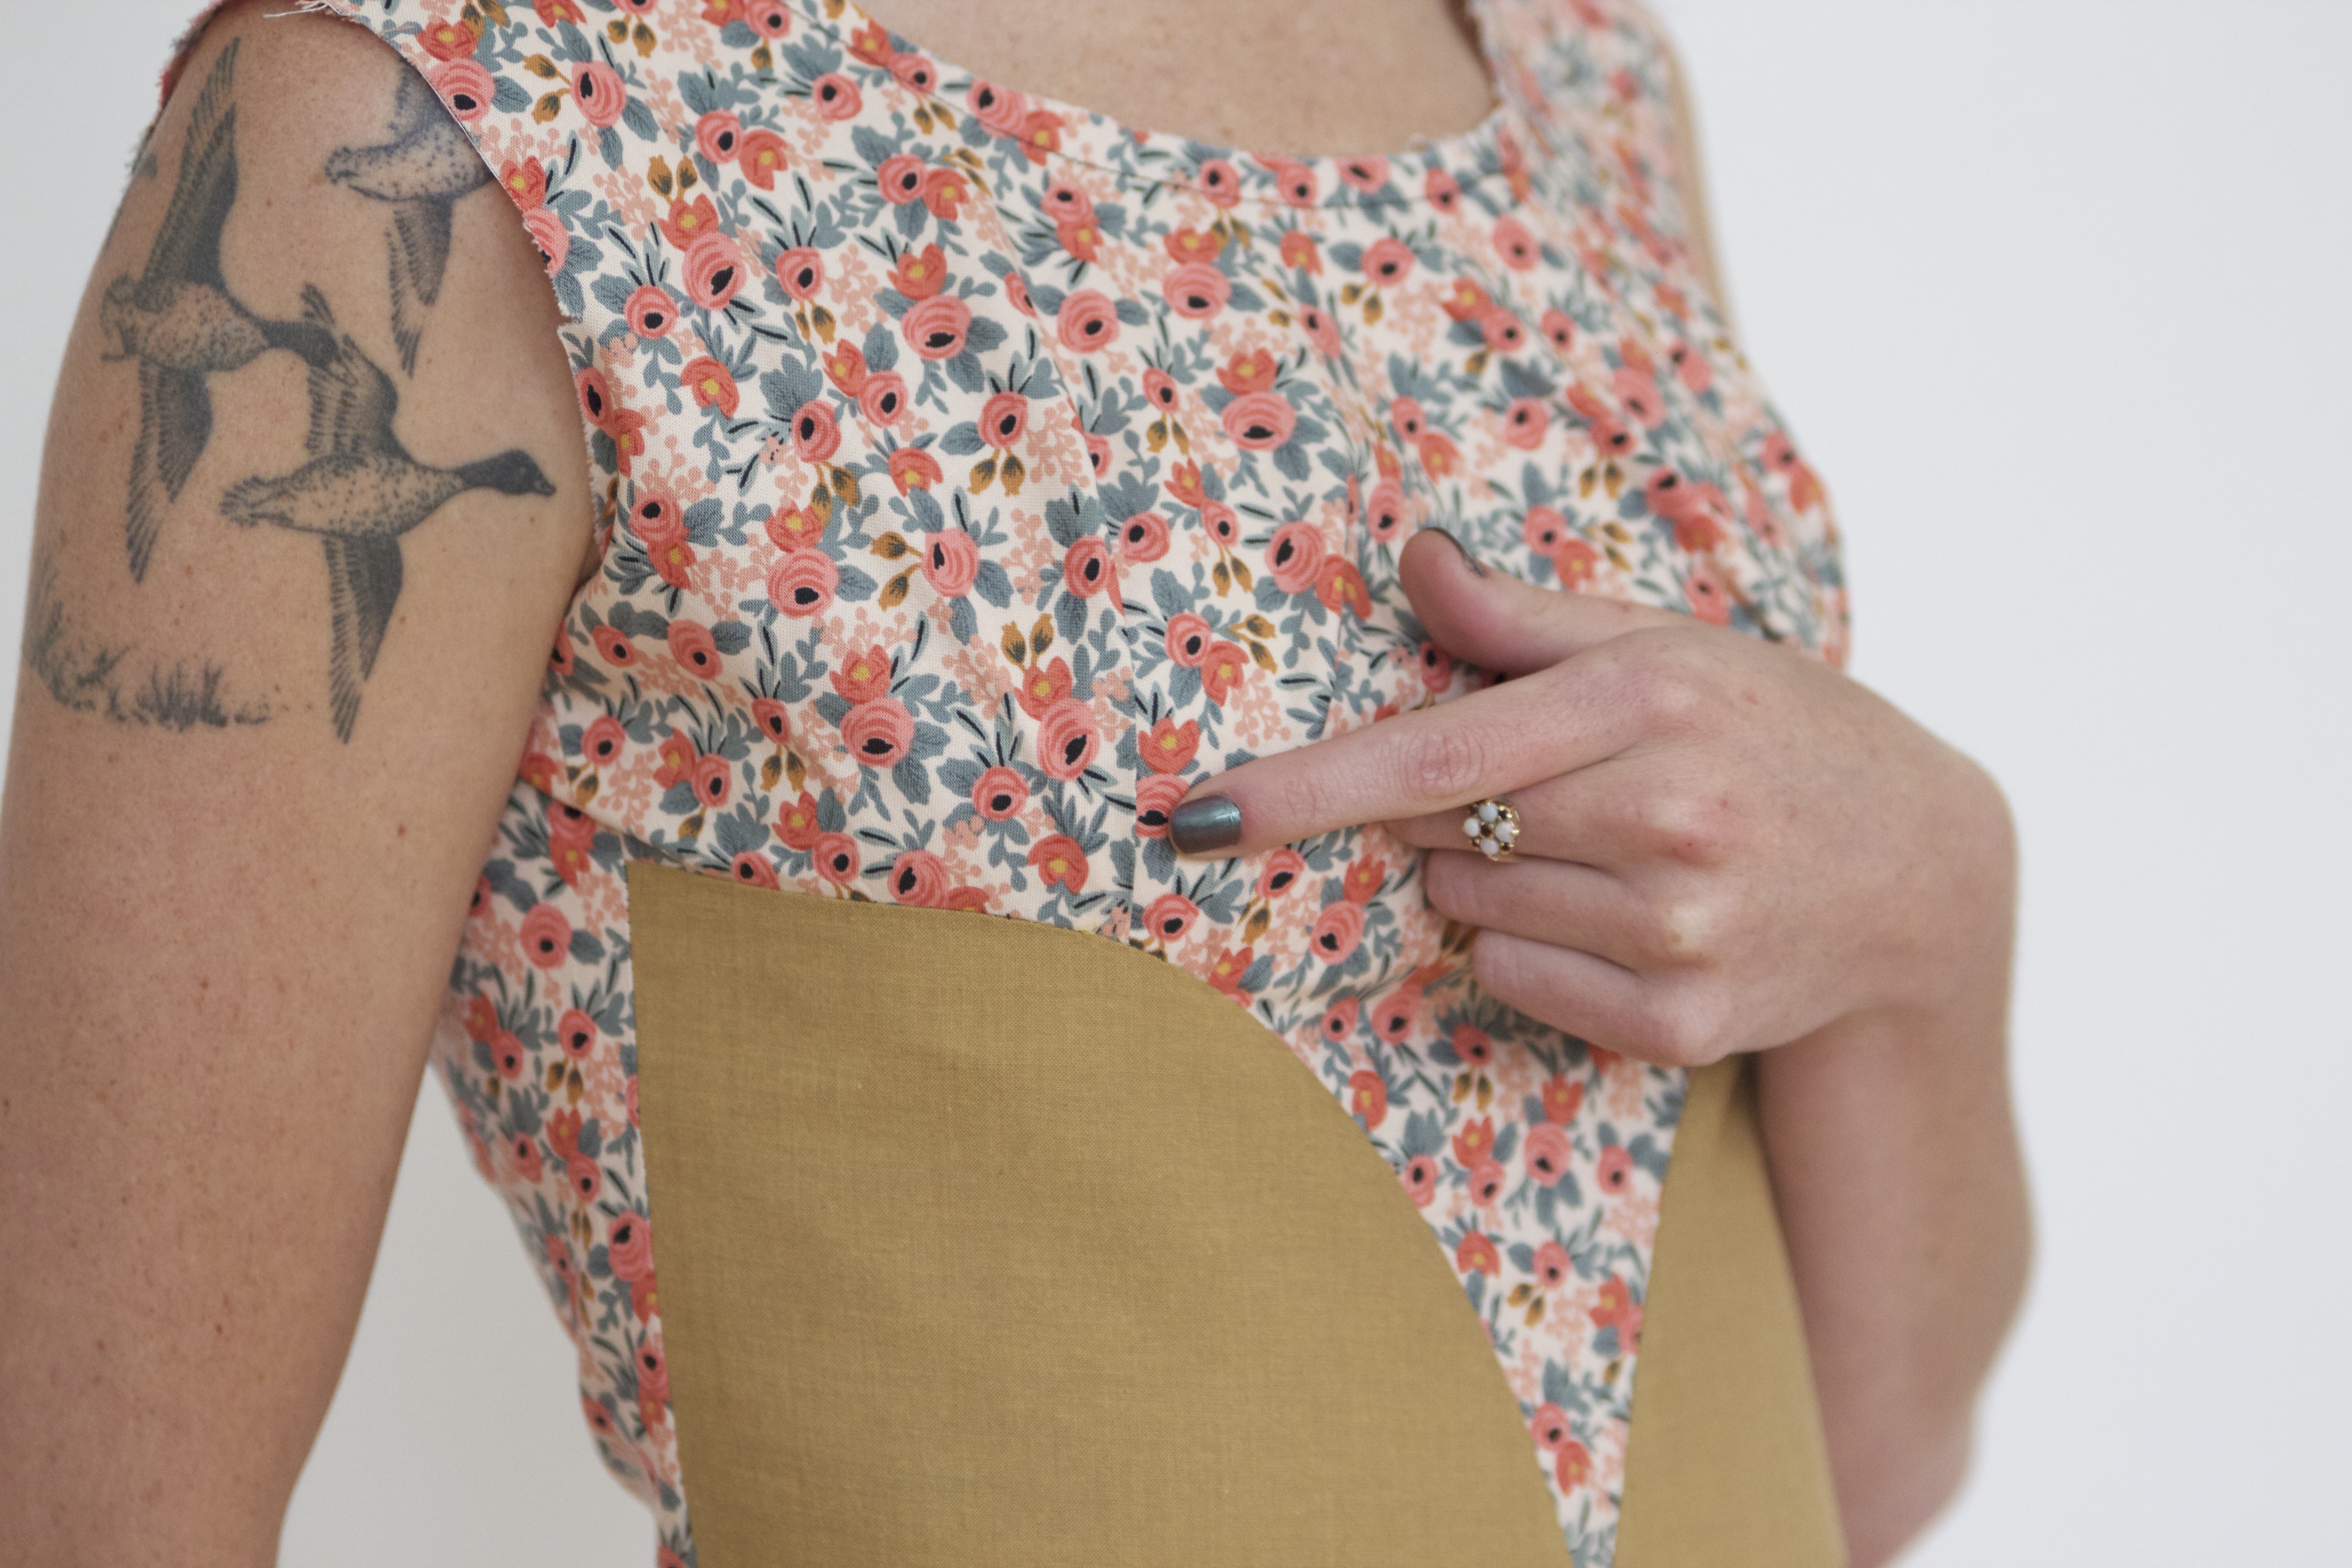
Rue is a fully lined dress, which is awesome but, I ain’t got time to do all these alterations on the lining pieces! Here’s a little insider tip—the lining pieces for the center front bodice, side front bodice, and back bodice are exactly the same as the main fabric pieces except that they are 1/8″ shorter in the neckline.
To save yourself some time, trace the altered pattern pieces and reduce the neckline by 1/8″.
Now that we’ve adjusted the bust height it’s time to make some room for them boobies!
Hop on over to the next lessons on full bust adjustments and small bust adjustments.
Comments
I’m so excited to be following this sewalong! I can finally do one live instead of stumbling across it years later. Me and my girlfriend are very eager to see how our dresses turn out.
I had a question regarding line placement. I love the look of Sarai’s dark plaid dress from your blog, where the style lines lay below the bust and accentuate curves a little more. Something like that would be more flattering on me. To achieve that, do I follow this guide and just add an extra inch or so to the bust height?
Hey Meghan! To get the results that Sarai had, you will need to lengthen the Center Front Bodice and possibly shorten the Side Front Bodice. I suggest lengthening the CFB and making another muslin. After you try that on, you can decide if you would like to shorten the SFB.
Hi Katie. I’m going to trace a size 18 in the bust, but I’m a size 22 in the waist and I don’t know what to do about the side seams or the waist. How should I increase to accommodate my waist?
I recommend doing a small bust adjustment on a size 22. It may seem counter-intuitive because you have a small bust, but it all relative to the waist in the grading process.
In the instruction SBA SFB 1. “Measure the amount needed to be taken from each tuck”. I do not understand where to measure and how to determine the amount needed to be taken from each tuck.
Hello Jan! To determine the amount needed to be taken out from each tuck, refer to the “Determine Adjustment Amount” section of the SBA post. In the photo for Step 1 of SBA:CFB, you can see that I there is a line, parallel to line C, 1″ away from line C. In this example, I am removing 1″ from each tuck.
Is it the same measurement I used in adjusting the length of the CFB? Or am I just missing it when I read the instructions for tHe SBA?
Got it! I wasn’t going back far enough for the instructions. Thanks for your patience!
My bust point landed 1/4″ above the bust point, I am not sure how to address this. Do I need to short the pattern?
I’m sorry Zainab, I think you mixed up your words a bit. Where is your bust point landing in relation to the style line?
Greetings Katie Whittle,
I apology for the confusion. I have chosen a size 12 in relation to my measurements – Waist – 34″, Hips 41″ and Bust 36″. I have completed a muslin and was able to mark my bust point 1/4″ above the curved style line. Do I increase/lengthen the pattern additional 3/4″ which would total 1″ above the “curved style line”?
Hi, I am a 43 waist, 48 bust and 43 upperbust and 53 hips…should i do the size for the waist measurement and work it out from there? Size 18?
Hey Claire, i would make your first muslin in a size 20. In that size your waist will have 1″ ease and 4″ in the bust. You may need to do a slight SBA to remove some of the extra ease in the bust but your waist will fit great!
Hi Katie, thanks for this. That was my first instinct and I did that but the design lines came over the apex, had gaping at the arm hole, and the shoulders sloped off my shoulders so wanted to double check this is right. I know those things can be fixed through adjustments but just wanted to make sure I am doing it the most effective way, thanks again
The bust point is supposed to be ABOVE the style line (curved seam) regardless of cup size/dress size. Correct? It would be helpful, for me at least, if we could see the adjusted muslin after the fixes, maybe with the red bust point marked. Just to clarify in photos what is hard to put into written text.
Your bust point should land 5/8″ above the style line if you are size 0-8. If you are a size 10-26, the bust point should land 1″ above the style line.
In the bodice post, I can add a photo of the finished bodice for your reference. :)
Katie, I am definitely learning from this bodice — all fun! I’ve sewn my straight size 6 bodice and it went together wonderfully. I’m going for the look somewhat like Sarai had with her plaid and with the fit of my muslin the apex is 1.5 inches above the style line. It’s about the same fit as Bianca (Vintage on Tap) which I like if I can work out the current issues — worst of which is a good bit of gaping across chest, slight drag lines from side back at a slight diagonal going towards the center back, a little tight under the arm and I think shoulder is a too wide since it’s falling off a little. Suggestions of what I should do? Thanks!
Hey Vicky! Can you send photos to service@colettepatterns.com. I will look at them and see if I can diagnose the problem :)
Hello Vicki! Thank you for sending those photos over! Here is my diagnosis :)
– I suggest lengthening the bodice for your next muslin, without trying to do any alterations about the gaping neckline. You will need that fullness for your bust once the style line has been lowered.
– I see what you mean about the tight armhole, follow this tutorial to learn how to lower the armhole and adjust sleeve cap height.
– Tomorrow, I will post a tutorial for adjusting for a narrow shoulder, which you definitely need.
– As for the back, I’m curious to see if after these alterations are done, if you will still have this problem at the back. For now, leave it be and if is still a problem after all of these alterations, I’ll help you through it.
Thank you so much for such a quick reply Katie! This sounds like a great plan. Oh yes, do you have a suggestion of how much to lengthen, and would it be just Center Front Bodice, as per the post re: Bust Height?
Katie, after marking bust points I could measure distance needed to move style lines below bust line, which was 3.5 inches. Now tucks are sewn but of course the bottom edge of the center front bodice is also 3.5 inches down, so my question is I’m thinking the style line needs to be altered so it still hits at the waist, right? I felt that should be done before continuing. Thanks!
Hi Viki! I suggest shortening the side front bodice pieces by 3.5″ if you would like the bodice to be the original length. If you do this, you will also need to shorten the lower portion of the center front bodice. If you need help, email us at service@colettepatterns.com
ok still struggling.. I don’t know why. The bust point is 3 ” above the style seam. If I’m understanding correctly, I need to subtract 1″ from the 3″. Then i need to subtract(?) 2 inches to get proper length? Or do I just subtract 2″ from 3″? And do I wind up removing the 2″ length of the pattern or adding? And if I remove it (shortening the bodice) where do I blend the side seam? at the furthest seam edge or do I blend the shorter points removing the longer one? I’m feeling like such a dunce. I’m having trouble visualizing the shortening of the bodice. But it appears if I do that it does take up the gap near the armscye above the bust.
Hi Katie, I made my muslin a size 10, which is appropriate for my bust, 38, but it is a tent. I would say there is 3-4 inches of extra fabric on each side. Should I just cut another and make it much smaller? What size? Will that then make it exponentially to small for my DDD cup? Thanks -Rachael
Hello Rachael! What is your waist measurement? For this pattern, I recommend choosing a size from your waist measurement and making adjustments for the bust.
My waist is a 32, under bust a 31. I am not sure if I somehow constructed the pattern incorrectly. There is no fitting to the bodice, can I email you a picture?
Of course! You can email a photo at service@colettepatterns.com
I sent two photos.
I need help! I’m totally new to these alterations. Based on my waist, I’m starting with the size 12. My bust point needs to be lowered 3/4″. My problem is, after shortening the bodice, there won’t be enough space on the side for the 5/8″ SA at the arm and style line. Do I just use a smaller SA?
Hi Michelle! I’m sorry, I’m having trouble understanding why you lost your 5/8″ SA. Could you explain a little bit more what you did? If it would help you could send a photo of your altered pattern piece to me at service@colettepatterns.com
Thank you for replying so quickly – you guys are awesome. I shouldn’t sew/post when I’m exhausted. I had a mental block and have since figured out that I was confusing myself. I also learned that you REALLY should do one adjustment at a time. I am now on my third muslin and am moving right along. Thank you for hosting this sew along and for all the valuable information.
Hi Katie,
I made the Muslim in a size zero for my 33.5″ bust, 26″ waist and 35.5″ hips. I chose this because of the considerable ease already in the pattern. I sent pics under separate cover, but am i correct in assuming after I increase the length 1.25 to account for the busy height adjustment that the arm hole tightness will also resolve? The SBA is then to follow.
Hi Winnie! Meg and I are looking at your photos now and we will be sending you an email response shortly.
I went on a small weekend vacation and I really feel like I’m behind now. I’m making my muslin today. Is is better to use waist measurements for this dress and alter the bust line? I see quite a few people doing that. Thanks.
Yes, we suggest choosing a size off of the finished waist measurement and adjusting for the bust.
How did you get the paper pattern without having to tape pieces together and just the one size? I ordered the paper pattern so it’s tissue, but I always try to keep it whole (i.e. not just cutting the size I think I need in case I want to use it later.) But, it makes it harder to cut it out. Do you have tips for this? I know this is REALLY off topic, but I struggle with this. Thanks.
-Stephanie
Thanks for an excellent sewalong and your detailed responses. I’m on my first muslin and I can see that I will need to lengthen the bodice to get the side front panels in the right place in relation to my bust apex. What happens if i extend the front and back bodice to accommodate the bust and the overall bodice becomes too long onto the waist? I don’t want to trim the waist edge and lose the pointed intersection of the front side panels. Is there another step required to take surplus length from the portion of the bodice from the bust down? Thanks in advance!
In case you haven’t seen the announcement, we have decided to reprint the pattern due to some drafting issues including the one you are running into. We did release a tutorial for fixing this issue here. The Sewalong will be postponed until October 25 but I am happy to work with you to fix issues you may run into. You are welcome to email me at service@colettepatterns.com anytime!
Thank you. I’m so pleased Colette has been able to respond to all the feedback with a redraft. It’s a beautiful dress but there’s been such a variation of placement of the side front panels. Sarai’s plaid dress is my muse. I will await the next version.
Thank you! I’m excited to start a new and help everyone make up perfectly fitted Rues!
Hello! We released the second edition of Rue on Tuesday. You can learn about the changes here.
I’m a little behind (still making my muslin), but am very excited to get sewing!
Based on my first muslin (size 8), everything fits perfectly in the bust region, with the style lines 5/8″ below my bust. However, the waist feels a little high– my shoulder-to-waist length is 18.75″, and the muslin is about an inch shorter. From neckline to belly button I’m ~13″, and the pattern/ muslin is 12″.
I like the look of the style lines below the bust… can I just follow those instructions, adding an inch to the top of the center front bodice in order to lengthen it overall, and leave the bottom of the CFB and side front bodices as they are? Or will that mess up the proportions + fit?
Thanks for your help!
In case you haven’t seen the announcement, we have decided to reprint the pattern due to some drafting issues including the one you are running into. We did release a tutorial for fixing the style line placement issue here. The Sewalong will be postponed until October 25 but I am happy to work with you to fix issues you may run into. You are welcome to email me at service@colettepatterns.com anytime!
Are you planning on updating this? I’m disappointed that there was no tutorial on how to adjust bust height following the pattern adjustment.
Hey Jessica! The instructions for bust height adjustment, blending sizes, and lengthen and shortening apply for both the first and second edition of Rue.