

Happy Boobie Day on the Rue Sewalong! This post is all about adjusting Rue for a full bust. The small bust adjustment can be found here. Remember—bust height adjustments should be made before small or full adjustments. You can learn all about adjusting bust height here.
DO I NEED A BUST ADJUSTMENT?
Most pattern companies draft patterns based on a B cup, but we draft for a C cup for sized 0-18, and a DD for sizes 20-26.
If you’re making size 0-18 and are an A or B, you will need a small bust adjustment or SBA. If you are a D or larger you will need a full bust adjustment or FBA.
For sizes 20-26, if you are a D or smaller you will need an SBA, and if you are a DDD or larger you will need an FBA.
DETERMINE ADJUSTMENT AMOUNT
Determining the amount to add or subtract from your bust is relative to the amount of ease you like to have in your garments. Below are my recommended bust ease amounts for different sizes in a semi-fitted dress in a medium-lightweight woven.
Sizes 0-8: 1 1/2″ ease
Sizes 10-26: 2 1/2″ ease
To determine how much to add to your bust, simply follow this equation.
Your Bust Measurement + Preferred Ease Amount – Finished Measurement = Adjustment Amount
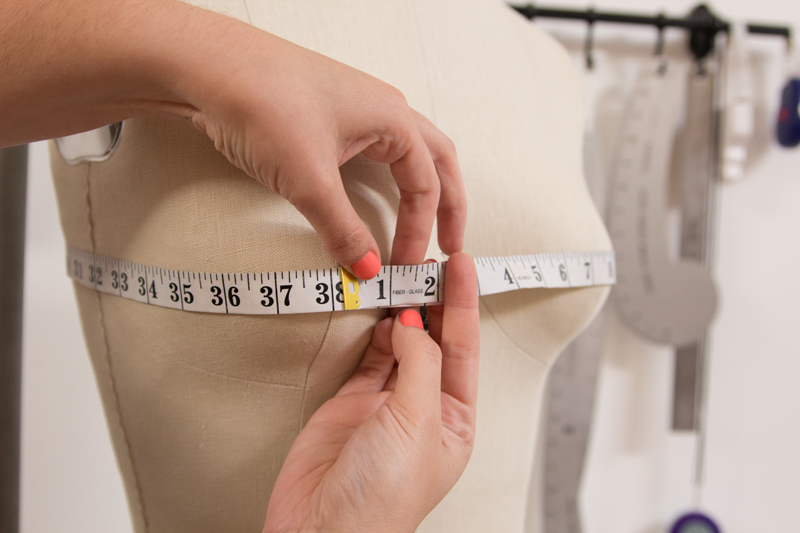
Let’s take a look at Haley’s measurement chart one more time, as an example.
Haley’s bust measurement: 42.5″
The size 12 finished measurement: 43.5″
Recommended ease in size 12: 2.5″
42.5″+2.5″= 45″
45″-43.5″= 1.5″ FBA
We will be adding extra room for the bust in two places on a piece that is cut on the fold. Therefore, we need to divide this FBA amount into 4 to evenly distribute the fullness.
1.5″ FBA ÷ 4 = .375″ (which is 3/8″)
You’ll need:
- Your Rue pattern
- A clear ruler (I use a 2” x 18”)
- Pencil
- Pattern paper
- Paper shears
- Tape
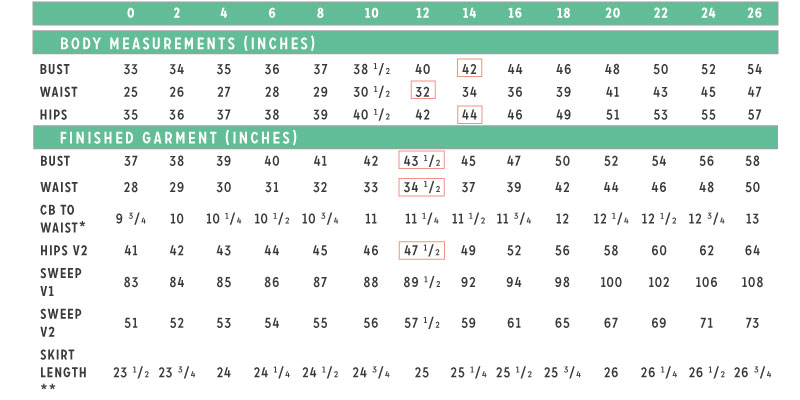
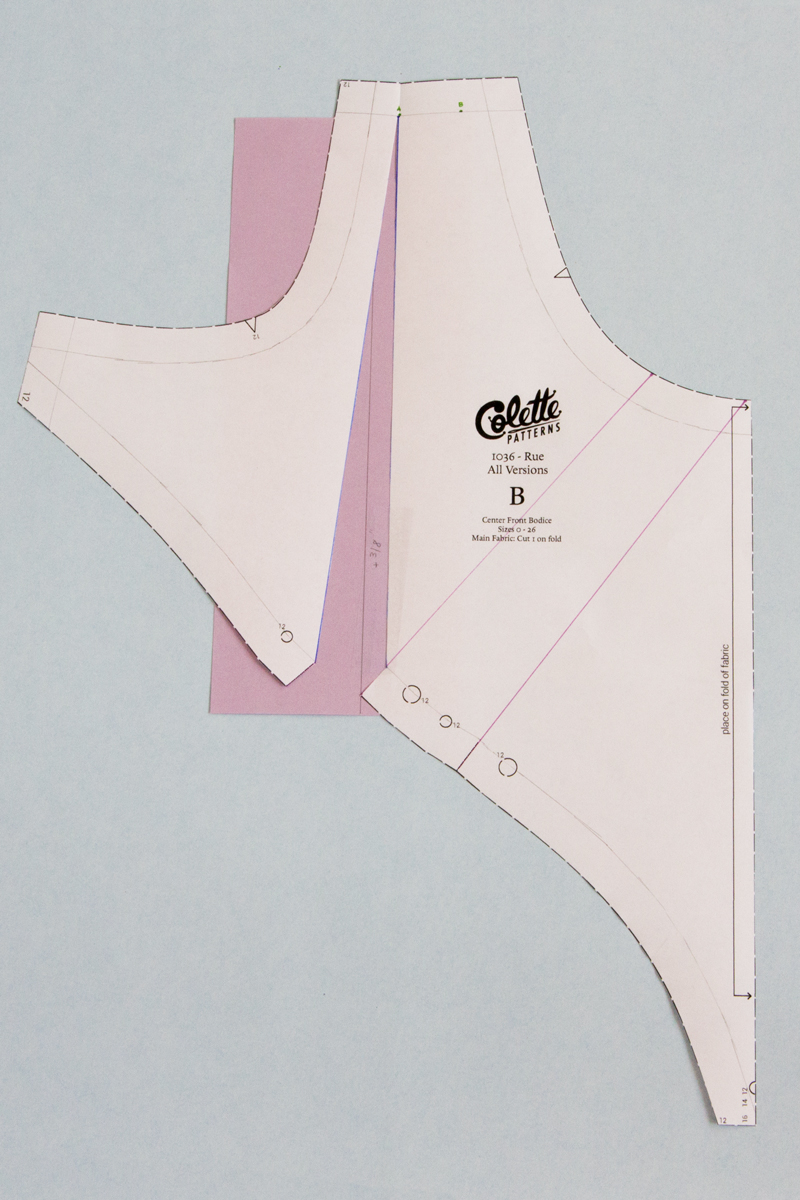
Preparing Center Front Bodice Piece
 1. Draw in all seam allowances on center front bodice.
 2. With a ruler, extend center tuck lines to neckline.
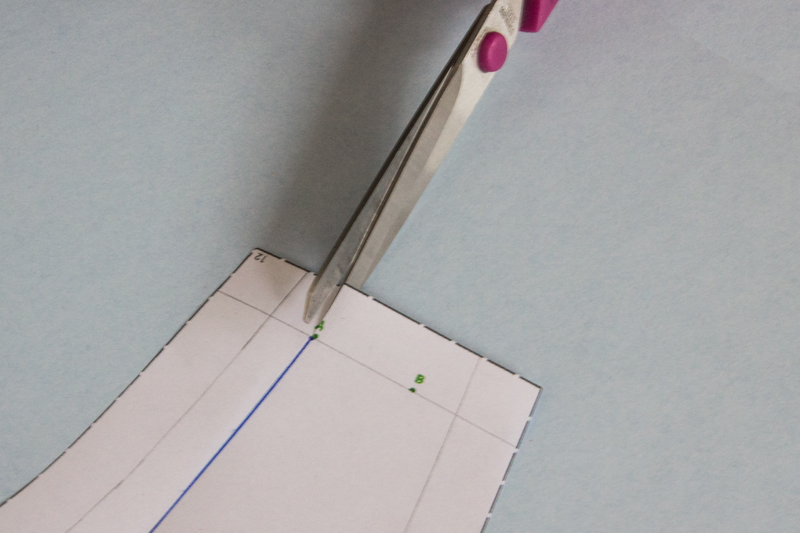
 3. On the shoulder seam, measure in 1/2″ and mark the sleeve seam line, this will be mark A. Measure in 1/2″ from the seamline on the necklines and mark, this is Mark B.
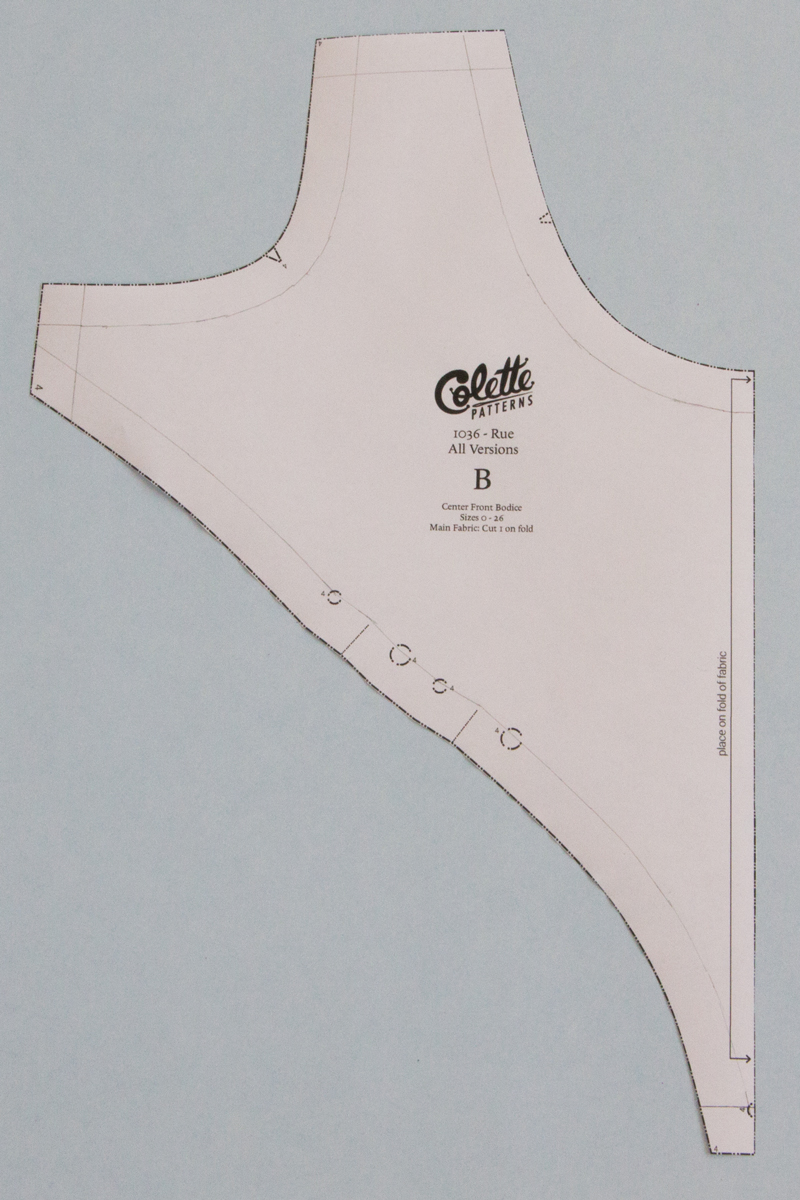
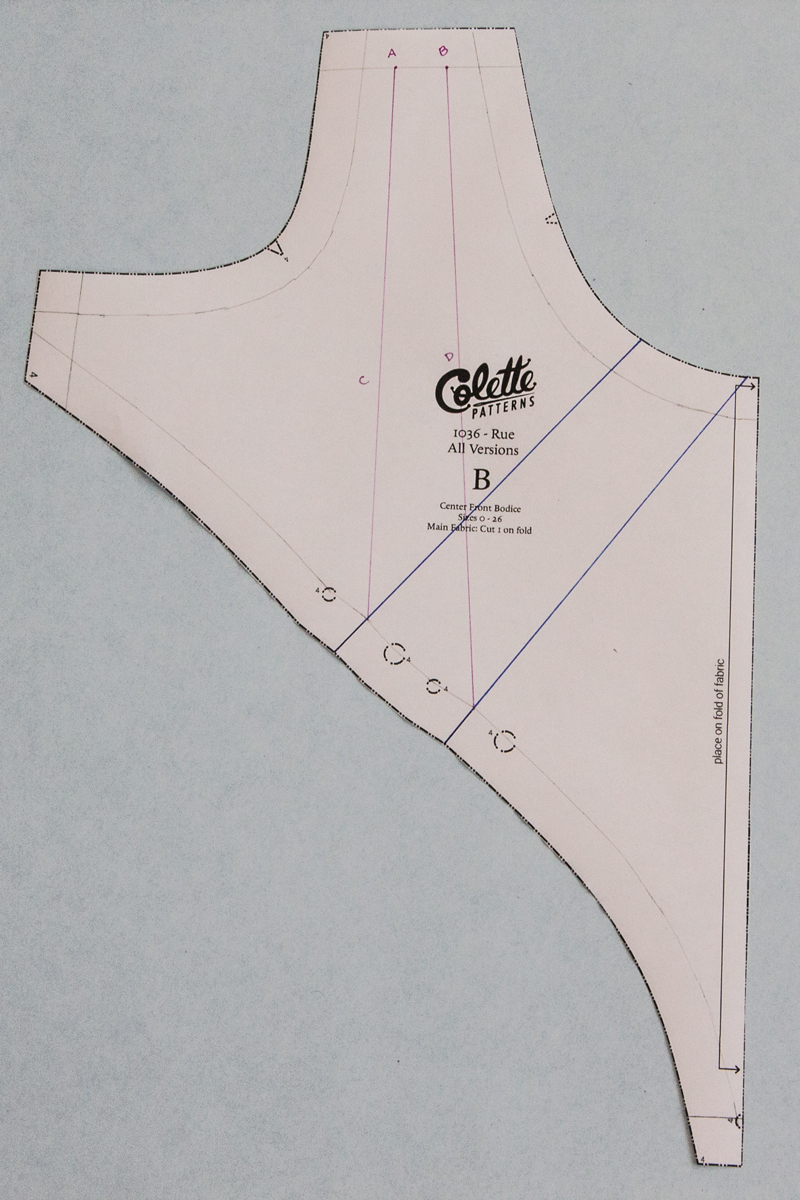 4. Draw a line from mark A to the point where the seam line and left tuck line intersect. This is line C.
Draw a line from mark B to the point where the seam line and the right tuck line intersect. This is line D.
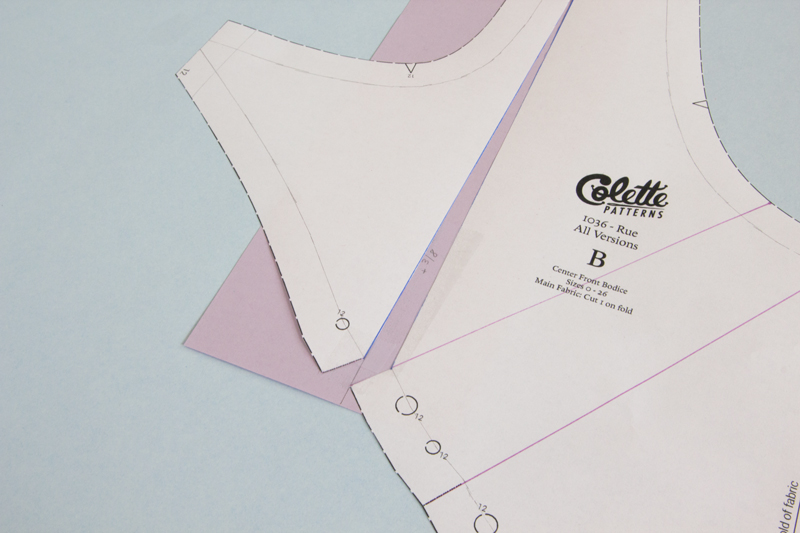
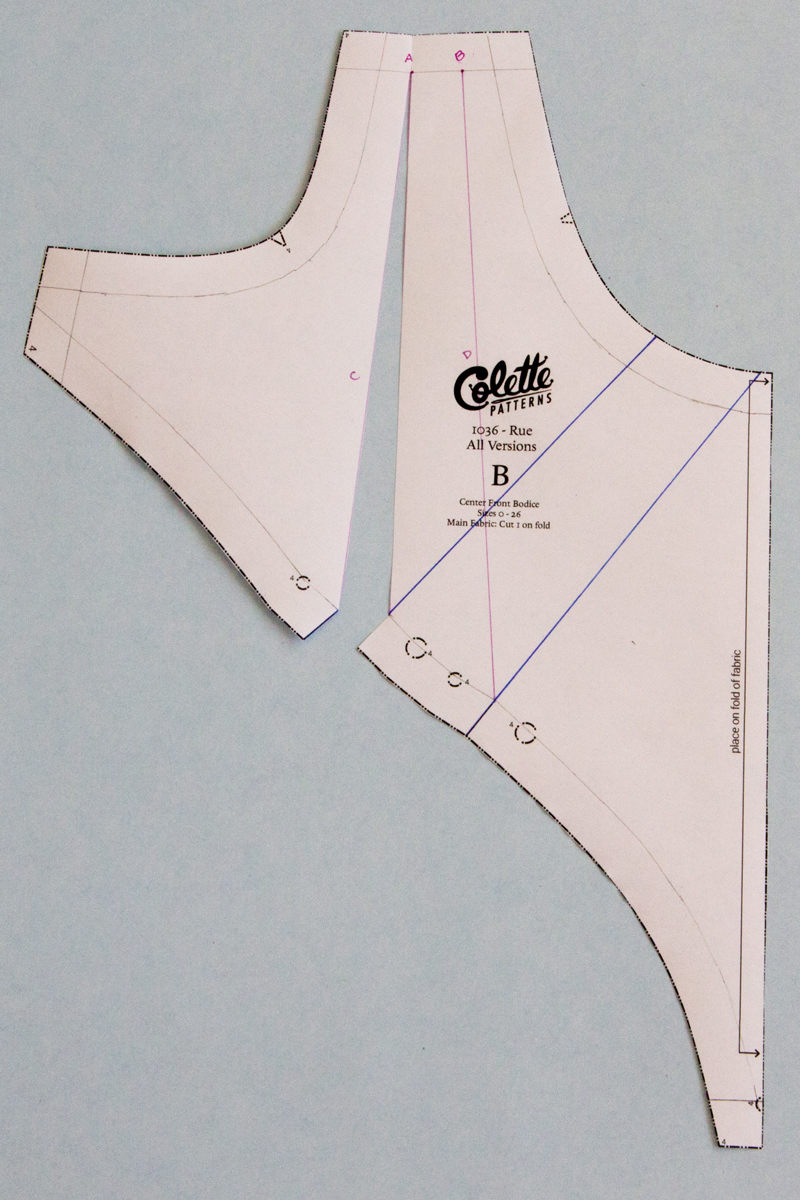 5. Cut through the left tuck line to the intersection with line C and continue cutting through line C to the seam line at the shoulder.
 6. “Hop over” the seam line and continue cutting from the edge of the paper to the seam line, creating a hinge.
Full Bust Adjustment: Center Front Bodice
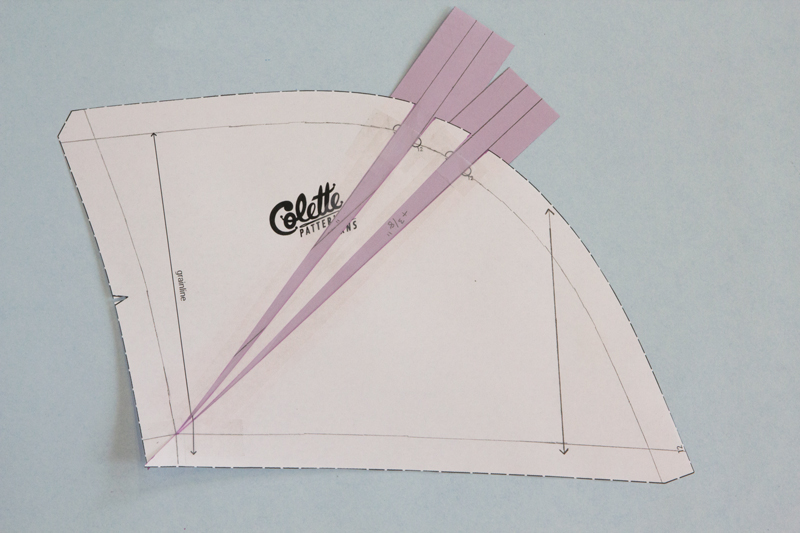
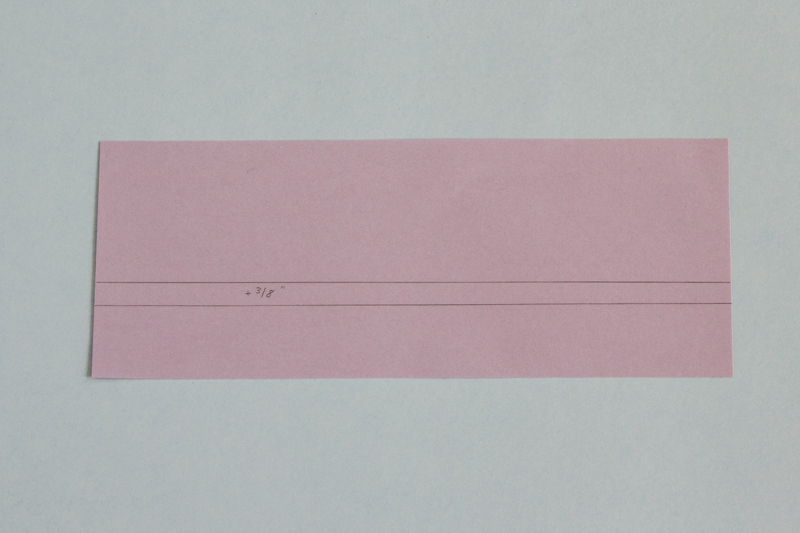 1. On a separate long piece of paper, draw two parallel lines. The distance between the lines should be the amount that will be added for your FBA. In this example, I needed to add 3/8″ to each tuck in the FBA.
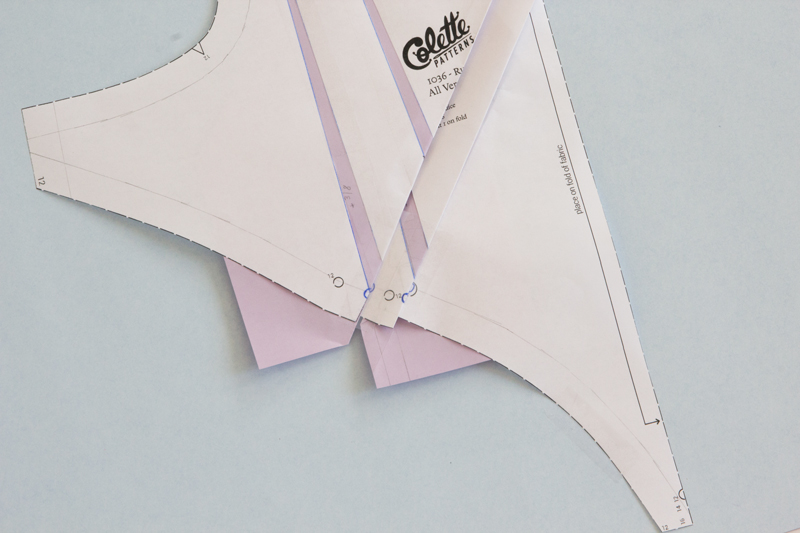
 2. Bring the extra paper under line C, aligning an outer line on the scrap paper to one side of the slashed line C. Tape in place.
 3. Swing the other slashed side of line C to meet the other edge of the scrap paper lines at the seam allowance. See photo for reference. Tape in place.
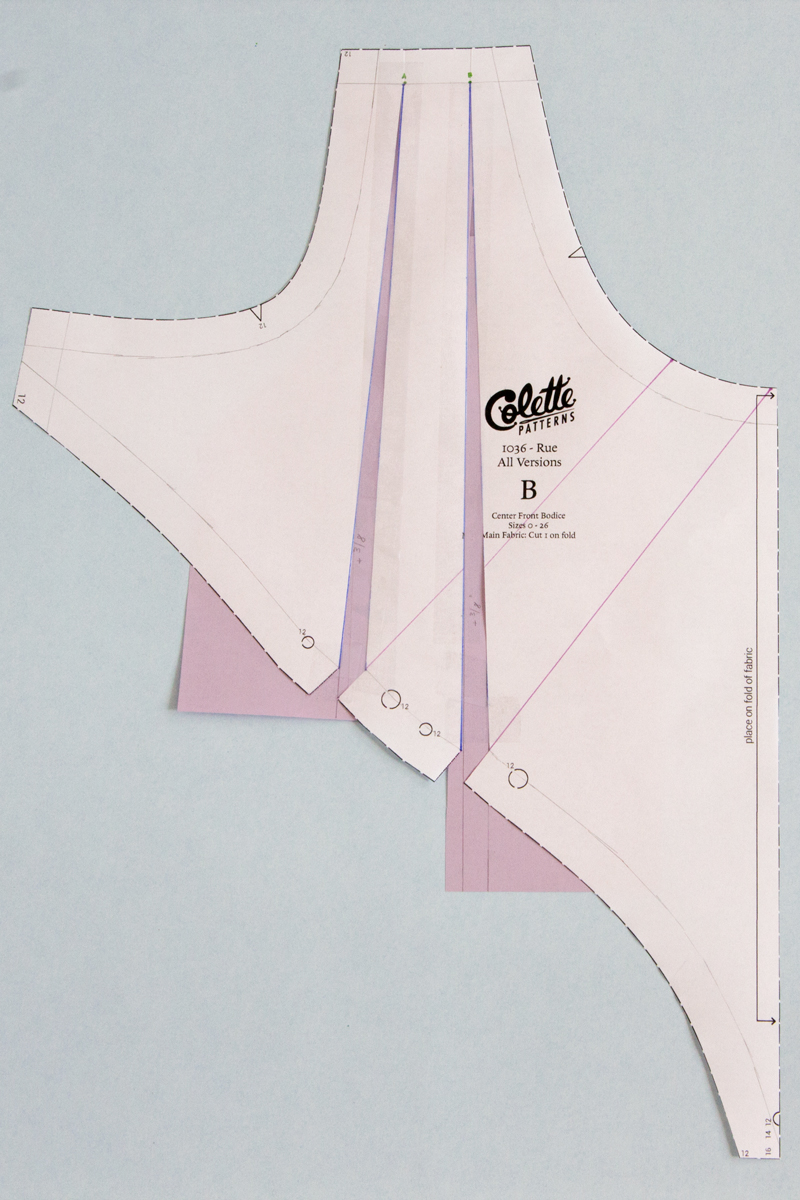
4. Repeat steps 1-3 for the right side tuck.
Truing Lines and Redrawing Tuck Marks: Center Front Bodice
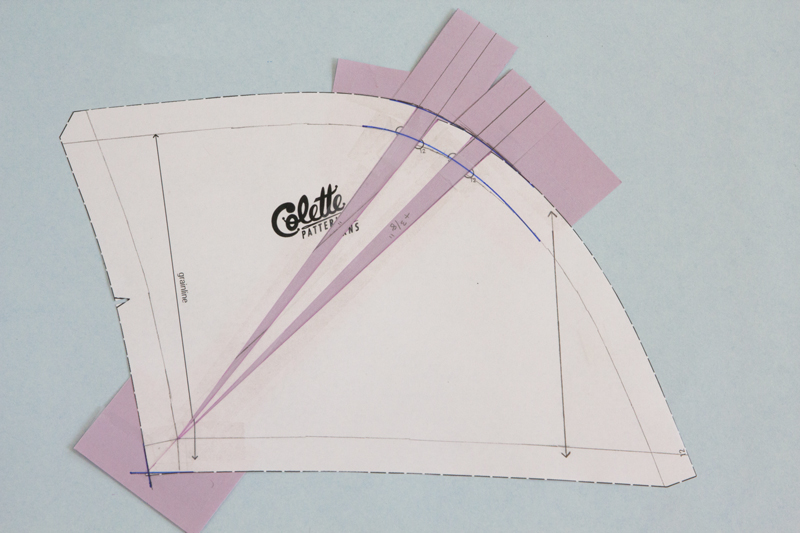
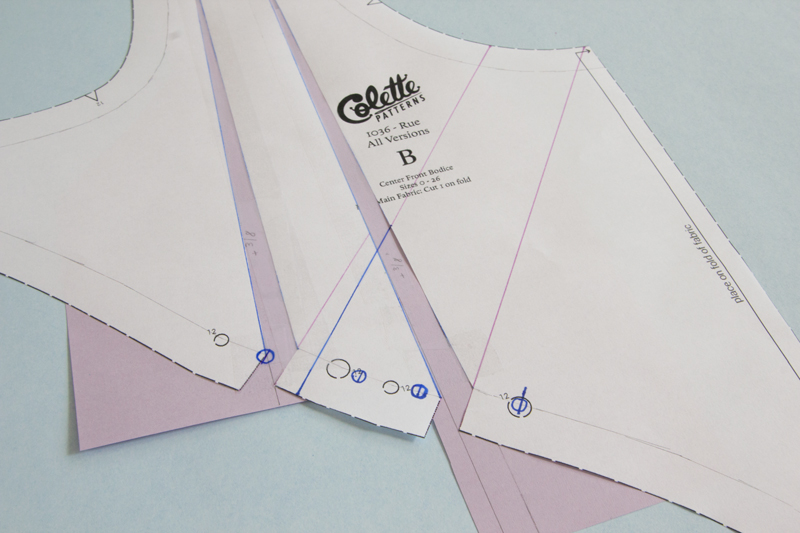 1. Start by drawing a short line at the first dot, on the right, parallel to the tuck lines. Continuing up the style line, draw a set of 5 lines, all 3/4″ away from eachother, parallel to the tuck lines.
 3. Fold the tucks. Redraw the seamline, blending from the original line towards the top and bottom. Cut along seam line.

4. Remove tape, keeping tucks in place. Add a long strip of paper behind the style line. Add 5/8″ seam allowance to the seam line. Next, measure 5/8″ from the cut edge up each of the tuck placements and mark with a dot. These lines and dots are now your new tuck marks.
Preparing Side Front Bodice Piece
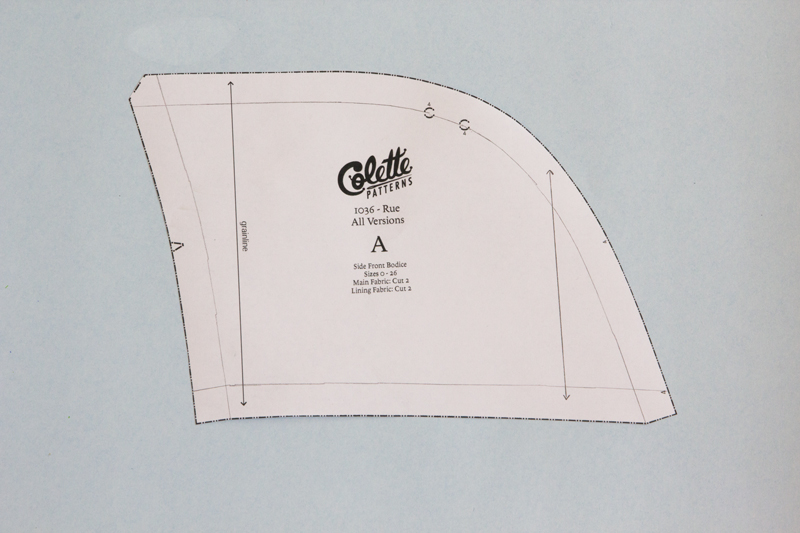
1. Draw in all seamlines on Side Front Bodice piece. Draw an additional grainline marking towards center front.
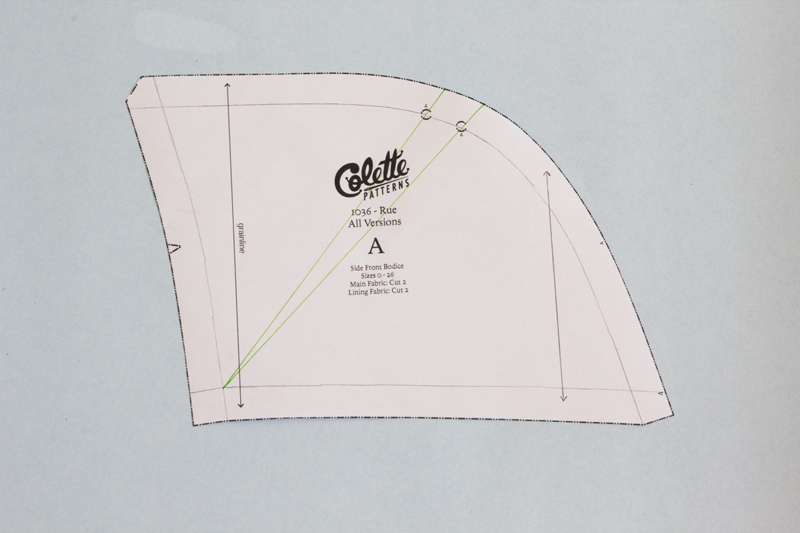
2. Draw one line from the intersection of the side and waist seam to the lower tuck placement dot, this is line A.
Draw an additional line from the intersection of the side and waist seam to the upper tuck placement dot, this is line B.
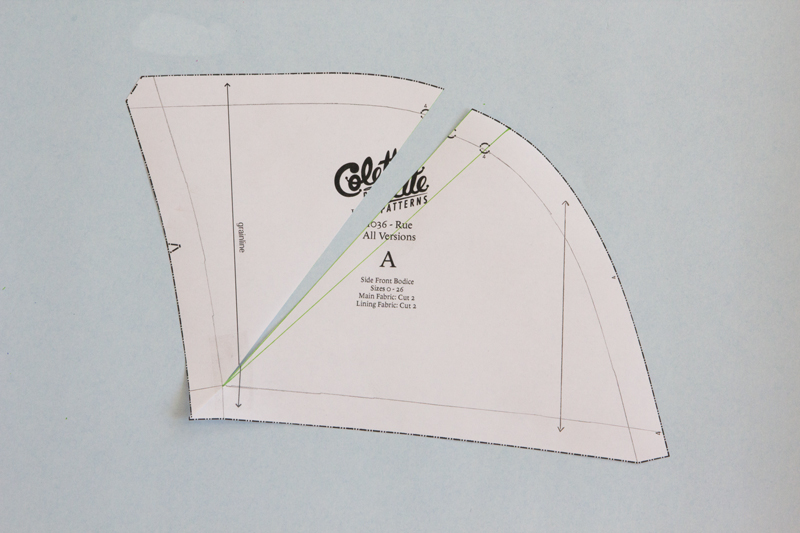
3. Cut through line B, from the style line to the seam line, “hop” over the seam line and snip into the seam allowance.
Full Bust Adjustment: Center Front Bodice
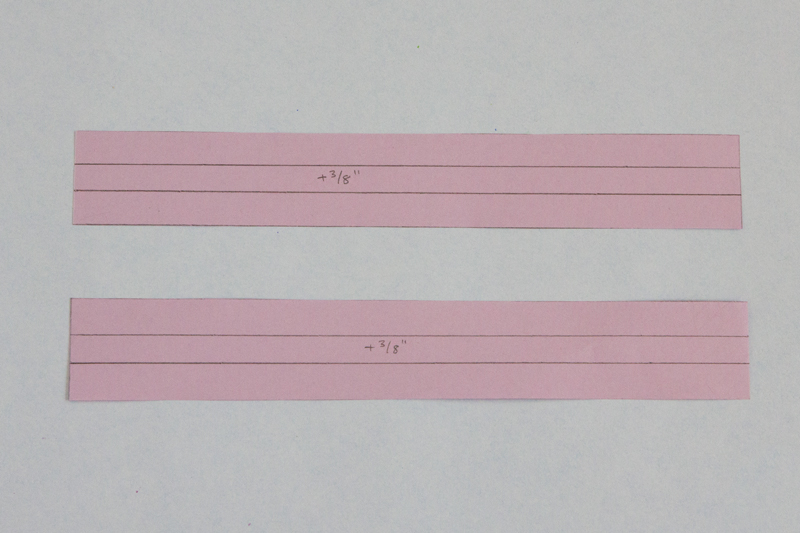 1. On a separate long piece of paper, draw two parallel lines, the distance needed to be added in the FBA apart. In this example, I needed to add 3/8″ to each tuck mark.
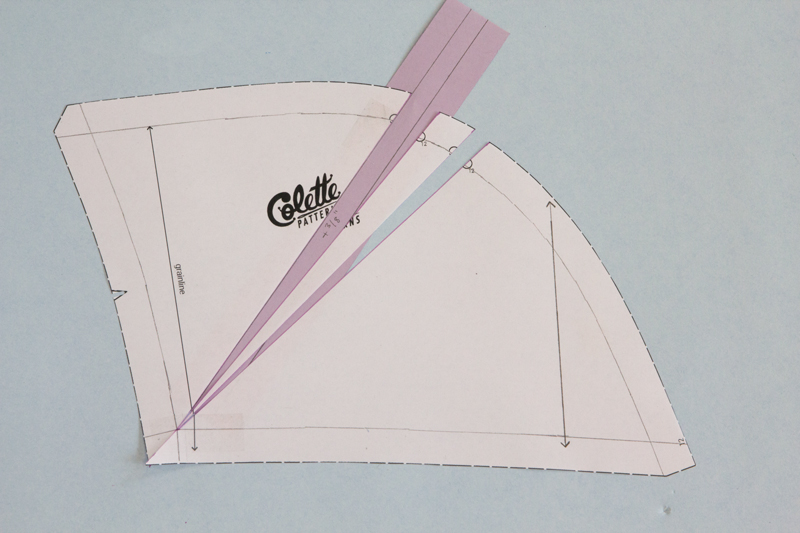 2. Bring the extra paper under Line B, aligning one of the outer lines on the scrap paper to the left side of the slashed line B. Tape in place.
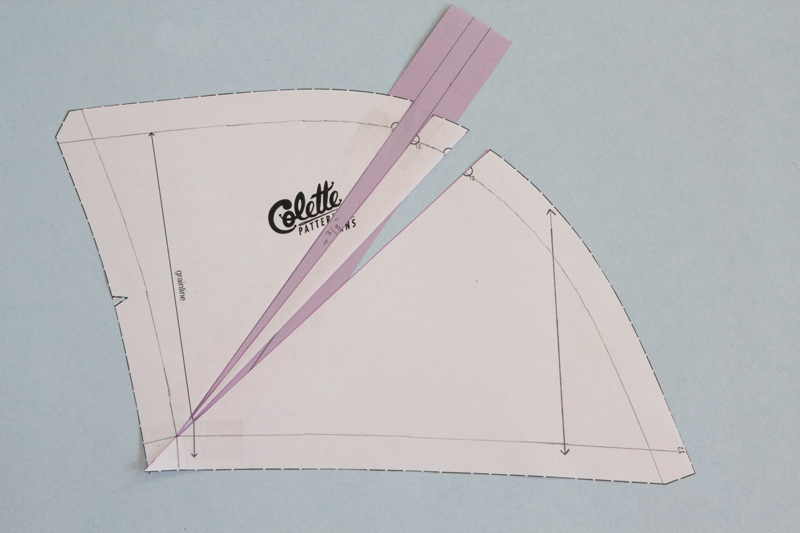 3. Swing the other slashed side of line B to meet the other edge of the scrap paper line at the seam allowance. See photo for reference. Tape in place.
 4. Repeat Steps 1-3 for the right side tuck mark.
Truing Lines and Redrawing Tuck Marks: Side Front Bodice
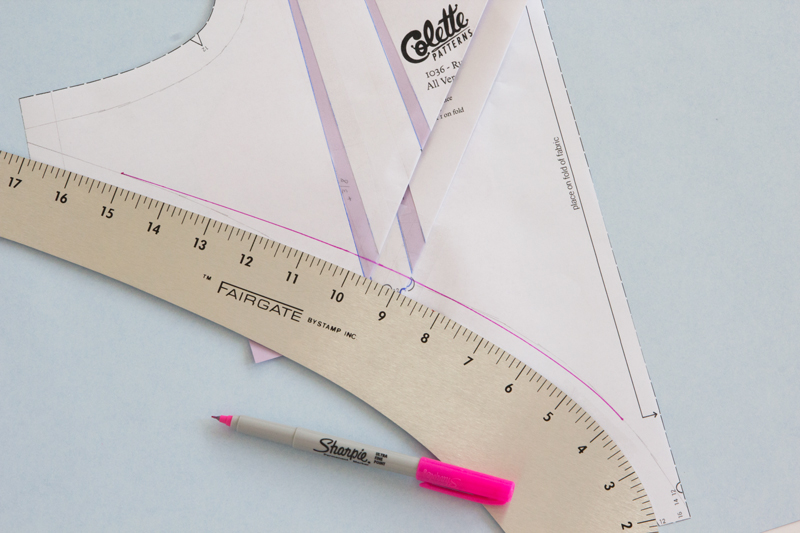
 1. Add a bit of paper behind the curved edge of the side front bodice. Using a french curve or curved ruler, re-draw the seam line, making sure to keep it as close to original shape. After re-drawing the seam line, add seam allowance.
- Re-draw the seam allowance at the waist and side seam intersection. You may need to add a scrap of paper here as well.
 3. Re-mark the left tuck placement mark by measuring up 3/4″ from the farthest right tuck mark. See photo for reference.
Lining Pieces
Rue is a fully lined dress, which is awesome but, I ain’t got time to do all these alterations on the lining pieces! Here’s a little insider tip—the lining pieces for the center front bodice, side front bodice, and back bodice are exactly the same as the main fabric pieces except that they are 1/8″ shorter in the neckline.
To save yourself some time, trace the altered pattern pieces and reduce the neckline by 1/8″.
And you’re done! Bonus Tip: If you’re altering a tissue pattern that you wish to fold up and store to use in the future, you may want to use medical tape for your pattern alterations. This allows you to gently iron the fold lines out because medical tape doesn’t melt like other tapes.
Tune in Thursday for a tutorial on how to adjust Rue for narrow or broad shoulders! This is very useful for those of you who struggle with “falling shoulders” on wide necklines.
Comments
I’m having a little difficulty reading my muslin. I have these horizontal pull lines across my chest, which would indicate FBA, but I also have diagonal lines from my bust to the sleeve head, plus a gaping neckline. I’m wondering if an FBA would also take care of the diagonal pulls or if I need to do anoth adjustment not listed. Pics here: https://instagram.com/p/BKenPYejyMl/
Hello Laura, thanks so much for the link. I suggest doing a slight FBA. The horizontal pulls may be from am armscye that is too short. Check out this tutorial for help with that adjustment. Also, I think the darts are a bit too long on the Bodice Back. Try shortening them by ~1.5″ and see if that removes the puckering your experiencing just beyond them in your muslin. Here is a tutorial on how to make that adjustment.
Okay, so I made a third muslin here: https://instagram.com/p/BLFOkLOjqHE/. I did an armscye adjustment and dropped the bust height 3/4.” This is actually a size down from the previous picture as once I dropped the bust height on the size 8 there was so much pooling fabric. So my question is: there’s a pull between my bust. Do you think the FBA would take care of that? I noticed Sarai had a fold on hers but it was flattering as it was under her bust and created a very fitted look.
Hey Laura! You are such a champ! A FBA will help, on Haleys muslin, we had the same problem and a slight FBA did wonders. Other than the “line” of fabric between your bust points, it looks good!
I just don’t get it :(. I’ve always used my high bust (30″), then adjust to a fb (35″). Plus, I have to do a BBA on all fitted woven garments because my bony shoulders sit wide, like a linebacker. Gross, I know.
Why can we just grade? Would it ruin the aesthetic? I mean, to FBA on this is pretty intense and unlike anything I’ve ever done before. The piece literally looks like the state of Texas!
Haha! I agree, this alteration is definitely one of the odder looking FBAs I have done. If you simply graded, the bust shaping would move inward, therefore away from your bust point. Essentially, the style line is creating shaping on the side and the lower portion of the bust and if this is simply increased on the sides it will effect fit. I still suggest choosing a size based on your waist measurement, since this is the most fitted part of the dress, and doing a FBA from there.
Hello, Katie! From there, I’d still be a size 0. I’m: 30″ hb, 35″ fb, 25″ waist, 34.5″ hips, 5’5″ tall and just under 110lbs. Soooo, I’m petite-yet-curvy-not-too short?? Ugh! And I signed up for Gravatar, yet still can’t put a pic up :(.
I’m so flustered and it could be just PMS, but this Rue has be all boggled. As I mentioned earlier, I have widely-spaced shoulders and all my RTW garments have rips and tears on the back seam because of this. Would a stretch woven be better for me? I’m used to using knits, mostly.
Oh, and the Rue’s smallest bust measurement is 33″, obviously. Will this be too much in the hb area?
The unlined, long sleeved one is the one I’m aiming for, but of course I can mix & match, no? Like, I could do an unlined short sleeve?
Lastly, and I’m so sorry for being such a bugaboo, but is it absolutely imperative I use an invisible zip rather than exposed? I just don’t like the small coils of invisible zips and how they’ve pinched my skin in the past. I have tons of invisible zips and an invisible zip foot for my Pfaff Ambition that’s still in its package (for over a year!)
Maybe I’ll just lose 20 pounds instead. ;) Well, I’m new to sewing for myself (and I want to sew for myself because few things OTR fit me). Your lesson is wonderful; it’ll just take me a while, and some hands-on, to get it figured out. Thanks for doing lovely tutorial. :)
Of course! Let me know if you have any questions, I’m happy to help!