

Before Rue’s release, we told you about how our design process changed and evolved as our team grew over the last two years over on our blog. A big part of that growth was learning even more about you and the patterns you love to sew. We were transparent about our process designing Rue, and now we want to be transparent about our mistakes.
Rue didn’t do everything we wanted it to do for you. After its release, we received feedback about fitting issues as well as the design. Since your feedback is the most important thing about the patterns we make and everything we do here at Colette each day, we want you to know that we hear you.
We are correcting some drafting issues on the Rue pattern and altering the design according to your feedback. Along with corrections to the armscye and sleeve that will improve fitting issues, we will adjust the bust of the pattern so that the style lines fit fully underneath the bust, rather than at 5/8″ or 1″ below the apex.
While some of you enjoyed the style lines at the bust just as they are, the majority of you preferred them to sit fully underneath the bust, like in Sarai’s plaid version here. After seeing your finished makes and reading your thoughts, we revisited the design and will make these changes. In the future, our design intentions will be clearly stated so you can easily make your garments fit you perfectly.
If you have already purchased Rue through our site, we will send you a corrected digital version of the pattern as soon as it’s done, to your email. We don’t want to rush this process, but we are estimating about 3 weeks. If you purchased a paper pattern through our site, we will also send you corrected tissue pattern pieces, to the address we have on file, which should take about 6 weeks. We will automatically send these new pattern pieces, there’s no need for you to send us your information again.
If you purchased the printed version at a shop and not directly through us, please contact customer service and we’ll ship the new bodice pattern pieces to you. Please be sure to include your name and mailing address.
In the meantime, if you are up for learning some skills, I’m happy to teach you! Below are step-by-step instructions for lowering the style line to sit fully underneath the bust.
The Rue Sewalong will be postponed until October 25, 2016. When we resume, you’ll learn how to make fitting alterations to the new pattern pieces. Including full bust, small bust, and shoulder adjustments. After fitting, I will continue to post new lessons every Tuesday and Thursday. See the new schedule below.
More than anything, we want you to trust our patterns. We want you to use them to expand your skills, discover new techniques, and fall even deeper in love with sewing. We’re doing the same thing, learning and growing and—in this case—we made a mistake.
We’re making these changes with open minds and heavy hearts, and welcome any thoughts that you might have. You can contact me at service@colettepatterns.com
Thank you for all of your support!
Style Line Adjustments
If you would like to change the placement of the bust style line to hit under the bust, follow these instructions for altering your pattern.
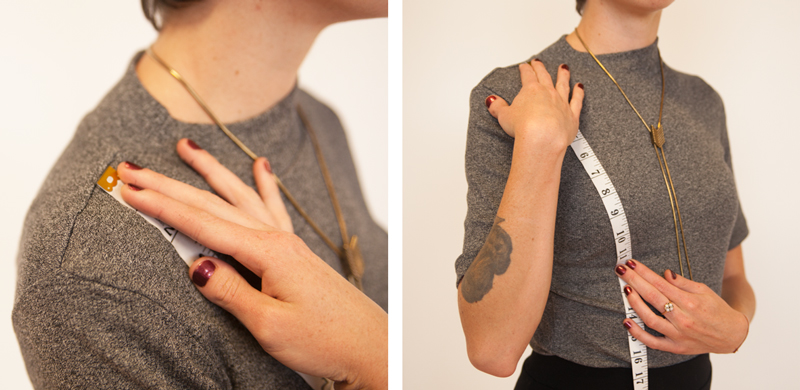
To determine the amount needed to be added to the center front bodice, measure the distance from your mid-shoulder to your underbust. Add 1″ bust ease to this measurement, this is your new finished shoulder to underbust measurement.
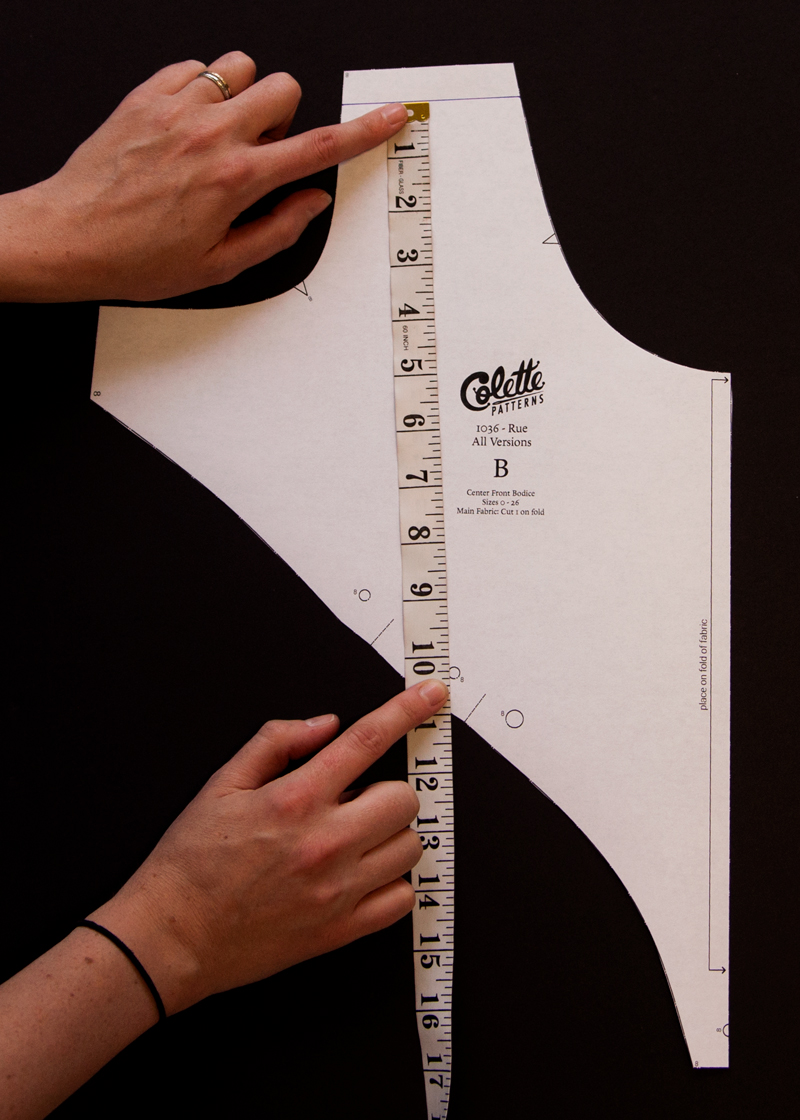
Measure the center front bodice piece from the mid-shoulder seam line to the dot that is the second from the right.
Subtract this pattern measurement from the finished shoulder to underbust measurement. This is the amount needed to be added to the length of the center front bodice.
In these photos, the mid-shoulder to underbust measurement is 11.5″. After adding 1″, the finished shoulder to underbust measurement is 12.5″.
The pattern measurement is 10 1/4″. Therefore, the pattern needs to be lengthened 2 1/4″.
Center Front Bodice
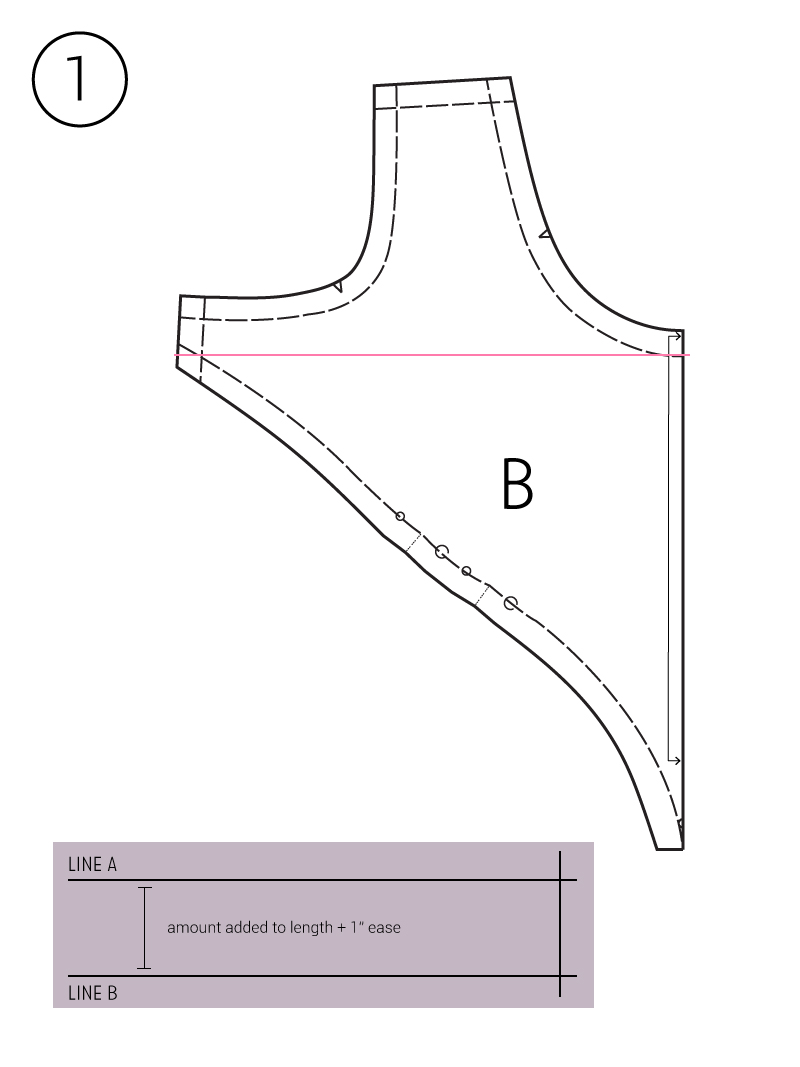
First, draw in all seam lines throughout the pattern piece. Draw a line perpendicular to the grainline from center front to the side seam. On a separate piece of paper, draw 2 parallel lines, the distance between these lines should be the amount needed to be added to the length. Draw a line perpendicular to these two lines on one end.
Cut through the line drawn on your center front bodice.
Bring the scrap paper behind the center front bodice pieces. Align the cut edge of the bottom portion of the slashed pattern piece with the bottom line on your scrap piece of paper. Match the center front line and tape in place.
Align the cut edge of the top portion of the slashed pattern piece with the top line on your scrap piece of paper. Match the center front line and tape in place. Blend seam allowances and seam lines through the scrap paper. You have now lengthened the upper bust area.
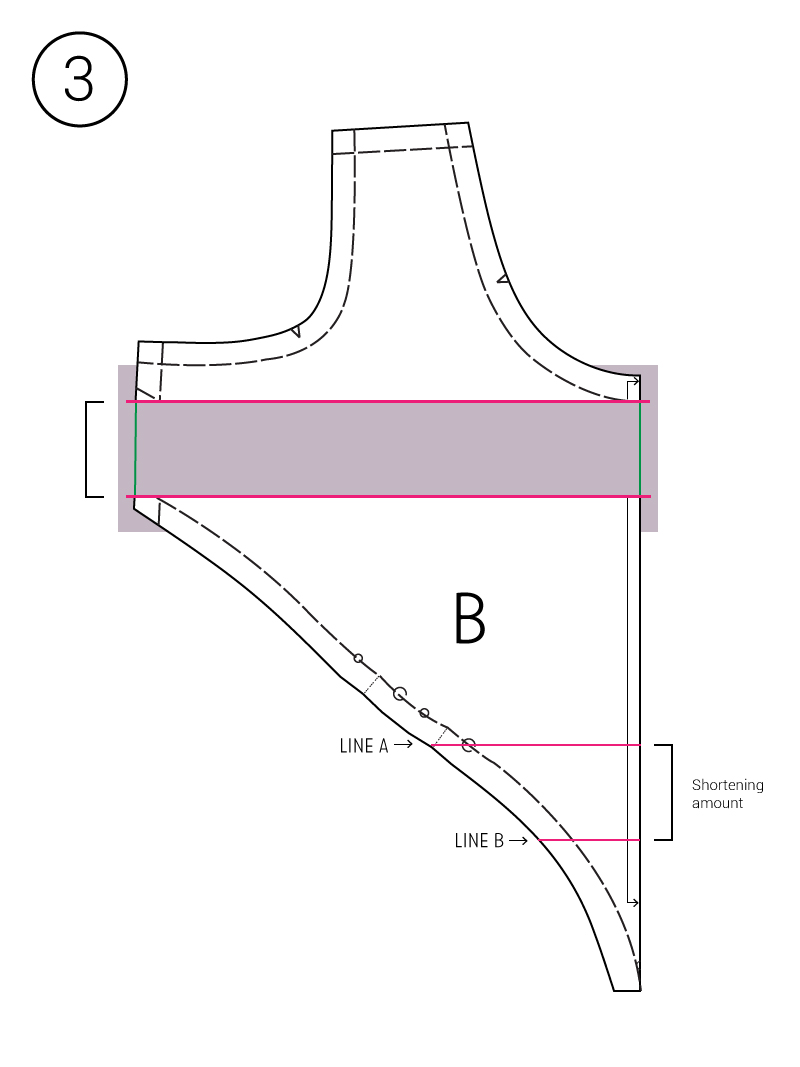
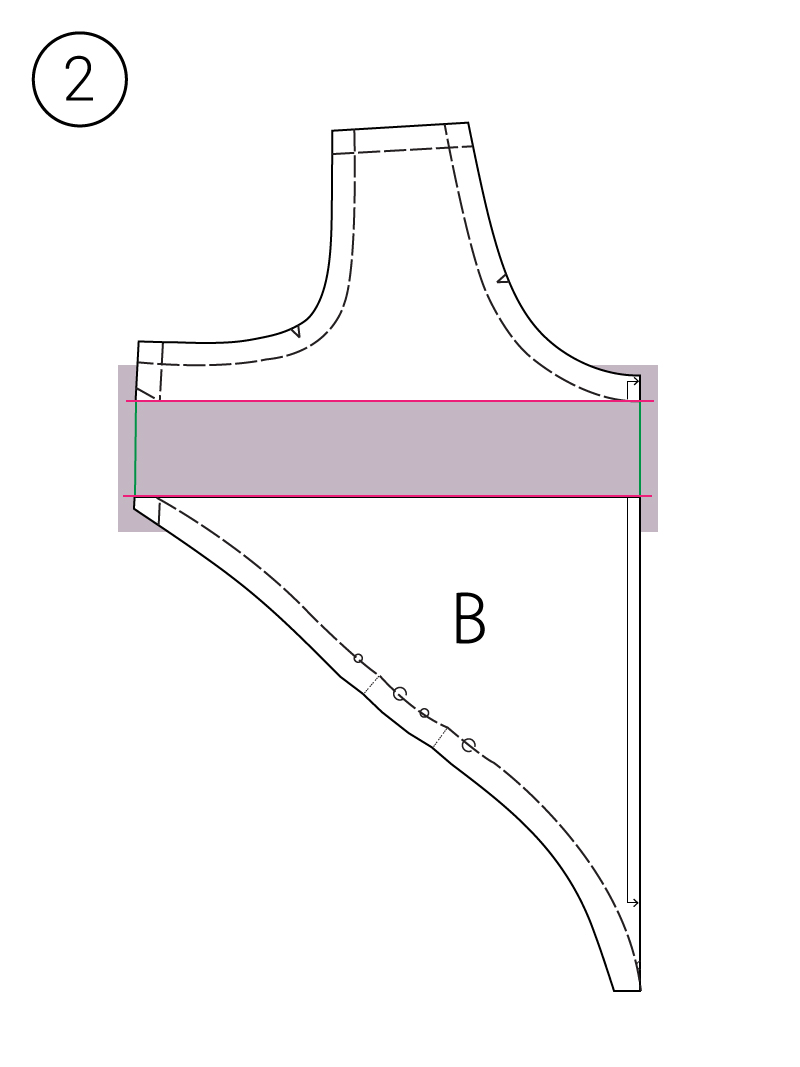
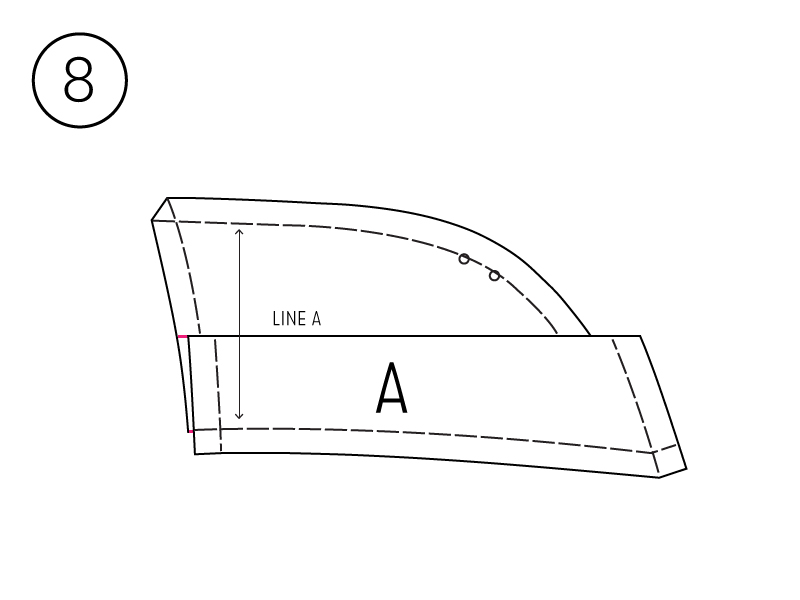
Now, it’s time to shorten the length underneath the bust points to counteract the length that was just added. Start by drawing a line perpendicular to the fold line from center front to the first, inside tuck. This is line A. Draw an additional line, parallel to line A. The distance between these lines should be the amount that was previously added to the length.
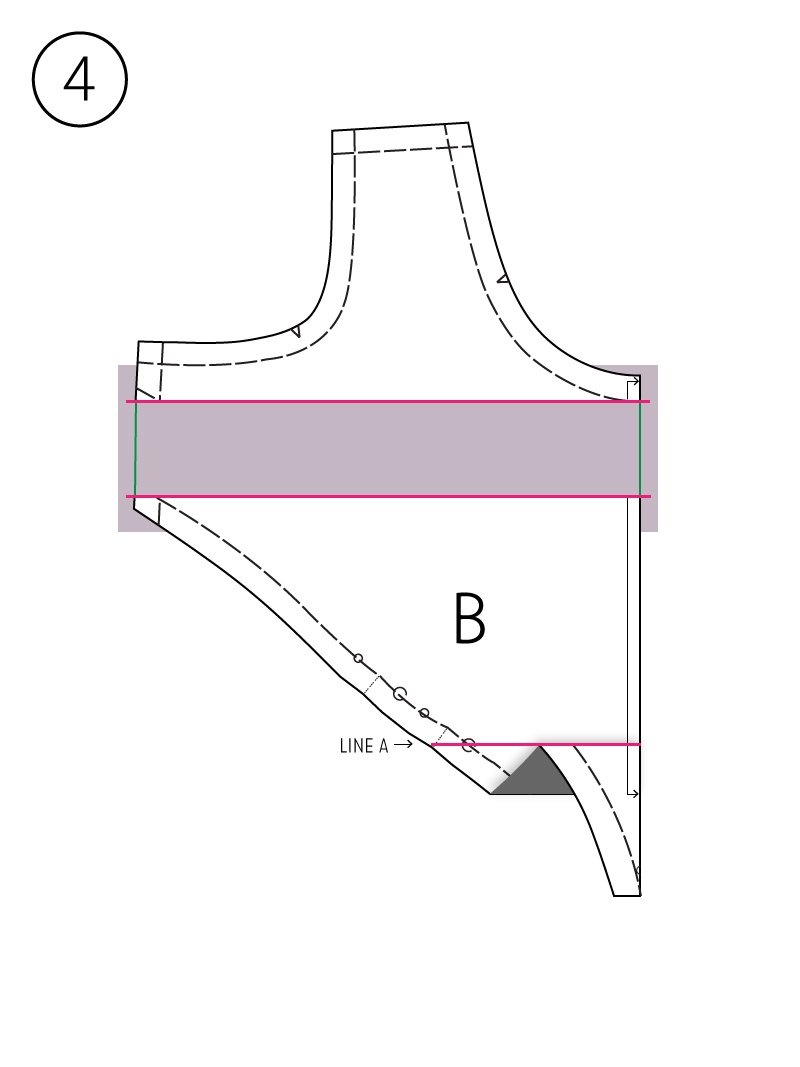
Fold line B to line A, making sure to keep the center front line straight.
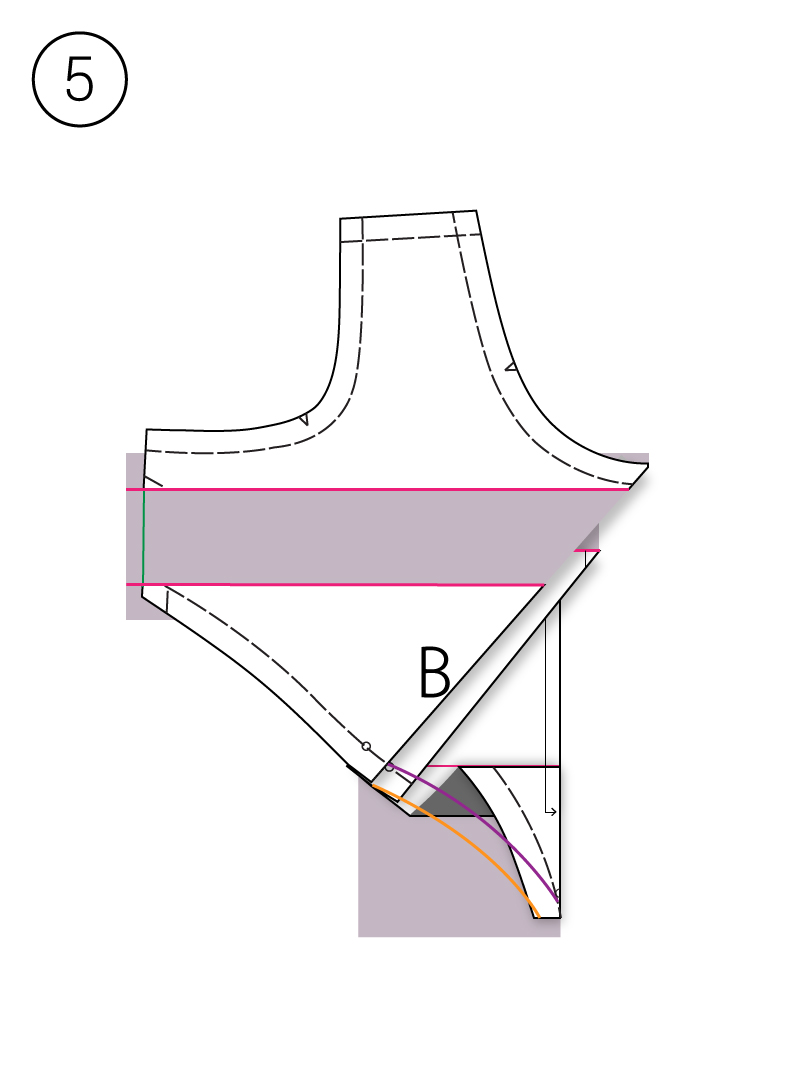
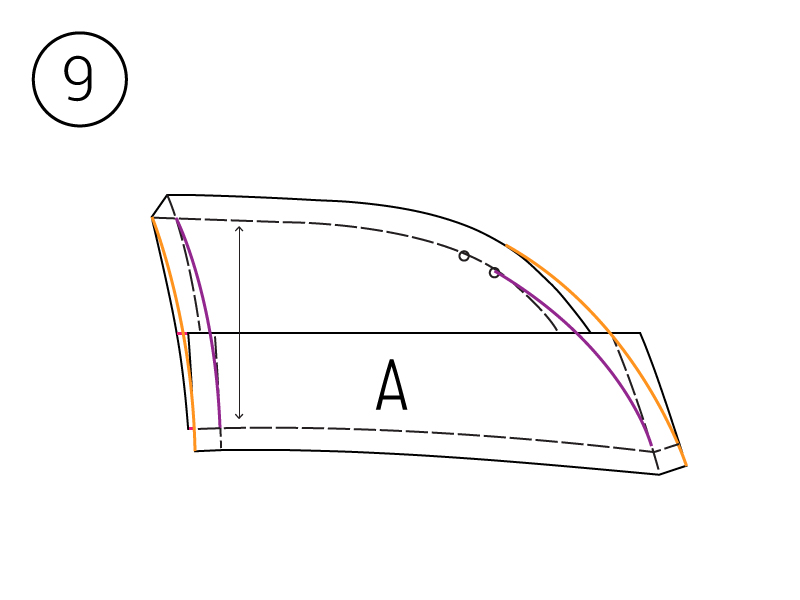
Fold the tucks of your pattern paper, temporarily tape in place. Bring a scrap piece of paper behind the lower portion of the center front bodice. Redraw the seam line from the first visible dot to the dot at center front. On the illustration above, this is the purple line. Draw in a 5/8″ seam allowance from this seamline, on the illustration this is the orange line. Before unfolding the tucks, trim off the excess paper by cutting this line.
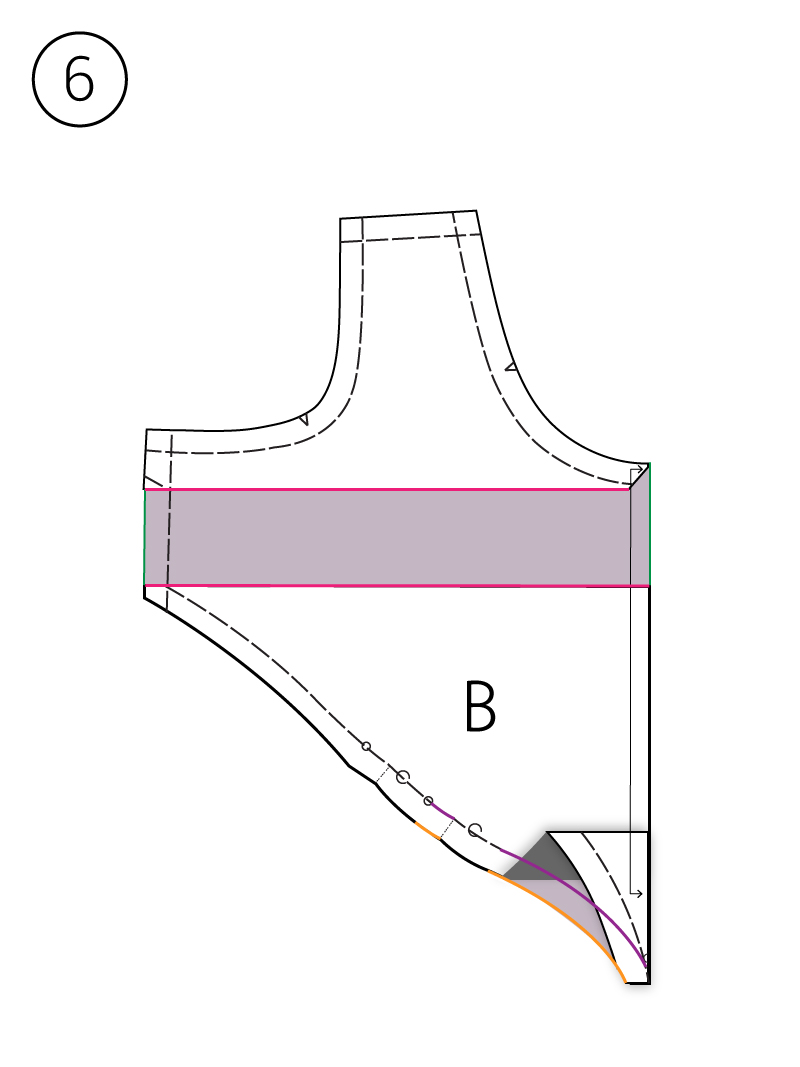
After trimming excess paper, your pattern should look similar to this.
Side Front Bodice
Since you have shortened the length under the bust on the center front bodice, you’ll need to also shorten the side front bodice, which sits directly under the bust.

Start by drawing a line perpendicular to the grainline from side seam to the curved style line, under the tuck dots. This is line A. Draw an additional line, parallel to line A, the distance between these lines should be the amount that was previously shortened from the center front bodice. This is line B.
Fold line B to line A, making sure to keep the grainline aligned.
Bring a scrap piece of paper behind the style line. Redraw the style line seamline from the right tuck dot to the waist seam line, add seam allowance, and trim.
Redraw the side seamline from the style line seam line to the waist seam line, add seam allowance, and trim.
In the illustration above, seamlines are purple and seam allowance lines are orange.
Again, you can contact me at service@colettepatterns.com if you have any comments or concerns.