

Welcome back to the Rue Sewalong! Yesterday, we released the new bodice pieces and gave updates on the Colette blog. If you bought the Rue pattern, you should have received an email from us letting you know that this pattern had mistakes, and we were going to fix them. You should also be getting an email with an updated, corrected version for you to download.
If you didn’t, all you need to do is go to our shop, log in to your account, and download the pattern from there. If you purchased Rue in a shop, please contact customer service and we’ll ship the new bodice pattern pieces to you.
To download only the corrected pattern pieces, and not the entire pattern, please go to our errata site here.
If you want to know about the nitty gritty – the whats and whys behind the scenes – Sarai wrote about the process on the Colette blog.
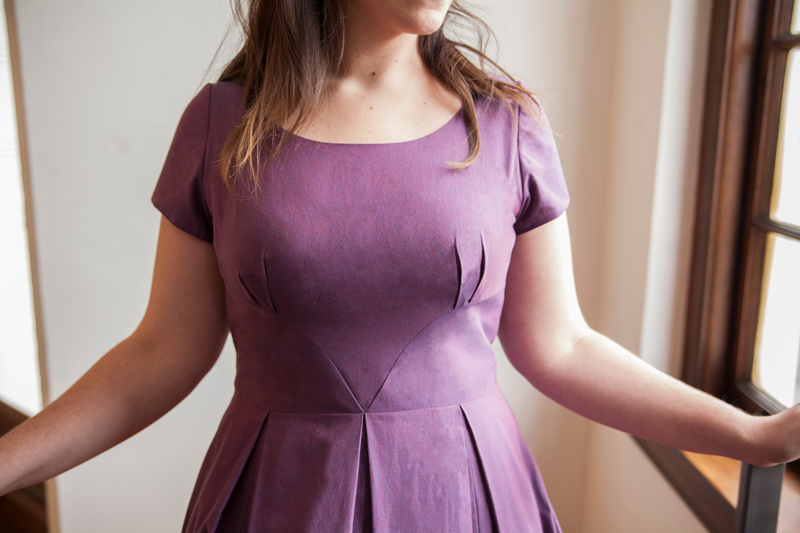
For those who have been awaiting the changes, we have a new version addressing your feedback, both in terms of style lines (specifically, the placement of the yoke seam – it has been lowered to sit below the bust) and the fit of the pattern through the upper bodice and sleeve (the sleeve, armscye, and shoulder were redrafted). Thank you all for patiently waiting to finish up your Rues, we all thank you for your understanding and encouraging words.
Now, let’s get back to it with the Small Bust Adjustment for Rue 2.0
DO I NEED A BUST ADJUSTMENT?
Most pattern companies draft patterns based on a B cup, but we draft for a C cup for sized 0-18, and a DD for sizes 20-26.
If you’re making size 0-18 and are an A or B, you will need a small bust adjustment or SBA. If you are a D or larger you will need a full bust adjustment or FBA.
For sizes 20-26, if you are a D or smaller you will need an SBA, and if you are a DDD or larger you will need an FBA.
DETERMINE ADJUSTMENT AMOUNT
The amount to add or subtract from your bust is relative to the amount of ease you like to have in your garments. Below are my recommended bust ease amounts for different sizes in a semi-fitted dress in a medium-lightweight woven.
Sizes 0-8: 1 1/2″ bust ease
Sizes 10-26: 2 1/2″ bust ease
To determine how much to add to your bust, simply follow this equation.
Your Bust Measurement + Preferred Ease Amount – Finished Measurement = Adjustment Amount
Let’s take a look at my measurement chart, as an example.

I decided to sew up at size 2, which would give me 2″ of ease at the waist.
My bust measurement: 33″
The size 2 bust finished measurement: 36 1/2″
Recommended ease in size 2: 1 1/2″
33″+ 1 1/2″= 34.5″
36 1/2″- 34 1/2″= 2″ SBA
We will be adding extra room for the bust in two places on pieces that are cut twice. Therefore, we need to divide this SBA amount into 4 to evenly distribute the fullness.
-2″ SBA ÷ 4 = -1/2″ from each tuck
You’ll need:
- Your Rue pattern
- A clear ruler (I use a 2” x 18”)
- Pencil
- Pattern paper
- Paper shears
- Tape
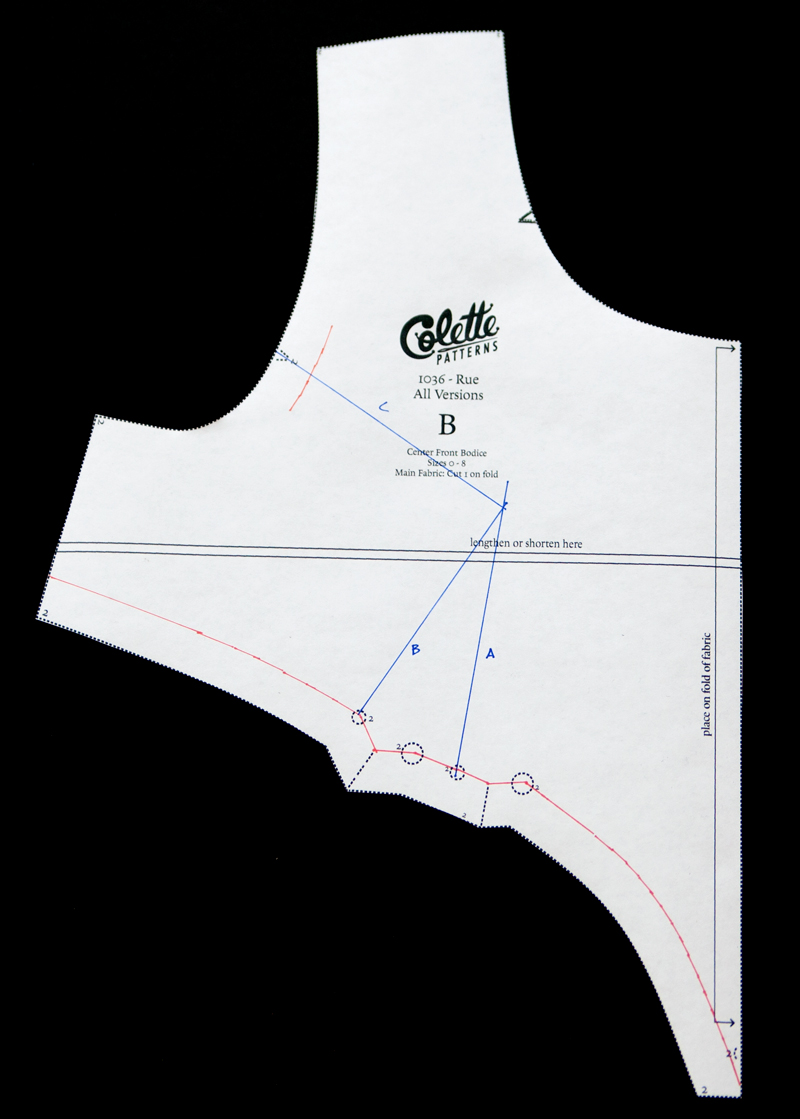
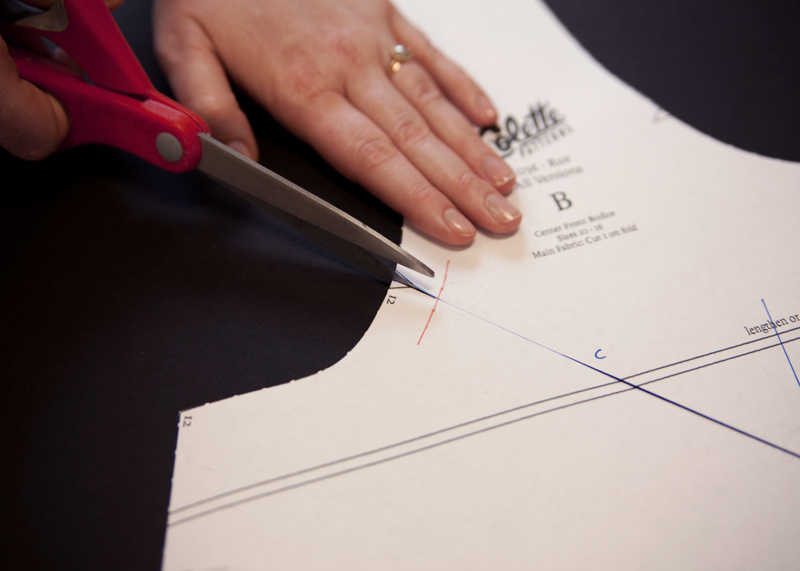
1.) Before begining the adjustment, measure the distance between your tuck placement markings. This distance will be the same between all of the markings. Make a note, we will reference this measurement when redrawing the tucks.
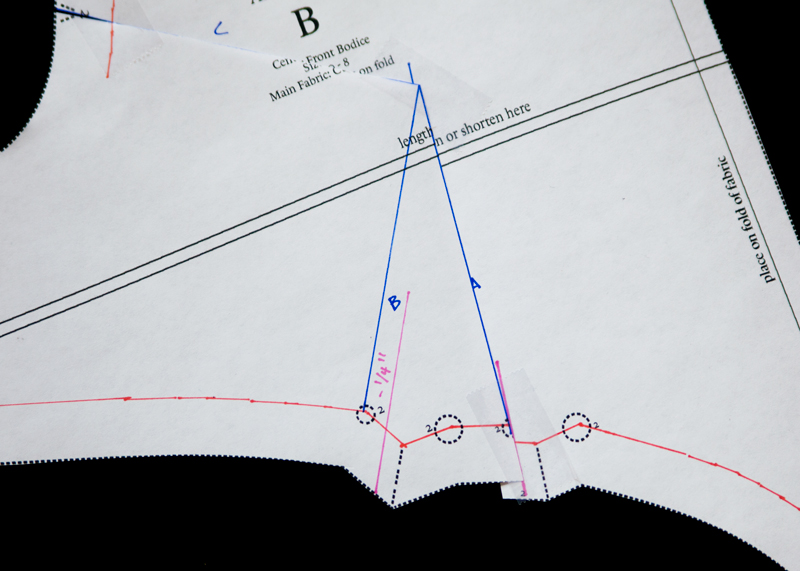
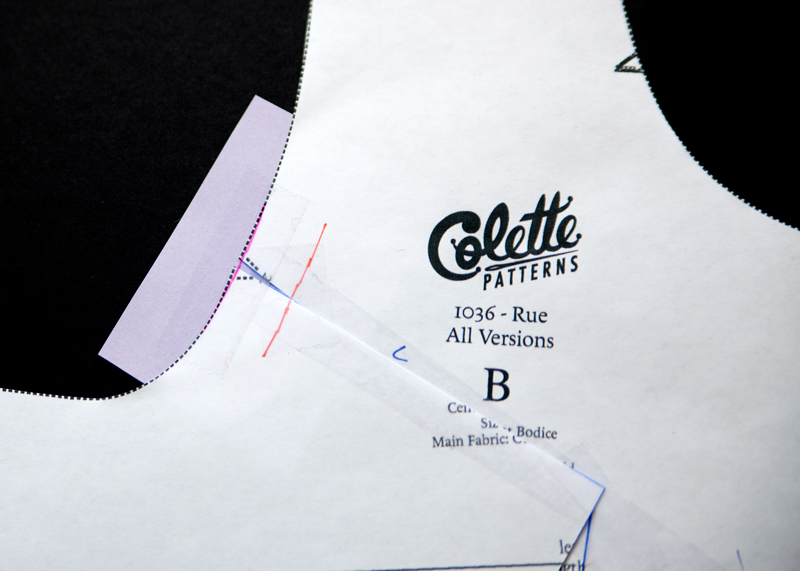
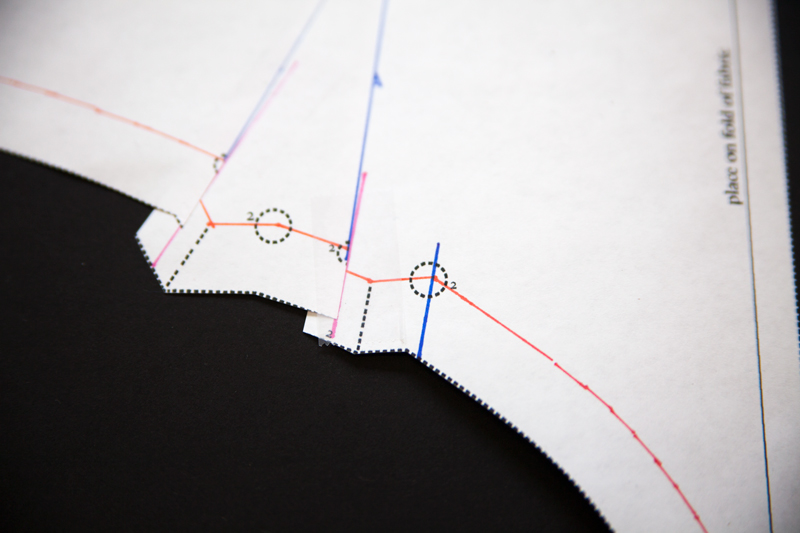
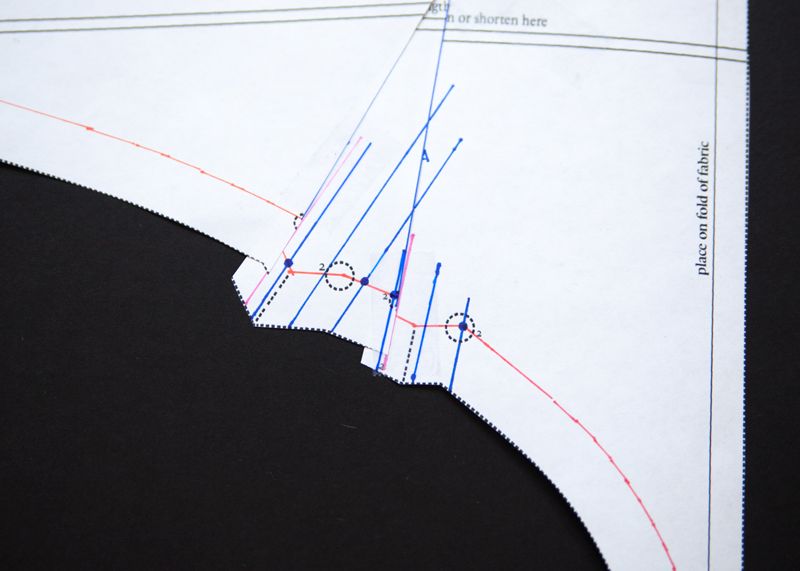
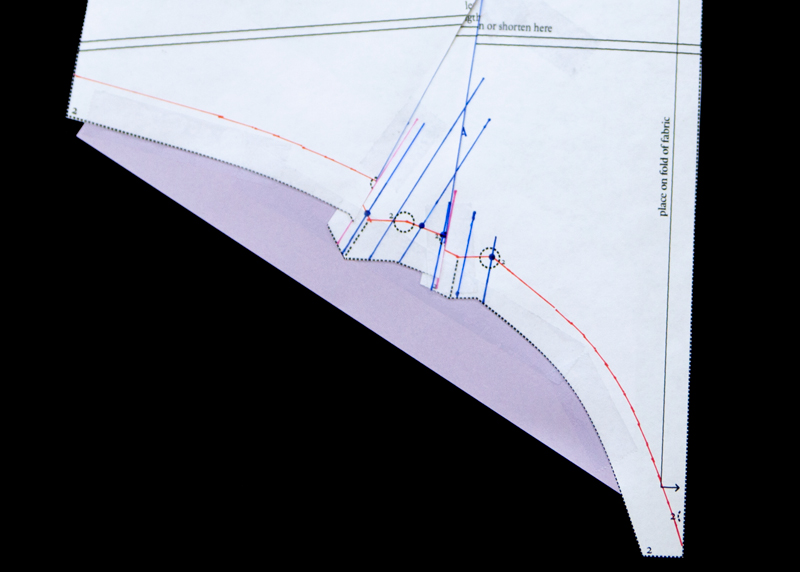
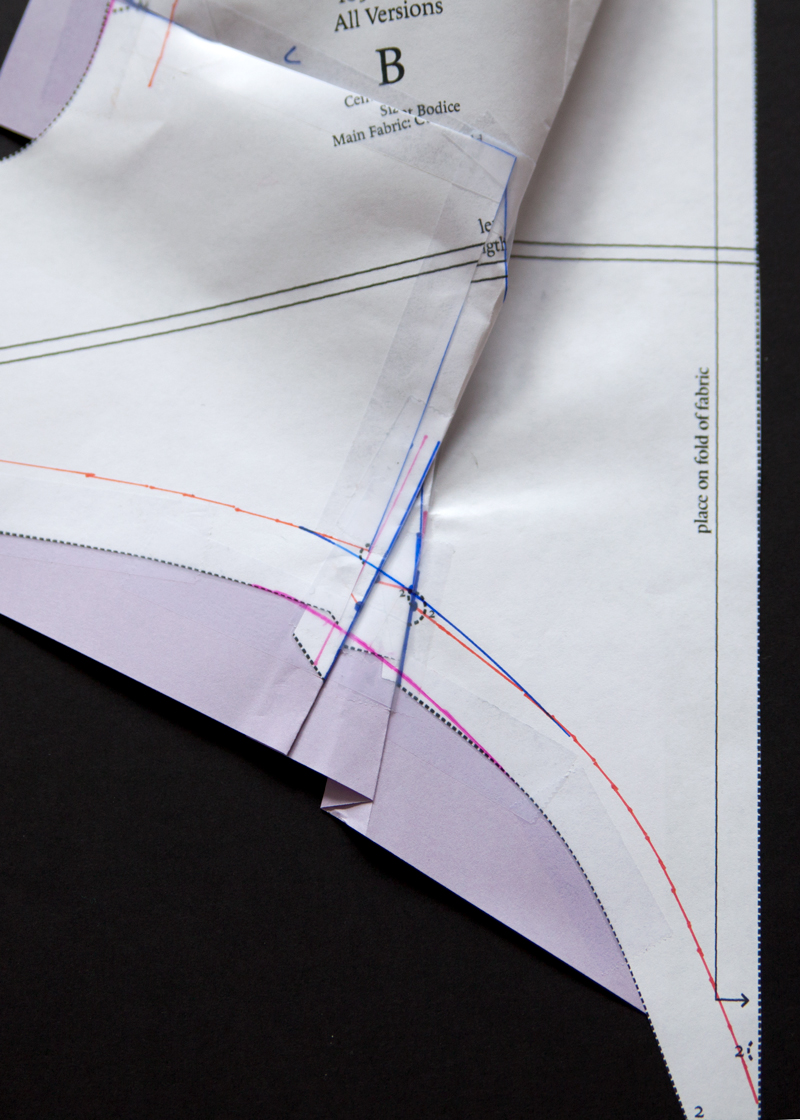
Start by drawing in the seamlines on the styleline and near the armhole tuck on the Center Front Bodice. Next, you’ll draw a series of lines in the following order. Line A should start at the left dot of the right tuck, through to the center of the bodice, at the same angle as the right tuck line. Line B should start at the left dot of the left tuck, through to the center of the bodice, at the same angle as the left tuck line. Lastly, draw line C, from the armhole notch to the intersection of line B and A.
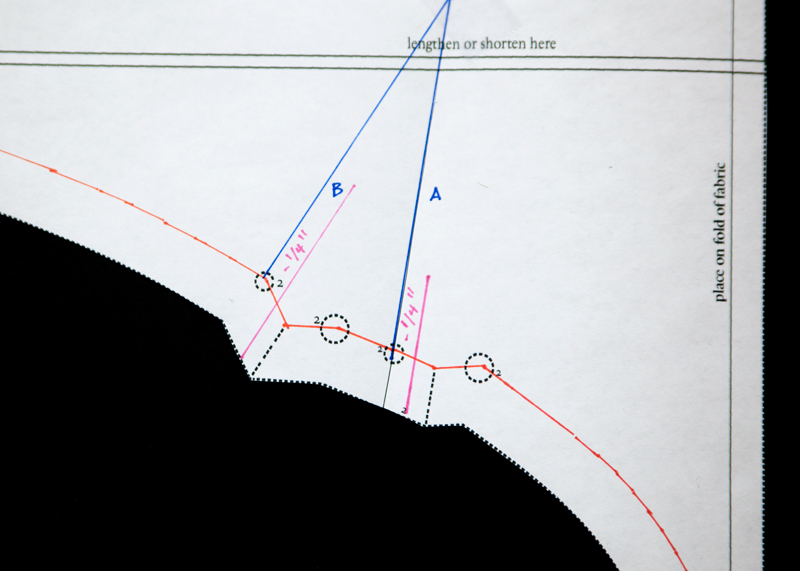
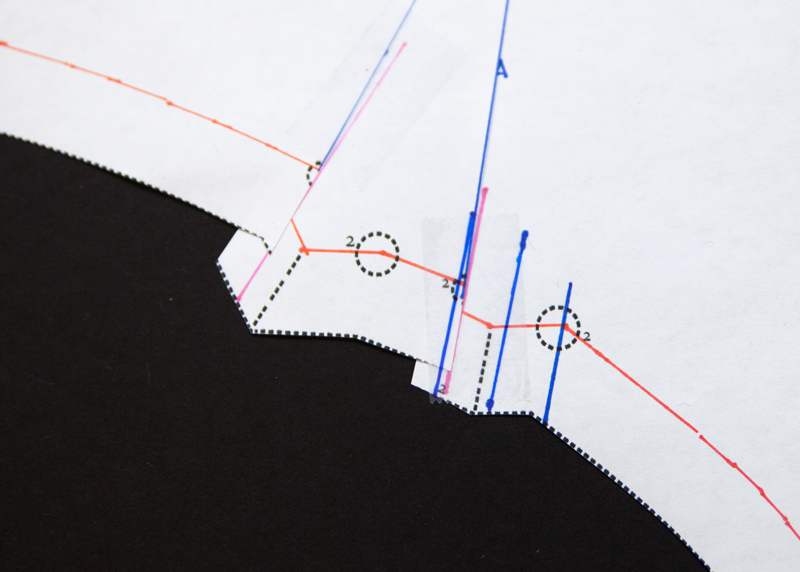
2.) Draw a line, your SBA amount distance away from line A, at the same angle as line A. Repeat this step for Line B. In this example, the SBA amount is -1/4″ from each tuck.
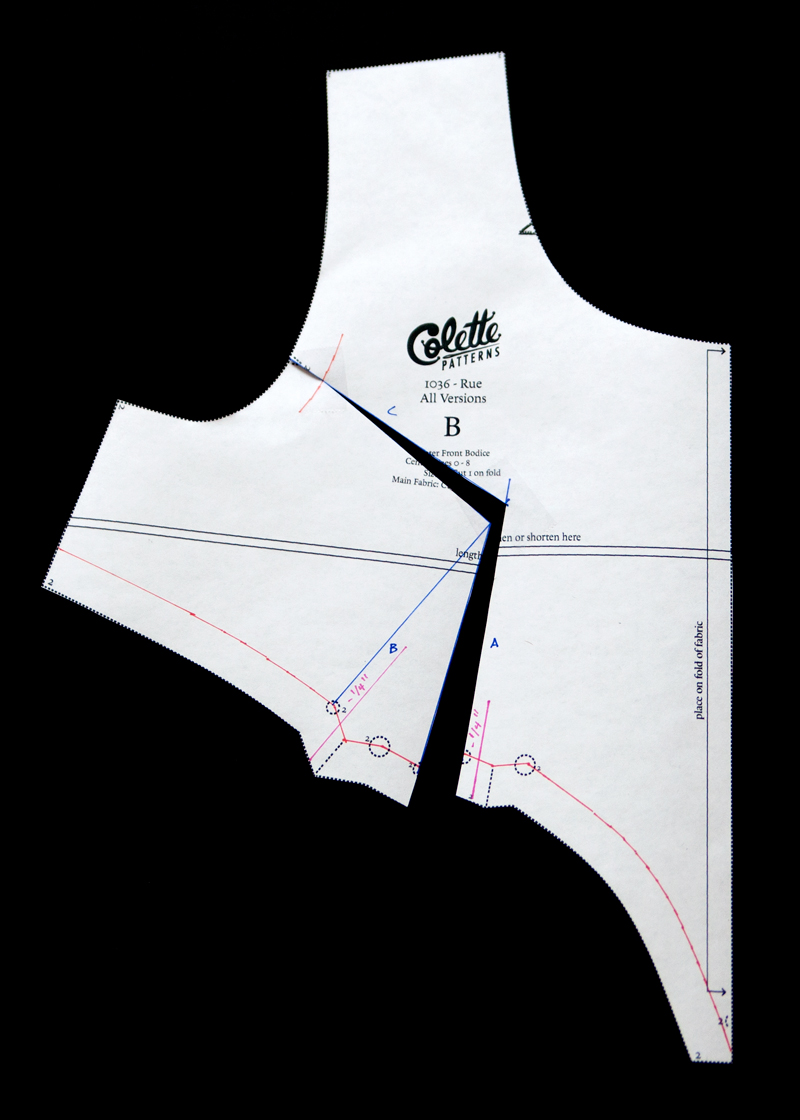
3.) Cut through Line A, pivot at the intersection and cut through to the seamline on line C. “Hop” over the seamline and continue cutting to the end of line C, creating a hinge on the seamline.
4.) Pivot the seamline on the left side Line A to meet with the SBA line. Tape in place.
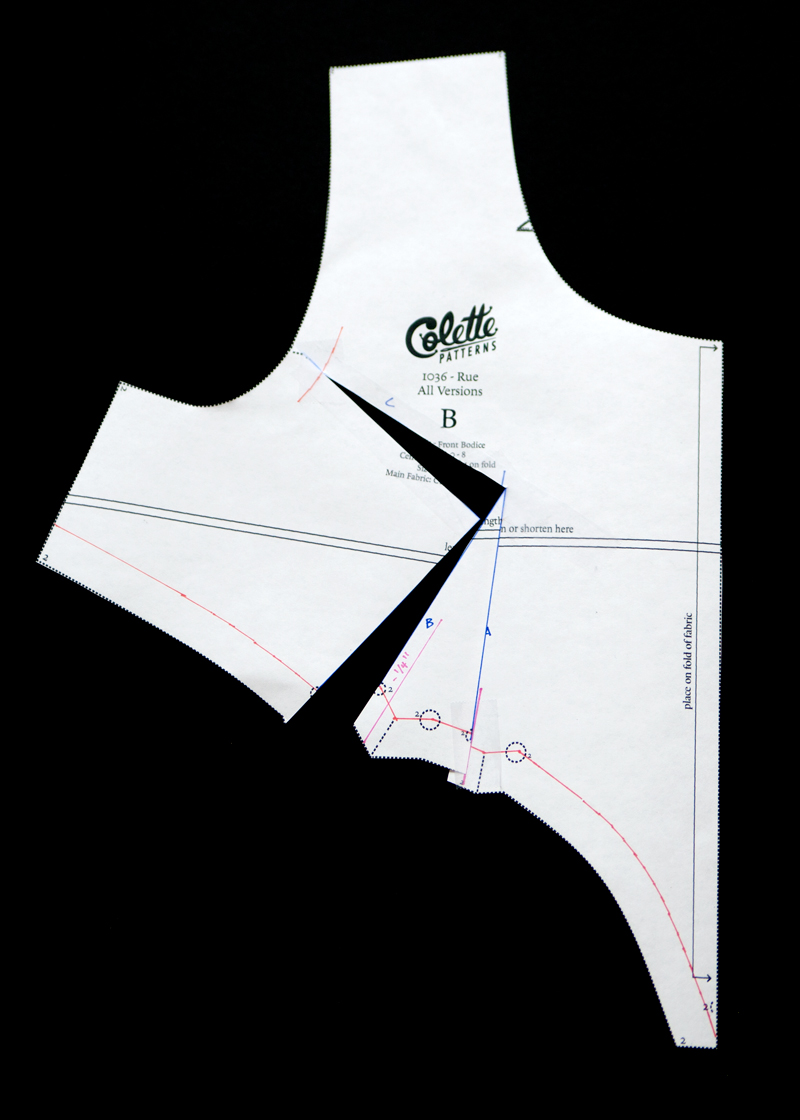
5.) Cut through Line B, pivot at the intersection and cut through to the seamline on line C. Again, “hop” over the seamline and continue cutting to the end of line C, creating a hinge on the seamline.
6.) Pivot the seamline on the left side Line B to meet with the SBA line. Tape in place.
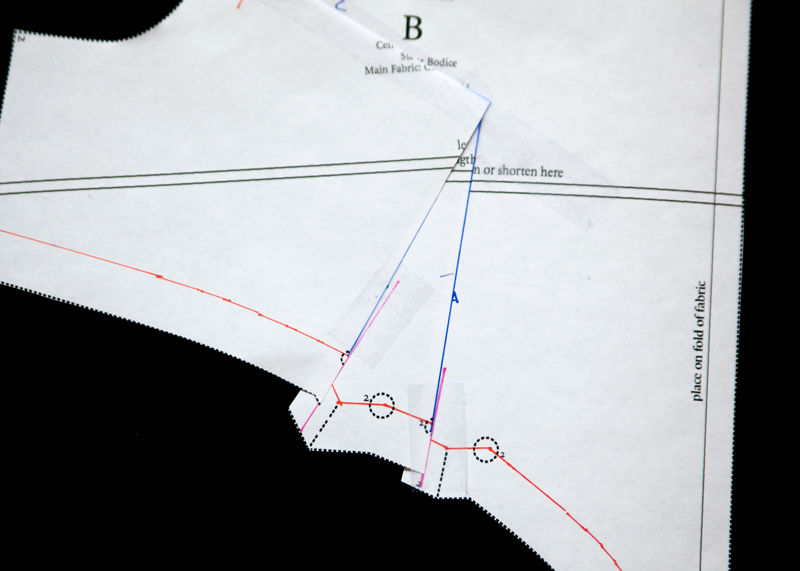
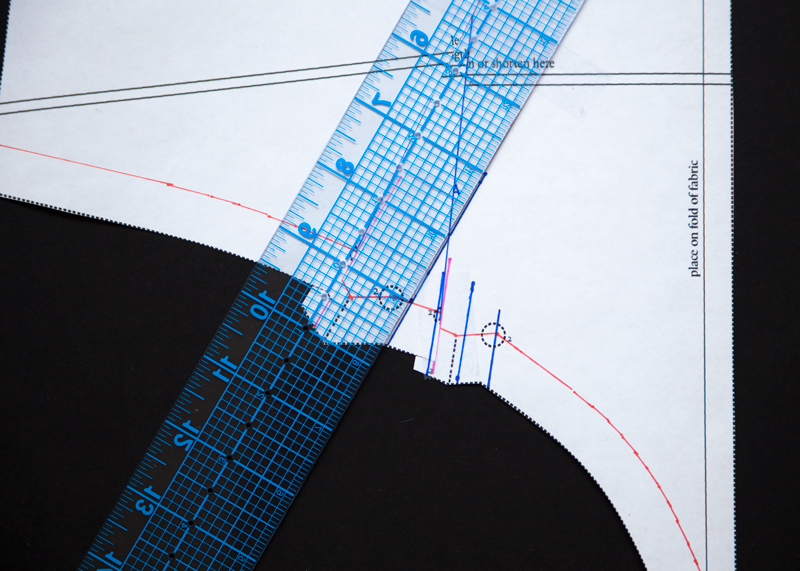
7.) This pivoting will change the seam allowance of the armscye near the notch. Place a scrap piece of paper under the spread seam allowance and re-draw the seam allowance.
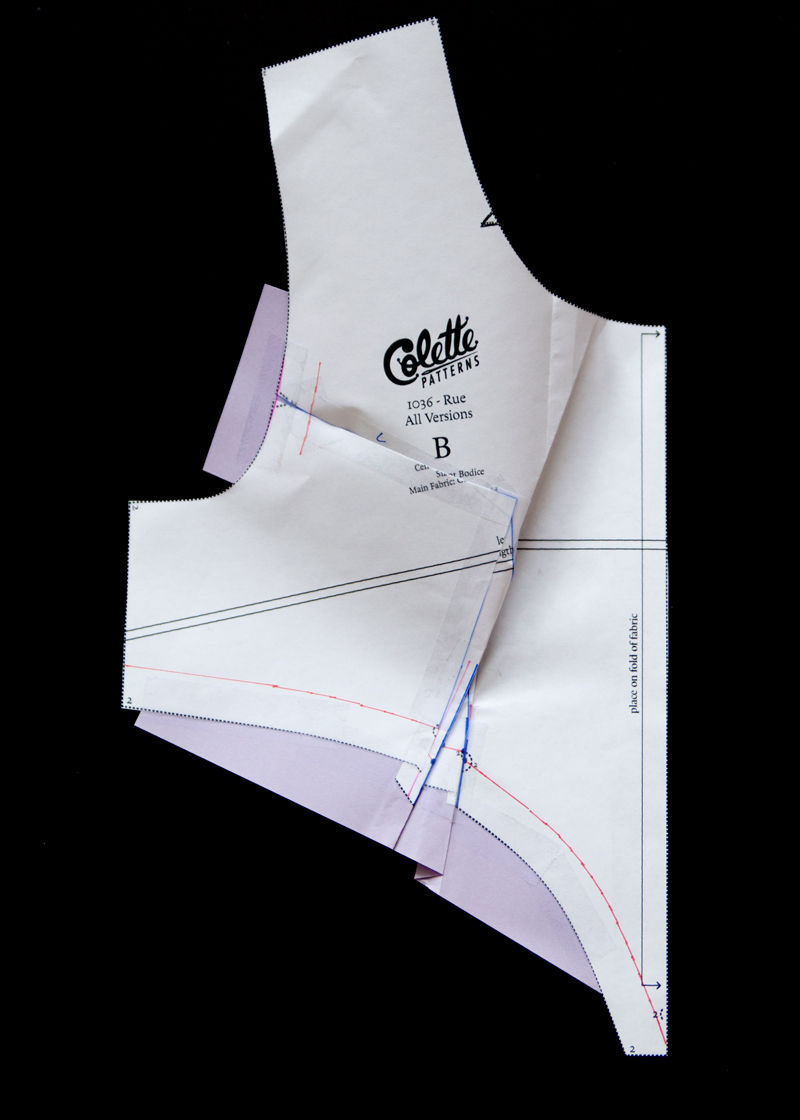
Re-Drawing Style line and tuck placement
By doing a SBA, you have reduced the size of the tuck. Therefore, the tuck placement markings will need to be at different distances away from each other. Before beginning, you should have measured the distance between each of your original tucks.
Here is a formula to decided the size of this distance after the SBA.
SBA amount ÷ 4 tucks across bust = amount taken from each tuck
Original distance between each tuck x 2 sides to the fold = Total amount in original tuck
Amount in original tuck – Amount subtracted from each tuck = New amount in each tuck after SBA
New amount in each tuck after SBA ÷ two sides to fold = New distance between each tuck
For example,
1″ ÷ 4 tucks = 1/4″ taken from each tuck
1/2″ distance between each tuck X 2 sides of fold = 1″ tuck
1″- 1/4″ = 3/4″ tuck
3/4″ tuck ÷ two sides to fold = 3/8″ distance between each tuck
8.) Draw a line from the right-most dot to the edge of the paper at the same angle as the right tuckline.
9.) Continue drawing two more lines, all perpendicular to the angle of the first line at the right dot, at the new distance between each tuck away from each other.

10.) After redrawing the right tuck markings, measure down the seamline the new distance between each tuck from the last tuck line made, and mark.
11.) Mimicking the angle of the left tuck line, draw a line from the previously made mark to the cut line.
12.) Continue drawing two more lines, all perpendicular to the angle of the first line, at the new distance between each tuck away from each other.
13.) Place a long piece of scrap paper below the style line and tape in place.
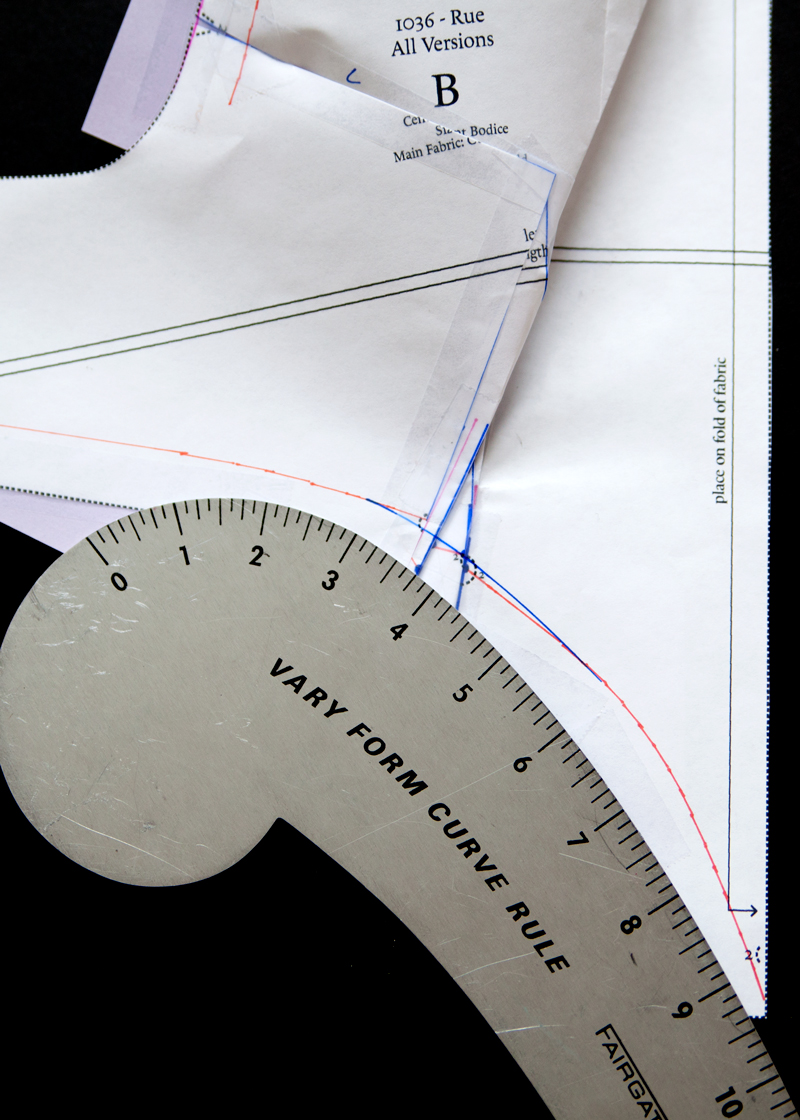
14.) Fold the tucks. Redraw the seamline, blending from the original line towards the top and bottom. Add seam allowance. Cut away extra paper.
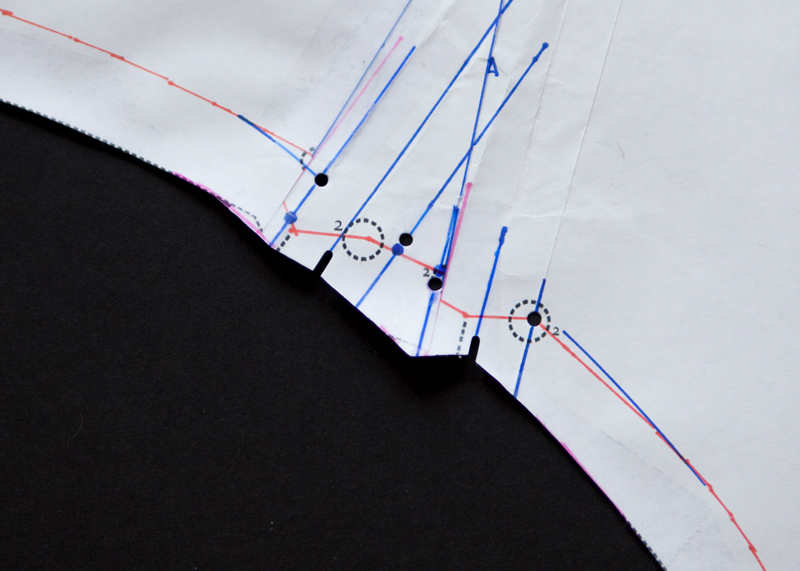
15.) After cutting away extra paper, measure 5/8″ each tuck dot line and mark, this is your new tuck dot. On the picture above, I used an awl punch to help me see it more clearly.
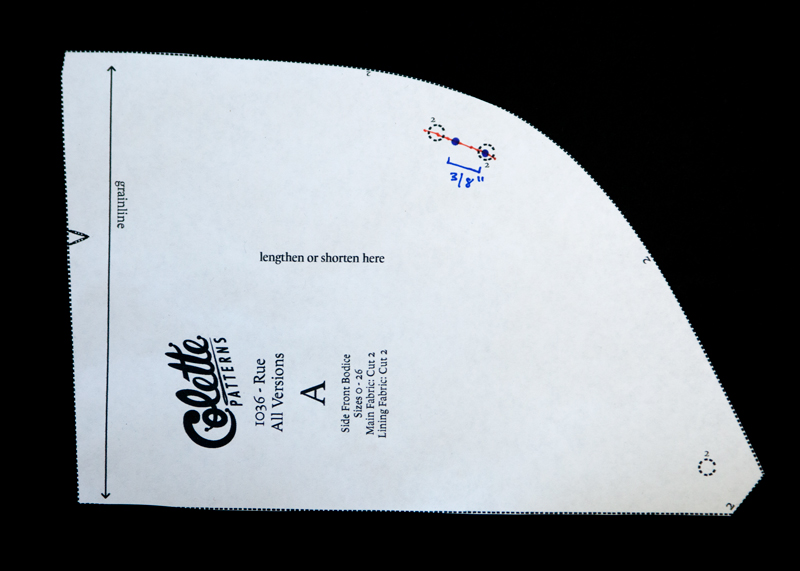
16.) Lastly, reduce the distance between the tuck placement markings on the Side Front Bodice to the new distance between each tuck.
If you have any questions, feel free to leave a comment below. Our next lesson will cover Skirt Assembly on Friday!
Comments
First, thanks for the updated pattern! Safe to assume the shortening/lengthening of the bodice is done the same way as before? Should the alterations be done in the same order as before? Thank you!
Hi Katie, glad to see the sewalog back!
My bust is 40″ and waist 36″, so I chose a size 16. According to your math, doing a SBA I’d have to take a whopping 1″ off of each tuck. I’m having a hard time pivoting that much, and my bodice piece is looking rather warped, especially in the armscythe (I don’t even remember how I accomplished this SBA on the first version of the bodice) Thoughts?
Hey Ashley!
I see your predicament, let’s try this instead: Cut a size 14, which will give you 1″ ease in the waist. Blend sizes from 14 at the waist to 12 on the side seam of the Side Front Bodice. From there, you’ll cut a size 12 for the remainder of the bodice pieces and size 14 for the skirt pieces. You’ll still need to do a 2″ total SBA but that will reduce the amount taken from each tuck to 1/2″
Thanks Katie! The side of the Side Front Bodice doesn’t have much of a descrepency in sizes. Could I blend from a 14 to 12 on the back bodice instead? I’m a little nervous about the lack of ease.
Technically, when blending sizes at the side seam, it should be blended on the back pieces as well as the front in order for your side seam to still land right on your side. If you just shorten the front, the back piece will “curl” over to the front. I would still blend sizes but include the back piece as well.
I had some questions in other lessons and did not get an answer. Should I ask again?
Hello Connie, did you receive the new bodice pieces and finished measurement chart? I’m happy to help you decide on a size and adjustments.
Will the shoulder adjustments be the same with the new bodice?
Yes, the technique for should adjustments is the same ;)
Hi Katie, So excited to get going on this again. My measurements are spot on for a size 4 Rue, but per my measurements, to get an 1.5″ ease I’d need to do an SBA (which I almost always have to do). I was wondering if I could just sew up a size 2 instead, which is at the 1.5″ ease, or will that have other bad fit implications because it’s overall too small and not just accommodating for my smaller cup size? Thanks for the help!
Hey Toni! What are your waist, bust, and hip measurements?
Hi Katie, They are 27 and 37.
Hey Toni, you may not have noticed that the finished bust measurements have changed with the updated version of Rue. You can find the new measurement chart in this post or on our errata page. According to the new measurement chart, you are a size 8 (37″) bust and size 4 (27″) in the waist.
I recommend making size 4 and actually doing an FBA to add 1″ to the bust to end with 1 1/2″ ease in the bust.
Hi Katie, Sorry for all the back and forth. My bust measurement is 35, waist 27 and hip 37. Sorry that was confusing in my last response. This is why I was wondering if I could make a size 2 and not do the SBA instead of a 4. I promise this is my last question about this subject! ha!
Perfect. Yes, If you would like less ease, you are good to go. A size 2 would give you 1 1/2″ ease in the bust, 2″ at the waist, and all kinds in the hip.
Am I the only one that is is having problem with printing out all the patterns of the remake? Mine are printing out incomplete. I don’t know if the problem is with with my print program or if its with the instructions from the instructions from the pattern pfd.
Hey Jan! Meg will email you directly to make sure that you’re printing the correct pattern pieces and the settings on your printer are correct. I’m sorry that it’s been giving you trouble.
My measurements are 35, 32 and 41. I have small shoulders and have to do an adjustment there. Which size do I have to cut out?
Hi Connie! Could you take your upper bust measurement and send it my way?
My upper bust measurement is 35 Inch.
Hey Connie, I suggest cutting a size 10 and grading to a 12 at the waist. Then, you would do a 3 1/2″ SBA.
Hallo Katie, can you explain me how to grade to 12 in the front? I would grade the back by connecting the 10 and the 12 with a line from the armpit to the waist line.
On the front pieces, you’ll just need to blend from a size 10 to 12 in the waist on the side seam of the side front bodice. The center front bodice can stay a size 10 throughout.
After two muslins, it’s clear I need to make a size 4 with SBA. Turns out making a size smaller didn’t work because the arm holes were too small and I had to lengthen the bodice. Plus I think I’ve had too much candy last month and need more ease in the waist now…muslin three coming up next…
Aw, I’m sorry that you’ve been struggling. If I can help at all let me know. You are also welcome to send us photos at service@colettepatterns.com if you think it’ll help. ;)
It’s my own fault for trying to get out of the SBA. If only patterns had cup sizes…. anyhow, I appreciate all the help and now have a winnning fit! Onto the actual garment!