

Welcome back to the Rue Sewalong! Yesterday, we released the new bodice pieces and gave updates on the Colette blog. If you bought the Rue pattern, you should have received an email from us letting you know that this pattern had mistakes, and we were going to fix them. You should also be getting an email with an updated, corrected version for you to download.
If you didn’t, all you need to do is go to our shop, log in to your account, and download the pattern from there. If you purchased Rue in a shop, please contact customer service and we’ll ship the new bodice pattern pieces to you.
To download only the corrected pattern pieces, and not the entire pattern, please go to our errata site here.
If you want to know about the nitty gritty – the whats and whys behind the scenes – Sarai wrote about the process on the Colette blog.
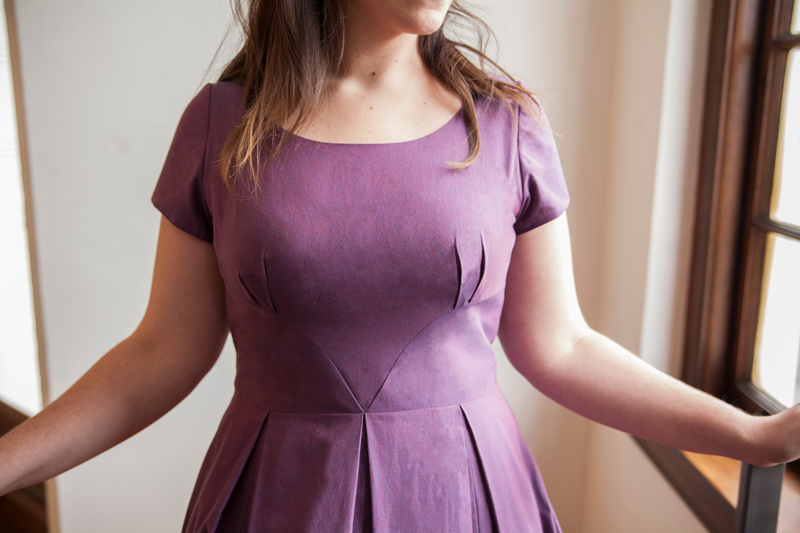
For those who have been awaiting the changes, we have a new version addressing your feedback, both in terms of style lines (specifically, the placement of the yoke seam – it has been lowered to sit below the bust) and the fit of the pattern through the upper bodice and sleeve (the sleeve, armscye, and shoulder were redrafted). Thank you all for patiently waiting to finish up your Rues, we all thank you for your understanding and encouraging words.
Now, let’s get back to it with the Full Bust Adjustment for Rue 2.0
DO I NEED A BUST ADJUSTMENT?
Most pattern companies draft patterns based on a B cup, but we draft for a C cup for sized 0-18, and a DD for sizes 20-26.
If you’re making size 0-18 and are an A or B, you will need a small bust adjustment or SBA. If you are a D or larger you will need a full bust adjustment or FBA.
For sizes 20-26, if you are a D or smaller you will need an SBA, and if you are a DDD or larger you will need an FBA.
DETERMINE ADJUSTMENT AMOUNT
The amount to add or subtract from your bust is relative to the amount of ease you like to have in your garments. Below are my recommended bust ease amounts for different sizes in a semi-fitted dress in a medium-lightweight woven.
Sizes 0-8: 1 1/2″ bust ease
Sizes 10-26: 2 1/2″ bust ease
To determine how much to add to your bust, simply follow this equation.
Your Bust Measurement + Preferred Ease Amount – Finished Measurement = Adjustment Amount
Let’s take a look at Haley’s measurement chart, as an example.
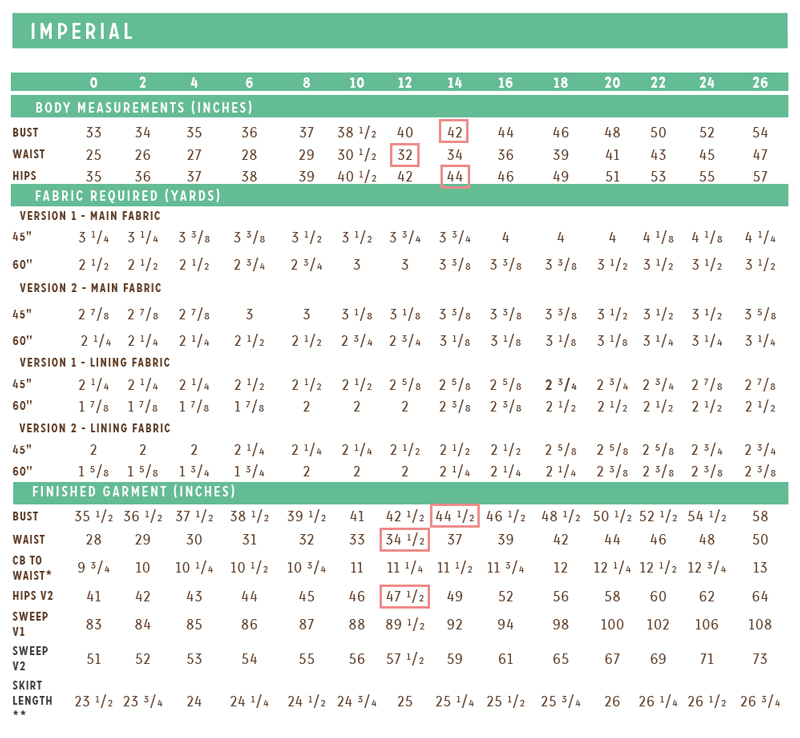
I decided to sew up a size 12 for Haley, which would give her 2 1/2″ of ease at the waist.
Haleys bust measurement: 42″
The size 12 bust finished measurement: 42 1/2″
Recommended ease in size 12: 2 1/2″
42″+ 2 1/2″= 44 1/2″
44 1/2″- 42 1/2″= +2″ FBA
We will be adding extra room for the bust in two places on pieces that are cut twice. Therefore, we need to divide this FBA amount into 4 to evenly distribute the fullness.
+1″ FBA ÷ 4 = +1/2″ to each tuck
You’ll need:
- Your Rue pattern
- A clear ruler (I use a 2” x 18”)
- Pencil
- Pattern paper
- Paper shears
- Tape
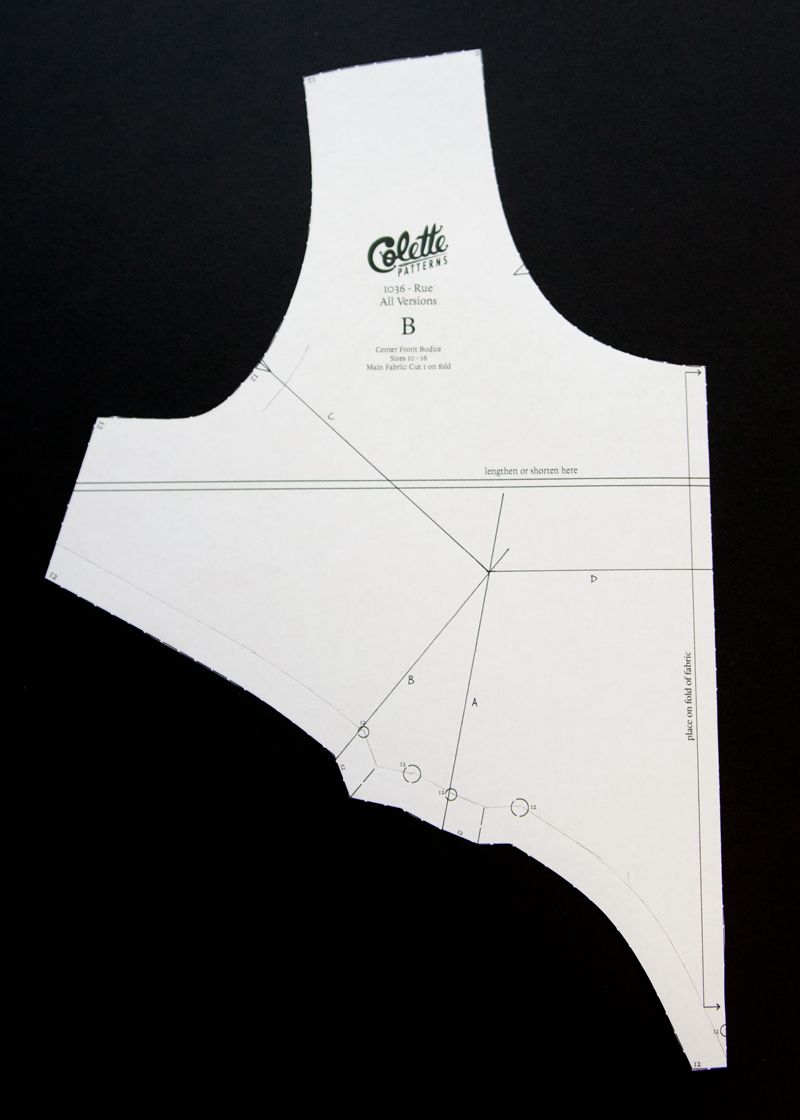
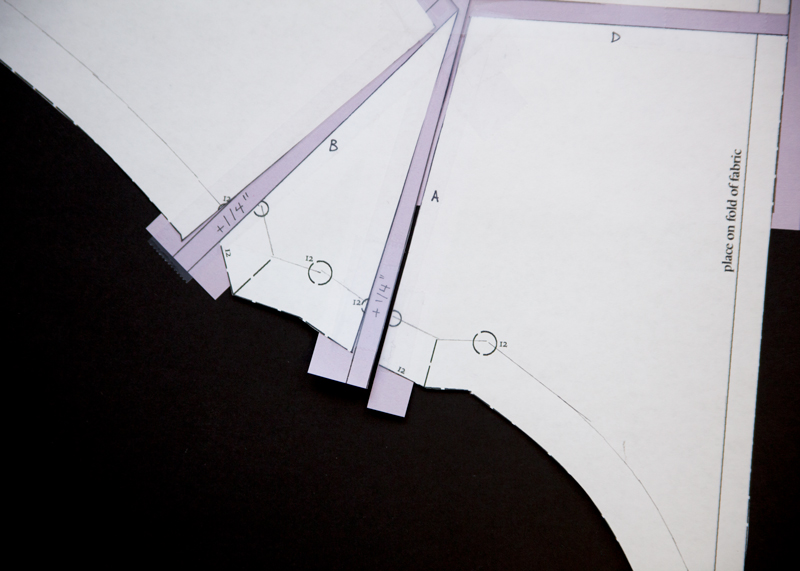
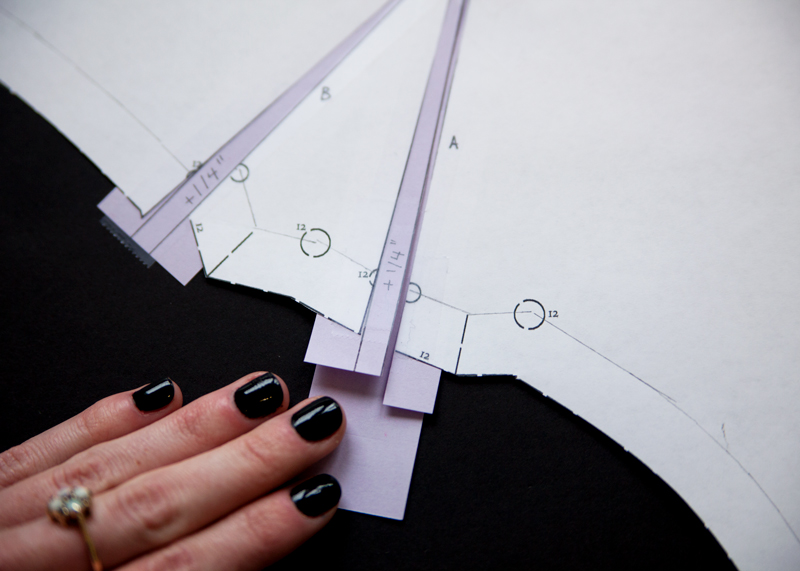
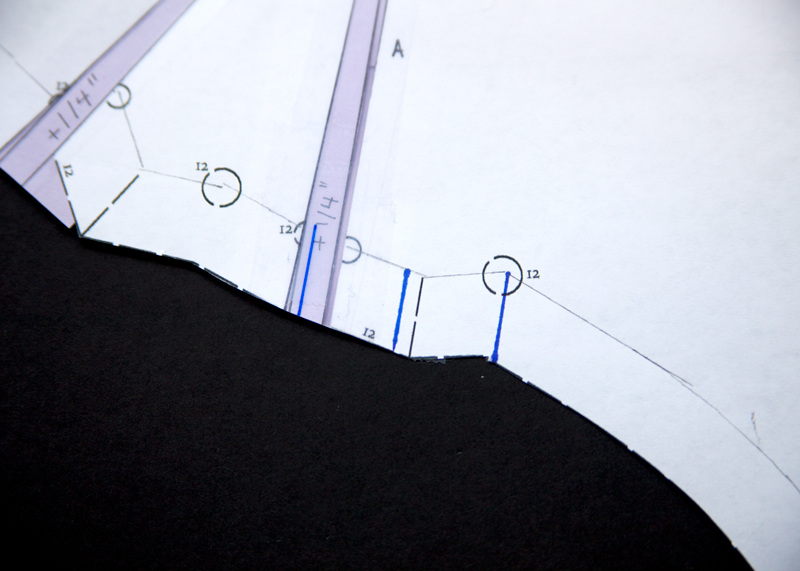
1.) Before beginning the adjustment, measure the distance between your tuck placement markings. This distance will be the same between all of the markings. Make a note, we will reference this measurement when redrawing the tucks.
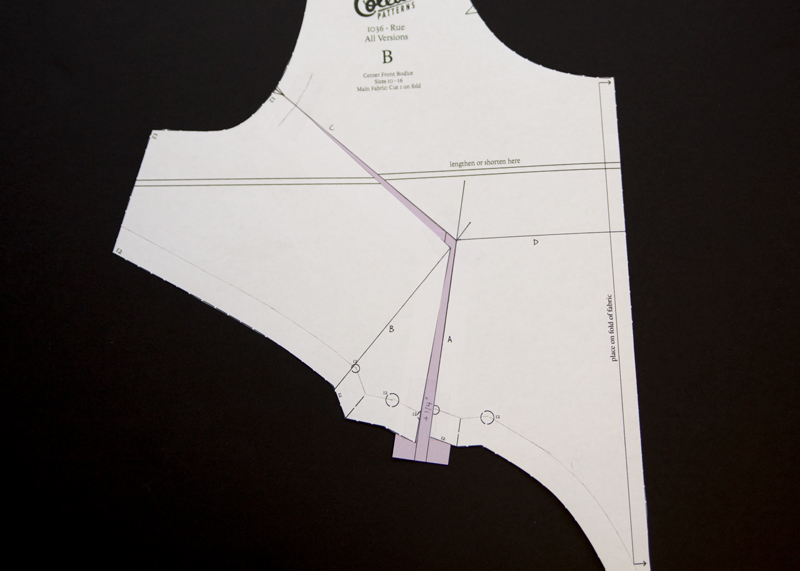
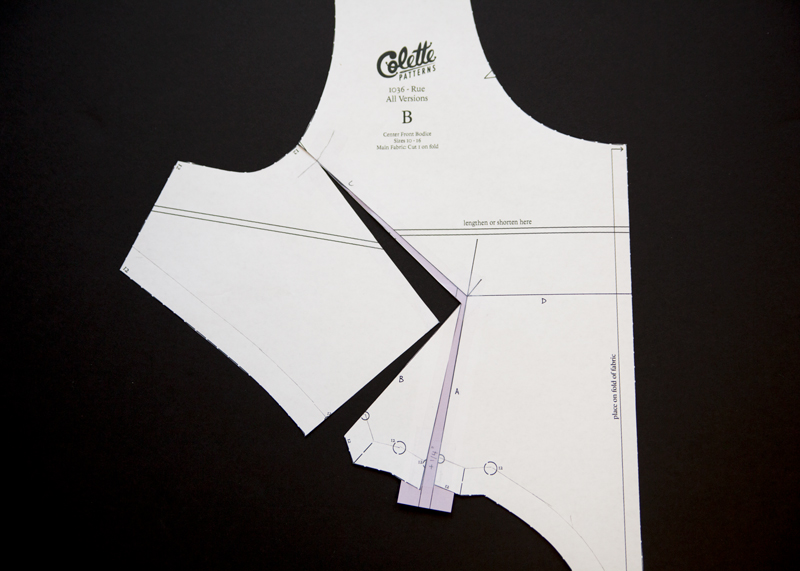
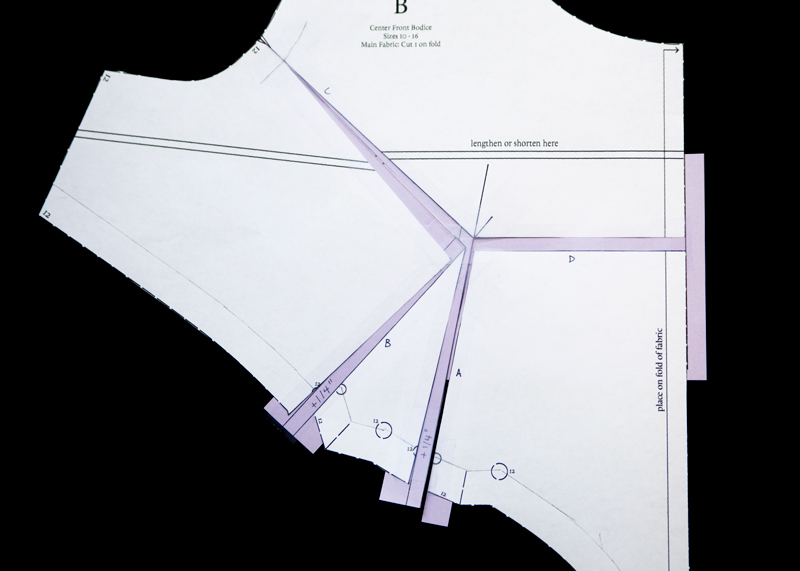
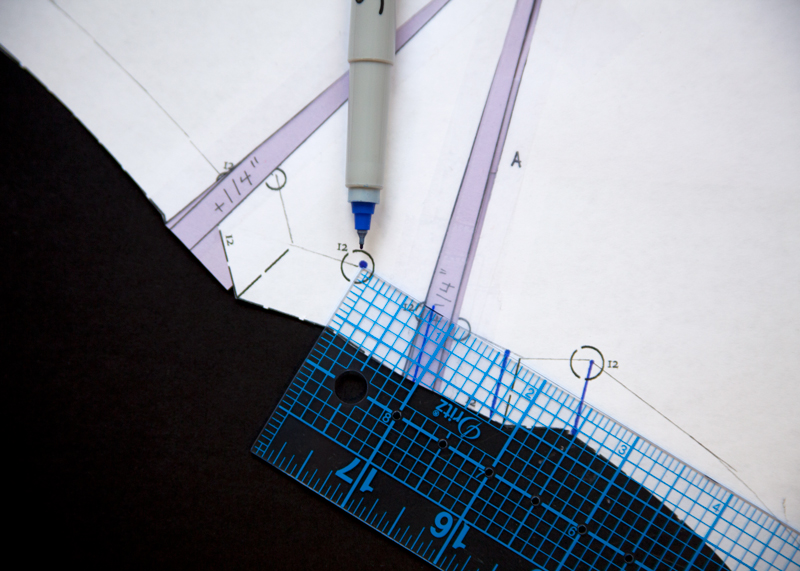
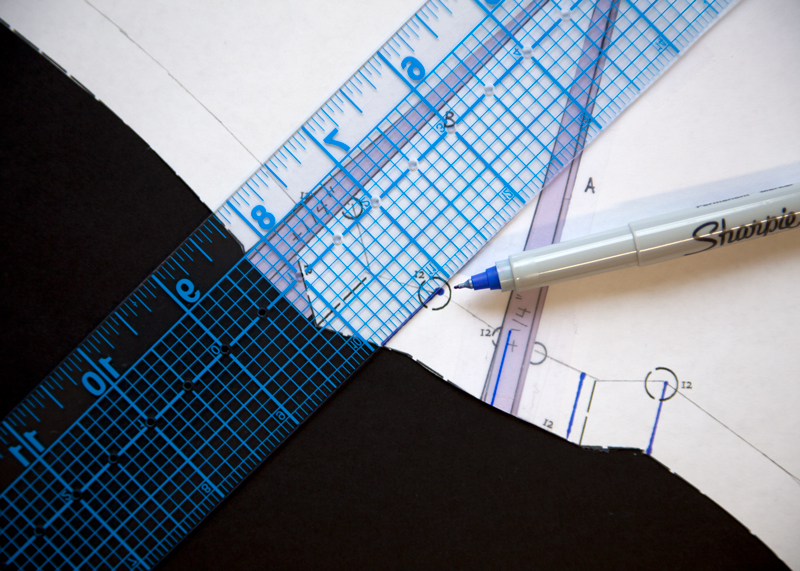
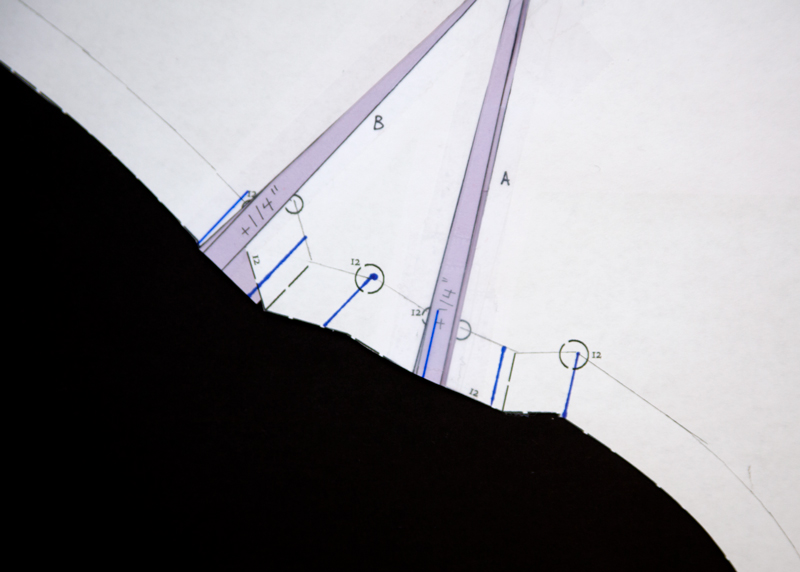
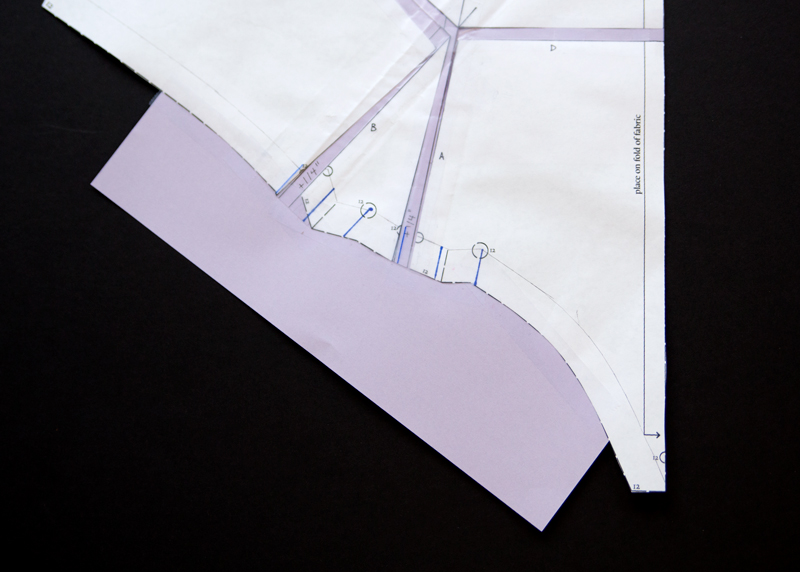
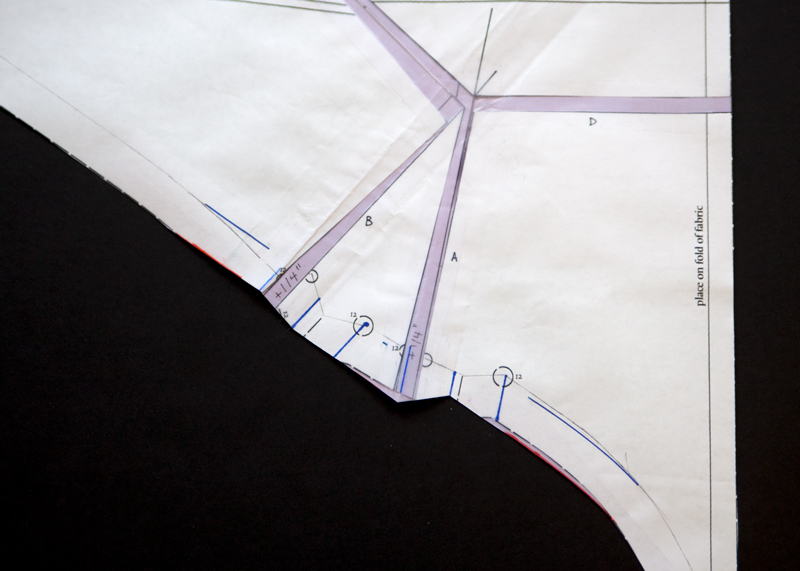
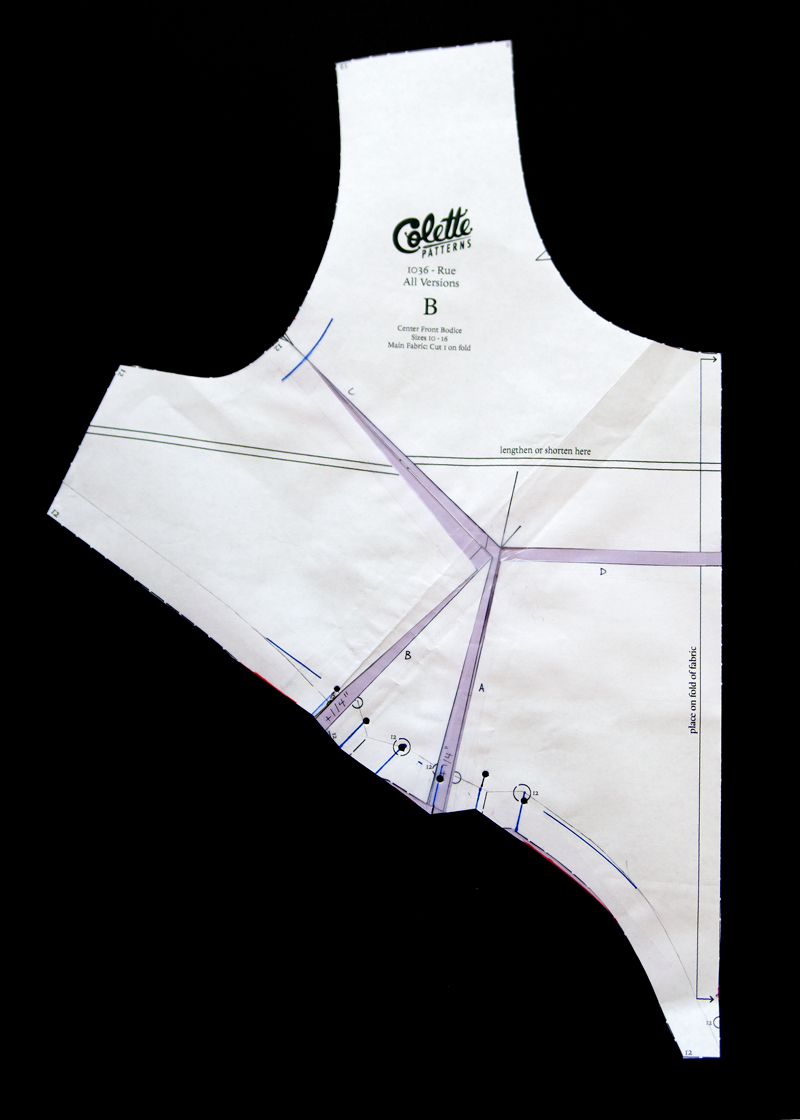
Start by drawing in the seamlines on the styleline and near the armhole tuck on the Center Front Bodice. Next, you’ll draw a series of lines in the following order. Line A should start at the left dot of the right tuck, through to the center of the bodice, at the same angle as the right tuck line. Line B should start at the left dot of the left tuck, through to the center of the bodice, at the same angle as the left tuck line. Draw line C, from the armhole notch to the intersection of line B and A. Lastly, draw line D, from the intersection of line B and A to center front, perpendicular to the “place on fold” line.
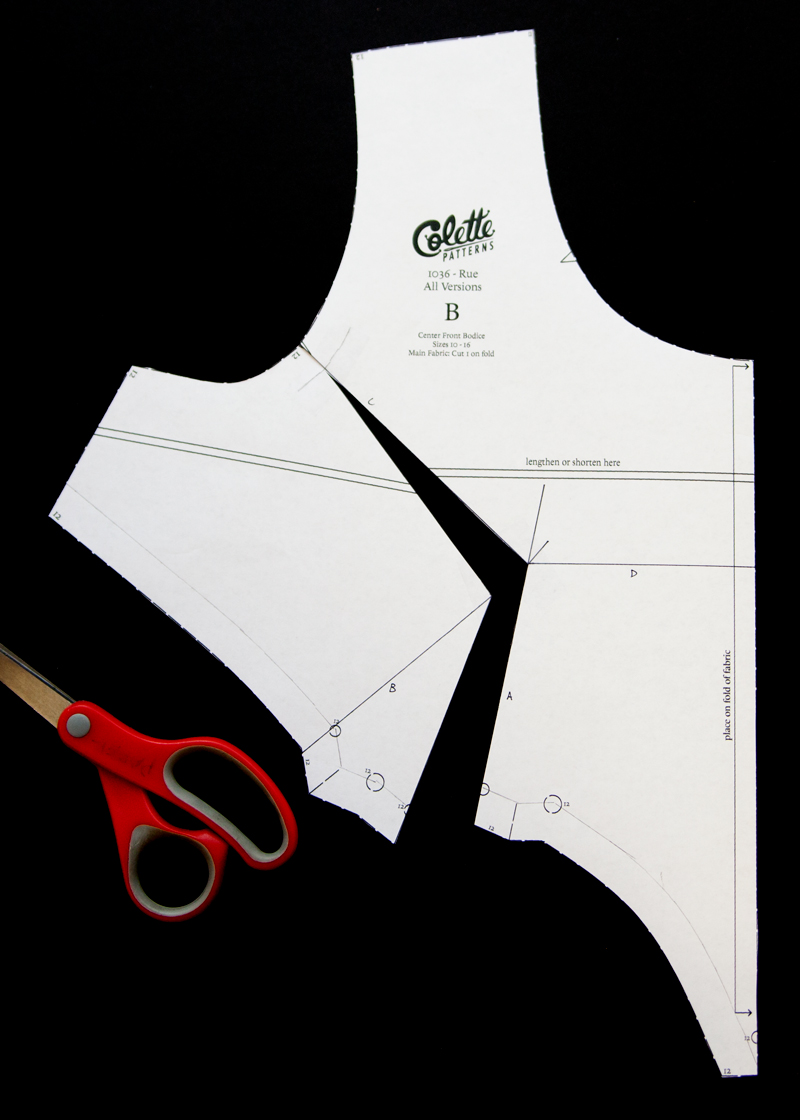
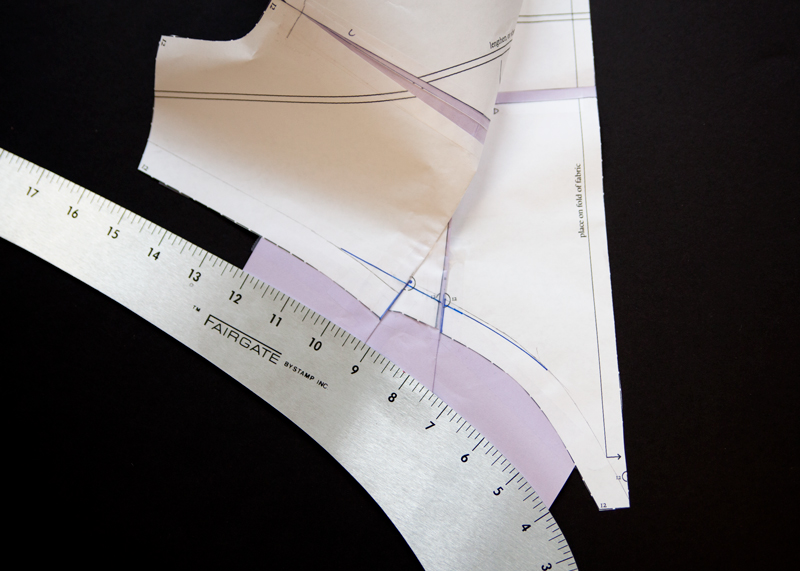
3.) Cut through line A, pivot at the intersection and cut through to the seamline on line C. “Hop” over the seamline and continue cutting to the end of line C, creating a hinge on the seamline.
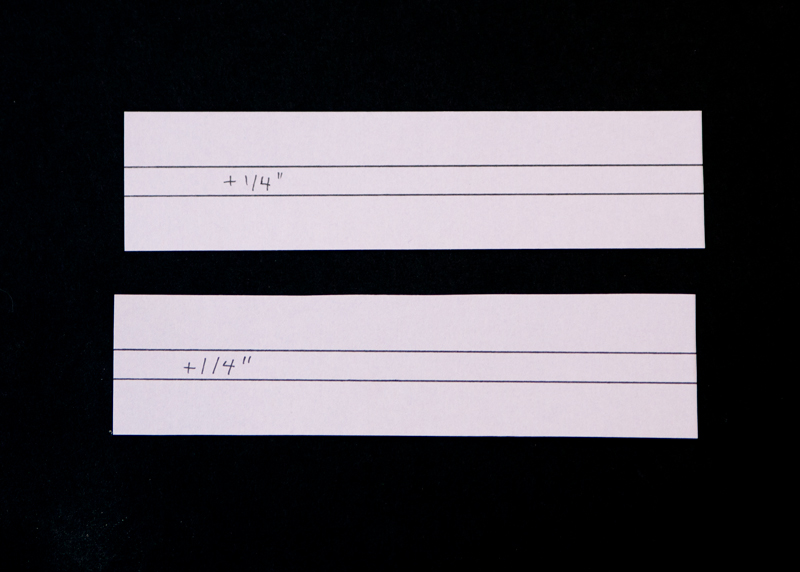
3.) On two scrap piece of paper, draw two perpendicular lines, the FBA amount away from each other.
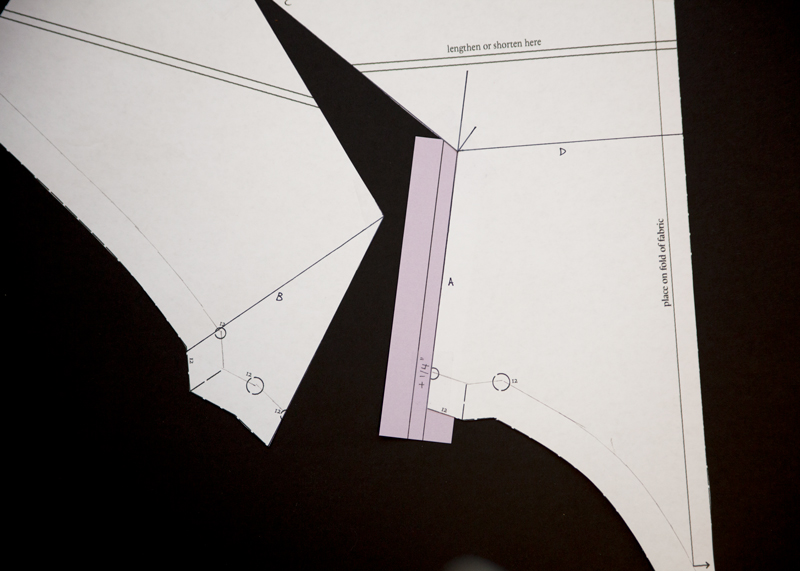
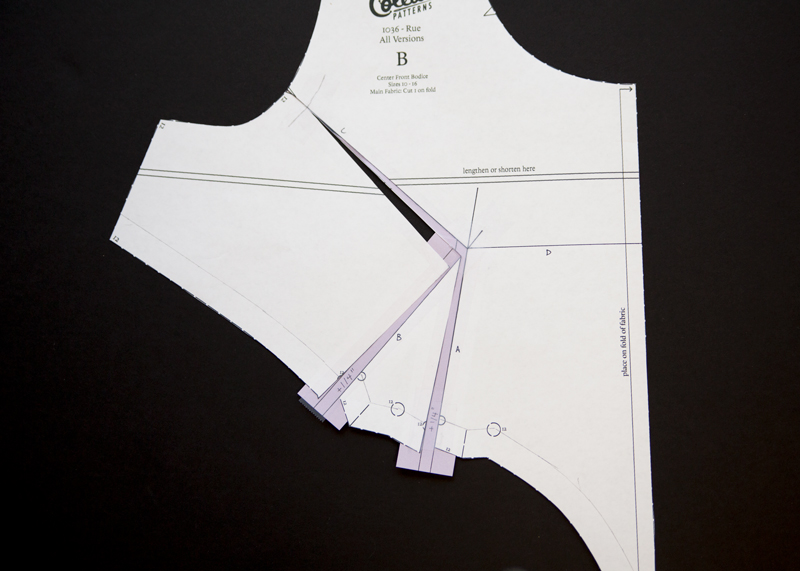
4.) Bring one of the scrap pieces under line A, aligning an outer line on the scrap paper to one side of the slashed line A. Tape in place.
5.) Swing the other slashed side of line A to meet the other edge of the scrap paper lines at the seamline. See photo for reference. Tape in place.
6.) Bring a scrap piece of paper behind the bare space between the slashed line C and tape in place.
7.) Cut through Line B, pivot at the intersection and cut through to the seamline on line C. “Hop” over the seamline and continue cutting to the end of line C, creating a hinge on the seamline.
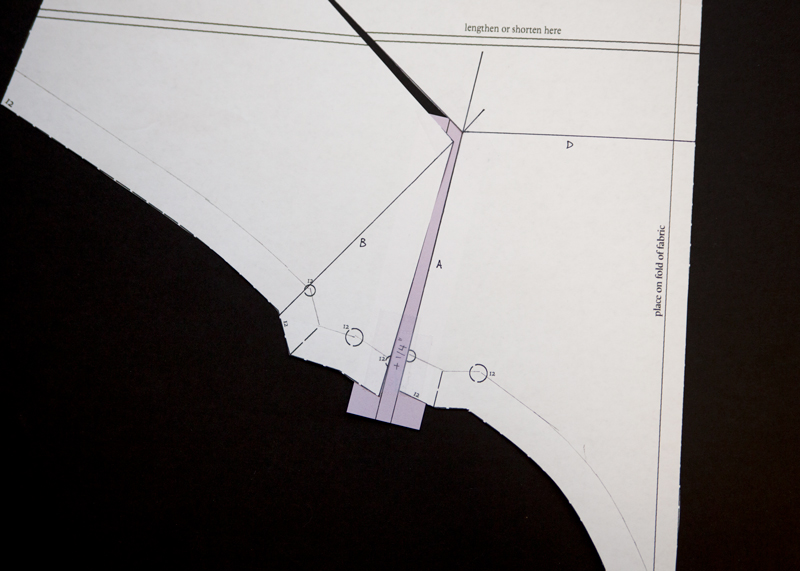
8.) Bring the other scrap paper under line B, aligning an outer line on the scrap paper to one side of the slashed line B. Tape in place. Swing the other slashed side of line A to meet the other edge of the scrap paper lines at the seamline. See photo for reference. Tape in place.
9.) Bring a scrap piece of paper behind the bare space between the slashed line C and tape in place.
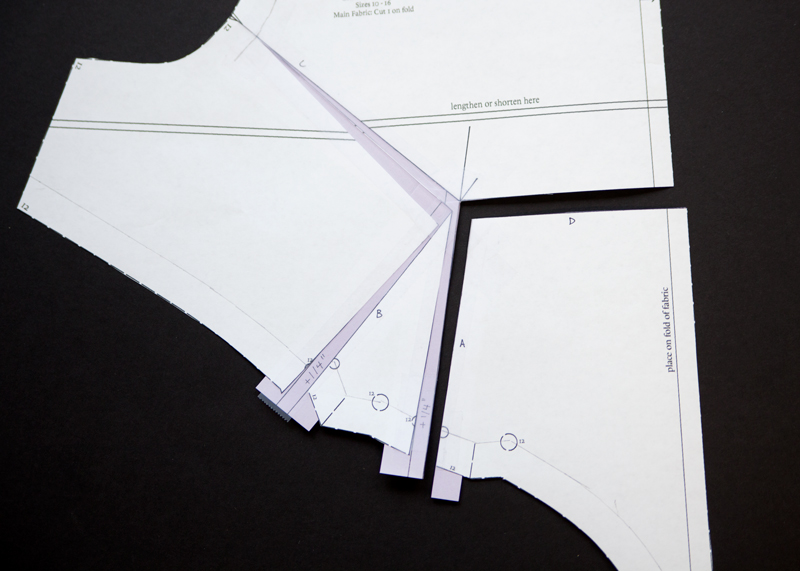
Cut through the right side of line A, pivot at the intersection of line D and cut down line D to center front.
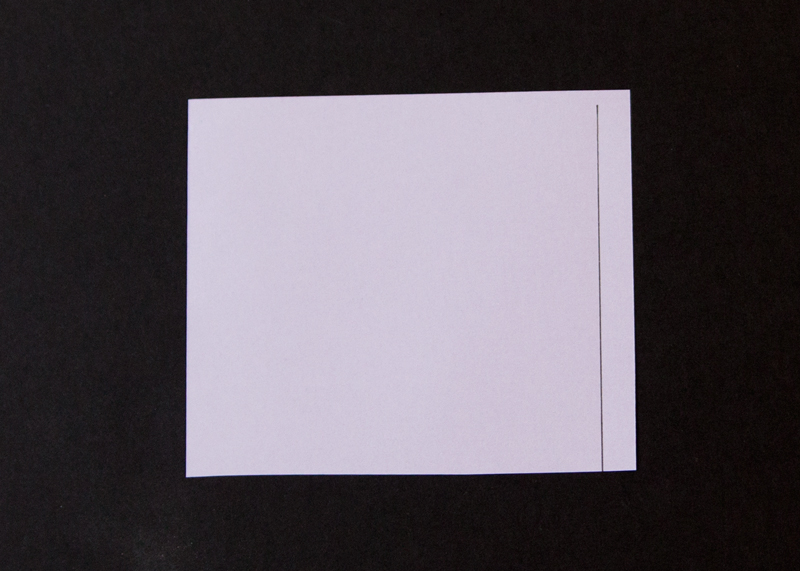
10.) On a scrap piece of paper draw a straight line. This will be used to extend your center front line.
11.) You will notice that the bottom seamline of your pattern is now two different lengths. A full bust requires additional length. Bring the scrap piece of paper under line D tape the top portion of line D to the line on the scrap paper. Shift the lower portion of line D down in order to line up the seamlines on the stlye line. With the center front lined up to the scrap paper’s line, tape in place.
12.) Because we are maintaining the center front line and line A is cut at an angle, a small gap may be created in between the slashed sides of line A.
13.) Place a scrap piece of paper behind this gap and tape in place.

Re-Drawing Style line and tuck placement
By doing a FBA, you have increased the size of the tuck. Therefore, the tuck placement markings will need to be at different distances away from each other. Before beginning, you should have measured the distance between each of your original tucks.
Here is a formula to decided the size of this distance after the SBA.
FBA amount ÷ 4 tucks across bust = amount added to each tuck
Original distance between each tuck x 2 sides to the fold = Total amount in original tuck
Amount in original tuck + Amount added to each tuck = New amount in each tuck after FBA
New amount in each tuck after FBA ÷ two sides to fold = New distance between each tuck
For example,
1″ ÷ 4 tucks = 1/4″ added to each tuck
5/8″ distance between each tuck marking X 2 sides of fold = 1 1/4″ tuck
1 1/4″+ 1/4″ = 1 1/2″ tuck
1 1/2″ tuck ÷ two sides to fold = 3/4″ distance between each tuck
14.) Draw a line from the right-most dot to the edge of the paper at the same angle as the right tuckline.
15.) Continue drawing two more lines, all perpendicular to the angle of the first line at the right dot, at the new distance between each tuck away from each other.
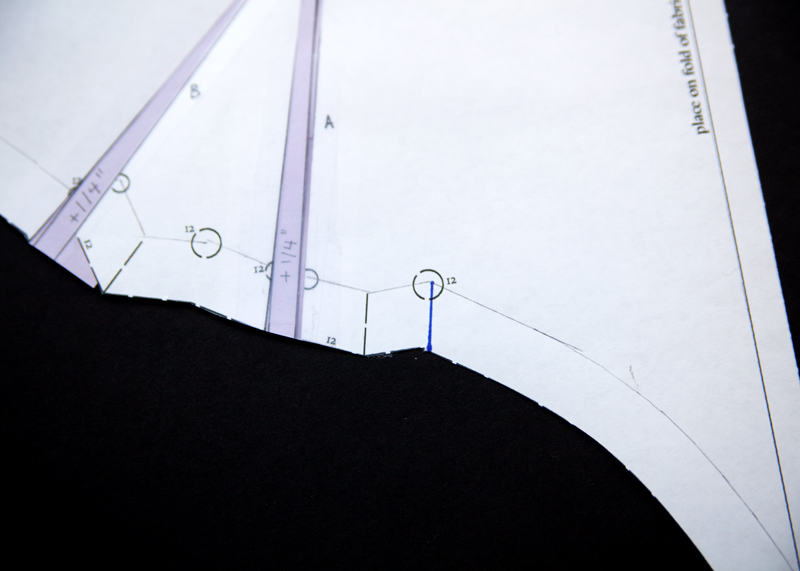
16.) After redrawing the right tuck markings, measure down the seamline the new distance between each tuck from the last tuck line made, and mark.
17.) Mimicking the angle of the left tuck line, draw a line from the previously made mark to the cut line.
18.) Continue drawing two more lines, all perpendicular to the angle of the first line, at the new distance between each tuck away from each other.
19.) Place a long piece of scrap paper below the style line and tape in place.

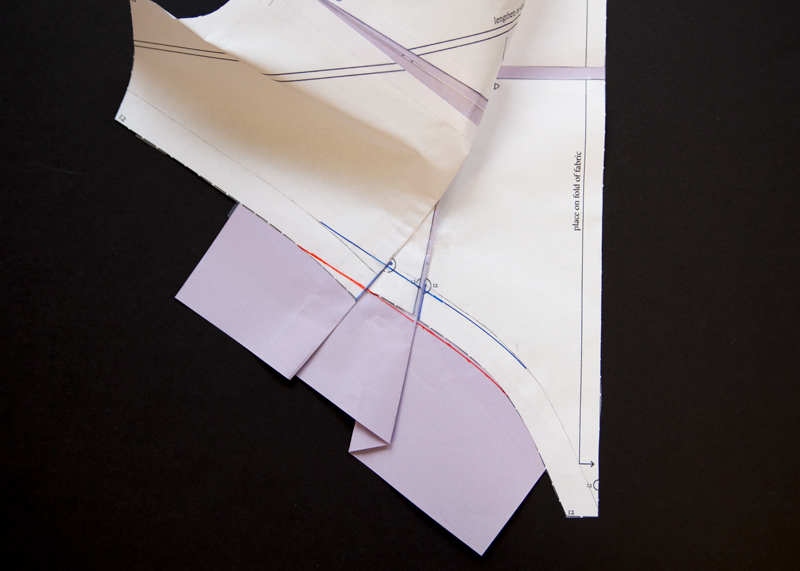
20.) Fold the tucks. Redraw the seamline, blending from the original line towards the top and bottom. Add seam allowance. Cut away extra paper.
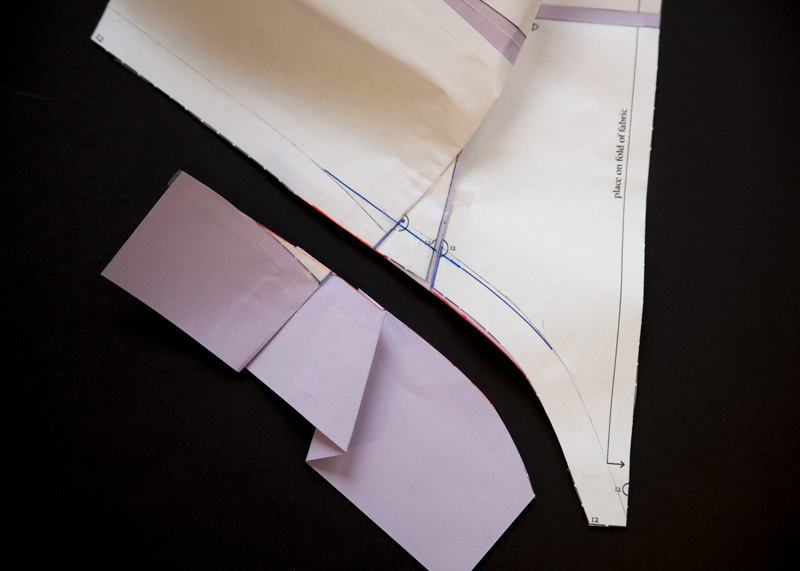
21.) Cut away extra paper on seam allowance line (orange).
22.) Remove tape and unfold tucks
22.) After cutting away extra paper, measure 5/8″ each tuck dot line and mark, this is your new tuck dot. On the picture above, I used an awl punch to help me see it more clearly.
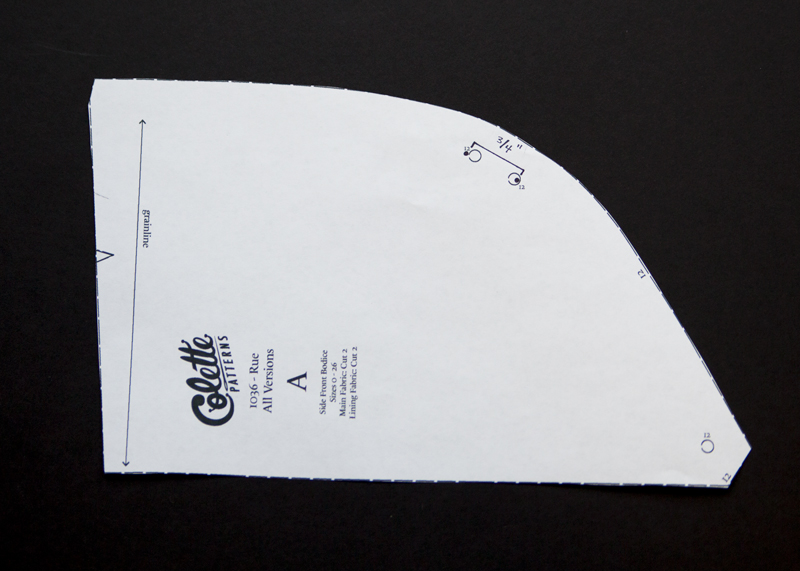
23.) Lastly, increase the distance between the tuck placement markings on the Side Front Bodice to the new distance between each tuck.
If you have any questions, feel free to leave a comment below. Our next lesson will cover Skirt Assembly on Friday!
Comments
Hi,
I think you have mixed up your calculations for a FBA or i am reading it incorrectly. There is referernce to making up a size 2 with 1 1/2 inch ease mixed in with making up a size 12 which I think should be 2 1/2 inches of ease.
Karen
Hey Karen! Thank you for noticing this. I apologize for the confusion. Everything should be reading correctly now, let me know if you have any other questions!
Would you please proofread what you write before you post? Whose measurements are you using? The blog post says it is written by Katie, but underneath the measurement chart is says “Haley’s Bust Measurement: ”
It also says : “I decided to sew up at size 2, which would give me 2″ of ease at the waist.” Are you making a 2 or a 12??
Then you refer to adding 1″ as a +1″ SBA….you mean FBA!!
“43 1/2″- 42 1/2″= +1″ SBA
We will be adding extra room for the bust in two places on pieces that are cut twice. Therefore, we need to divide this SBA amount into 4 to evenly distribute the fullness.
+1″ SBA ÷ 4 = -1/4″ from each tuck”
Everyone at Colette should be dotting their “i’s” and crossing their “t’s”, this blog post is the opposite of that
Hey Meigan, I agree. The copy for the SBA and FBA got mixed up and is fixed now. Thank you for pointing this out and for your feedback.
The example above is confusing. If her bust measurement is 42 and it should have 2 1/2 in of ease, wouldn’t you start with the size 14? I thought part of the corrections would now be basing the sizing off of the bust ease not waist ease. Am I missing something?
I decided to sew up a size 12 for Haley, which would give her 2 1/2″ of ease at the waist.
Haleys bust measurement: 42″
The size 12 bust finished measurement: 42 1/2″
Recommended ease in size 2: 1 1/2″
42″+ 1 1/2″= 43 1/2″
43 1/2″- 42 1/2″= +1″ FBA
We will be adding extra room for the bust in two places on pieces that are cut twice. Therefore, we need to divide this FBA amount into 4 to evenly distribute the fullness.
+1″ FBA ÷ 4 = -1/4″ from each tuck
My measurements are 47.5, 42, 48. Based on the new size chart I think it’s a solid 20 but just want to be clear. I’m following along with the sewalong but waiting for printed pattern pieces to make this up later. Thanks!
Hey Dana!
Even in the 2nd edition of Rue, I recommend choosing your size off of your finished waist measurement. I choose a size 12 for Haley because it would give her 2 1/2″ at the waist. If I selected the size 14, she would have 5″ of ease in waist.
I did have a typo in this calculation, thank you for helping me notice it. The recommended amount of ease in the bust on a size 12 is 2 1/2″, not 1 1/2″. The edited calculation read as follows.
Haleys bust measurement: 42″
The size 12 bust finished measurement: 42 1/2″
Recommended ease in size 12: 2 1/2″
42″+ 2 1/2″= 44 1/2″
44 1/2″- 42 1/2″= +2″ FBA
We will be adding extra room for the bust in two places on pieces that are cut twice. Therefore, we need to divide this FBA amount into 4 to evenly distribute the fullness.
+1″ FBA ÷ 4 = +1/2″ to each tuck
Based on your measurements, a size 20 is the right choice. You will have 3″ of ease in the bust, which may be a bit too much. After making a muslin, you may decide to do a slight SBA but, I think you’ll be safe.
Thanks Katie!