

Today, we’re going to talk about two of the most common adjustments: adjusting the shoulders to make them wider or narrower.
If you’re a woman or sewing for a woman, it is very likely that you’ll want to make the shoulders more narrow. For guys, either fit issue could come up. We’ll start by showing you how to adjust for wide shoulders, then move on to narrow shoulders. They are very similar pattern alterations.
Problem: Wide Shoulders
The shoulder is the point from where your coat or jacket hangs, making it the most important part of the jacket to fit for a man since it affects the way the rest of the garment falls. If you have wide shoulders, you may notice that the coat feels tight across the back. In front, you might see pulling at the upper chest and the armholes pulling towards each other. To adjust this, we’ll modify the front and back.

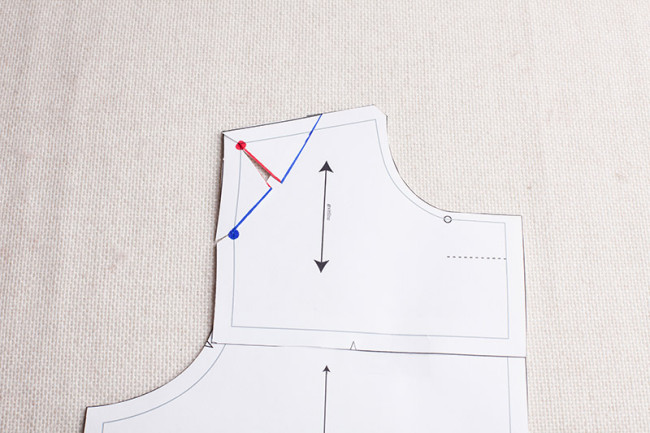
1. On the front yoke, draw a pivot point at the low shoulder (red dot), and another along the armhole (blue dot). Draw a line from the armhole point towards the middle of the shoulder (blue line). Draw another line from the first line to the low shoulder pivot point (red line).
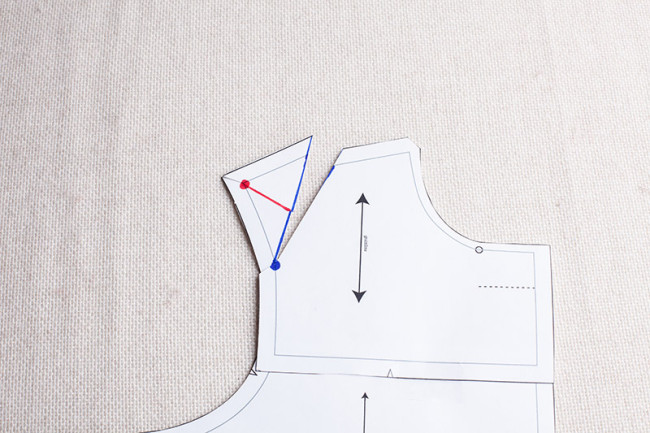
2. Slash the lines up to the pivot points and clip into the seam allowances.
3. Pivot the blue line outward to make the shoulder wider.
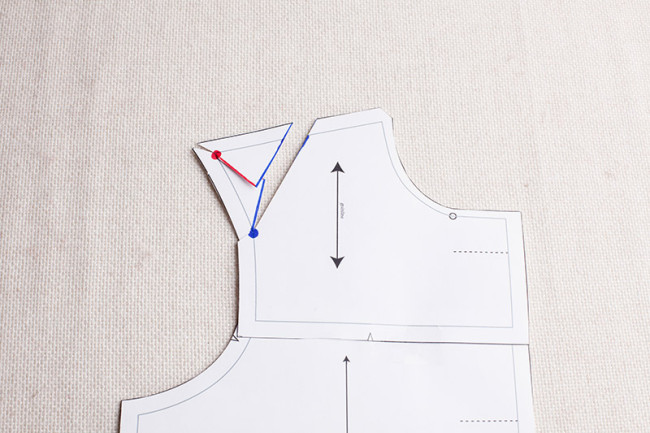
4. Pivot the red line inward to realign the shoulder seam.
5. Repeat steps 1-4 for the back shoulder. For version 1, adjust lining pieces to match.
Problem: Narrow Shoulders
Some men (and many women) may need to adjust the coat for narrower shoulders. If you find the armholes sitting away from your body and the top of the armhole slipping off your shoulder, try this adjustment.
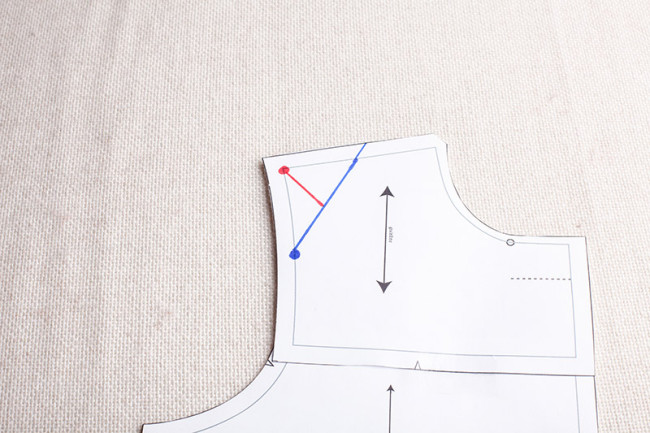
1. Draw a pivot point at the low shoulder (red dot), and another along the armhole (blue dot). Draw a line from the armhole point towards the middle of the shoulder (blue line). Draw another line from the first line to the low shoulder pivot point (red line).
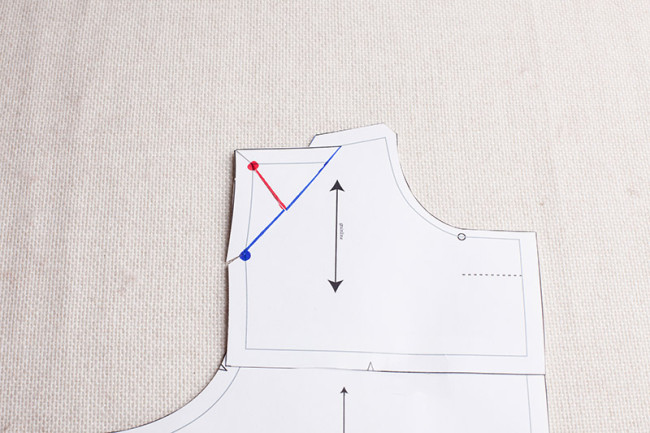
2. Slash the lines up to the pivot points and clip into the seam allowances.
3. Pivot the blue line inward to make the shoulder narrower.
4. Pivot the red line outward to realign the shoulder seam.
5. Repeat steps 1-4 for the back shoulder. For version 1, adjust lining pieces to match.
When You’re Finished
Now that you’ve altered your fit and pattern, you may feel like creating another test version. This is entirely up to you and how severe the changes you’ve made are. For minor changes, you may feel confident moving on to cut your real fabric. For big changes, you may want to give it another test.
Comments
I am going to have to narrow the shoulders, and I have a question about Step #3 in the Narrow Shoulders section. Your instructions say: “3. Pivot the blue line inward to make the shoulder narrower.” By how much should I move the blue line inward? How do I determine how much narrower to go? Should I take a trial and error approach or am I trying to achieve some measurement related to my shoulder width? Thanks for your help. It’s fun to sew along!
You will want to make a muslin first in order to determine how much to take the shoulder in. See our previous post on how to make pattern adjustments: /albion/albion-how-to-fit-and-adjust-your-pattern
Yes, I’ve made the muslin, and I guess the way to figure it out is in the pinching out excess fabric and pinning at a good fit. I really appreciate the extra help with fitting, my biggest struggle in any project. Well, off I go to try it out!
WOW! This is so GREAT! this has been a BIG problem for me in the past!
Sarai, you are a magician! You make things easy and doable! Thank you so much!